Contents
Lana Passport
"Lana Passport" v1.4.0 Documentation by "Lana Codes"
Introductory
The "Lana Passport" plugin allows almost any type of software to connect to the WordPress authentication system with OAuth 2.0 protocol.
The "Lana Single Sign On" plugin with "Lana Passport" plugin provide that the user can log in to the WordPress client website via "Single Sign On" button which uses WordPress OAuth server authentication.
The "Lana Passport" plugin is WordPress 6.2 compatible.
It has been tested on the following browsers:
- Google Chrome
- Firefox
- Opera
- Edge
- Safari
You do not have to enable JavaScript in your browser to use this plugin, but it is highly recommended.
The plugin uses openssl extension library.
Support
If you have any more questions, feel free to contact us at: https://codecanyon.net/user/lanacodes
Created: 07/28/2022
Updated: 09/06/2025
By: Lana Codes
E-mail: [email protected]
Installation
1. Install WordPress
Download and Install WordPress 4.5 (or higher).
2. Upload Plugin via FTP
Upload "Lana Passport" plugin folder via FTP into /wp-content/plugins directory.
or
2. Upload Plugin in WordPress Admin
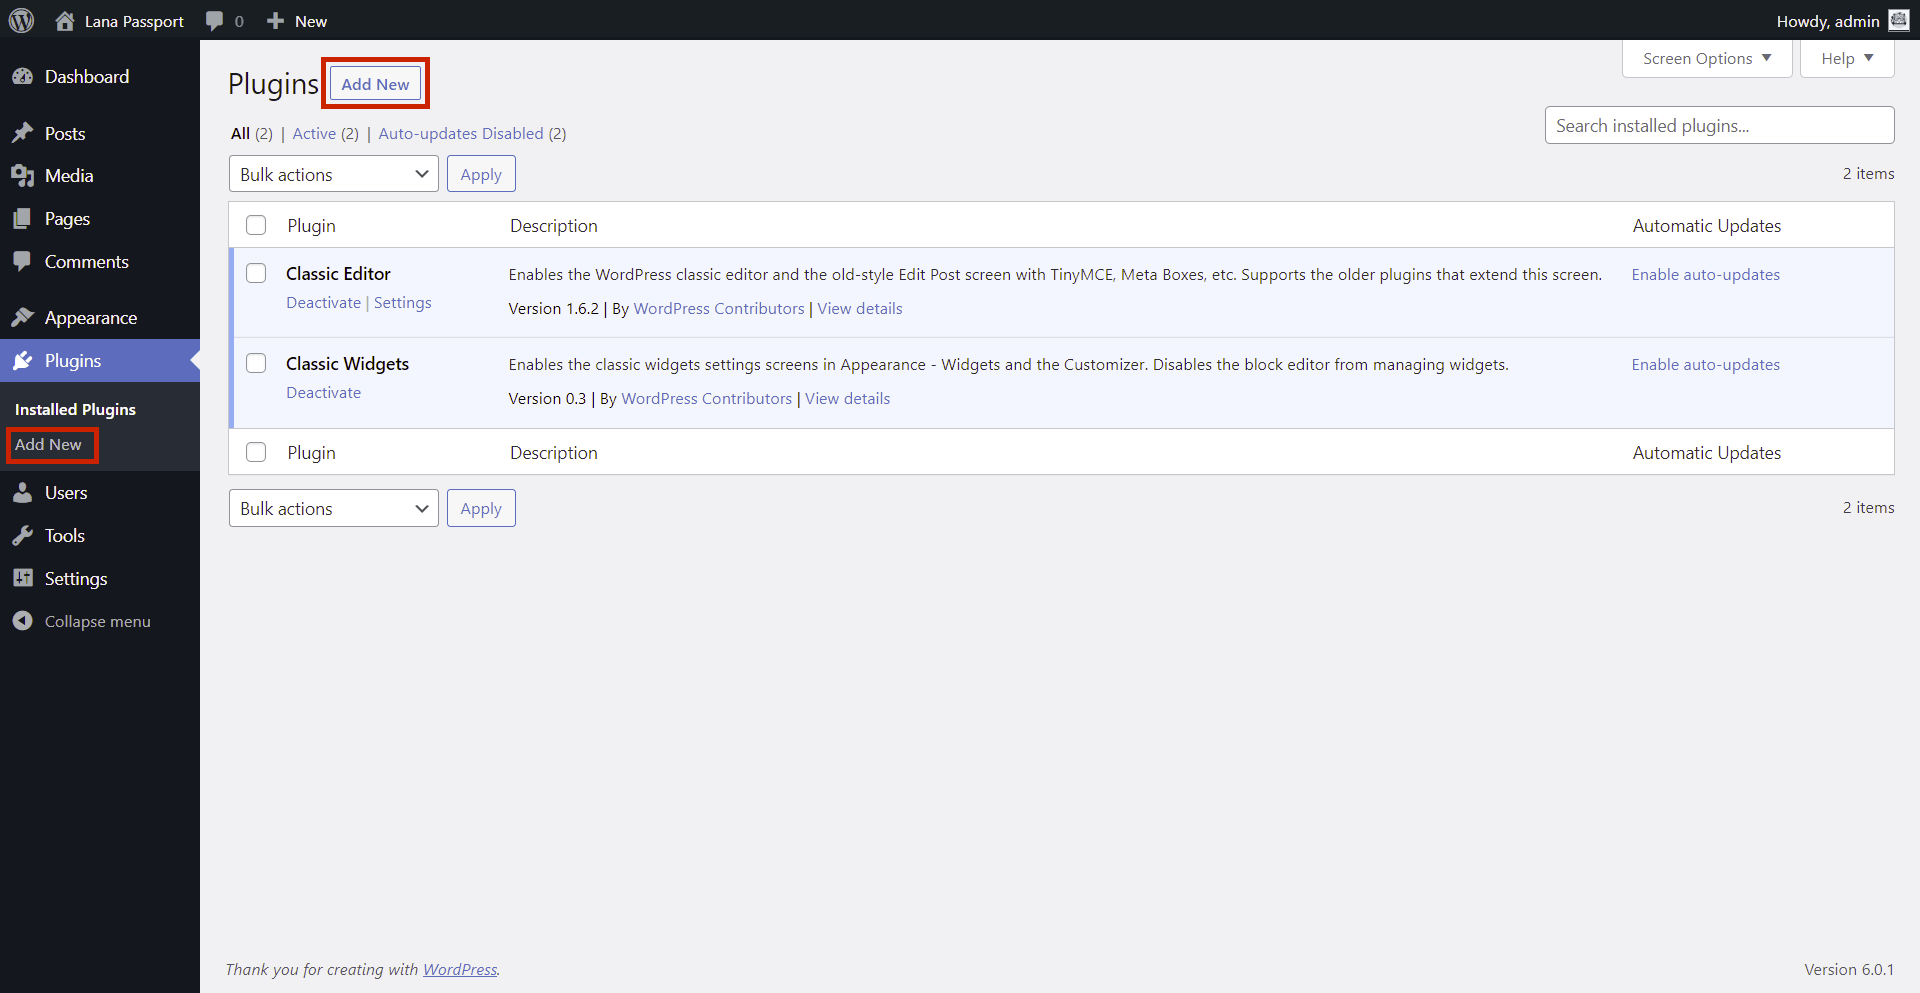
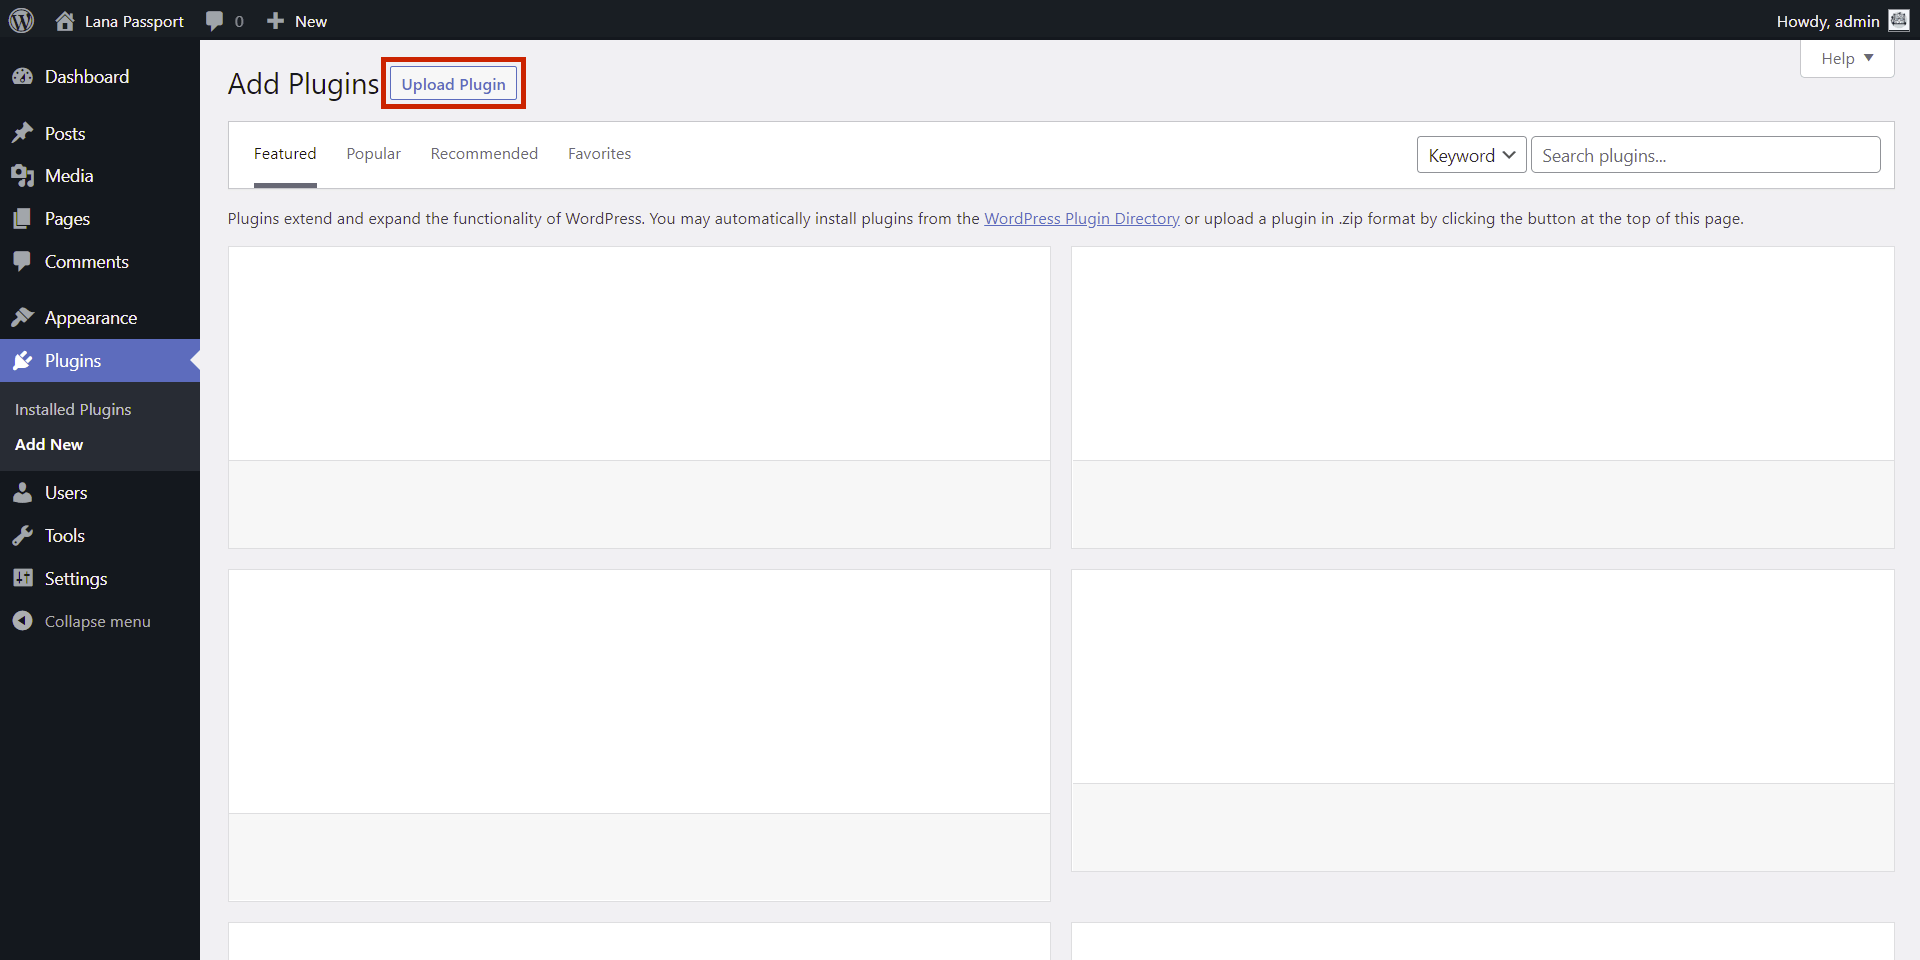
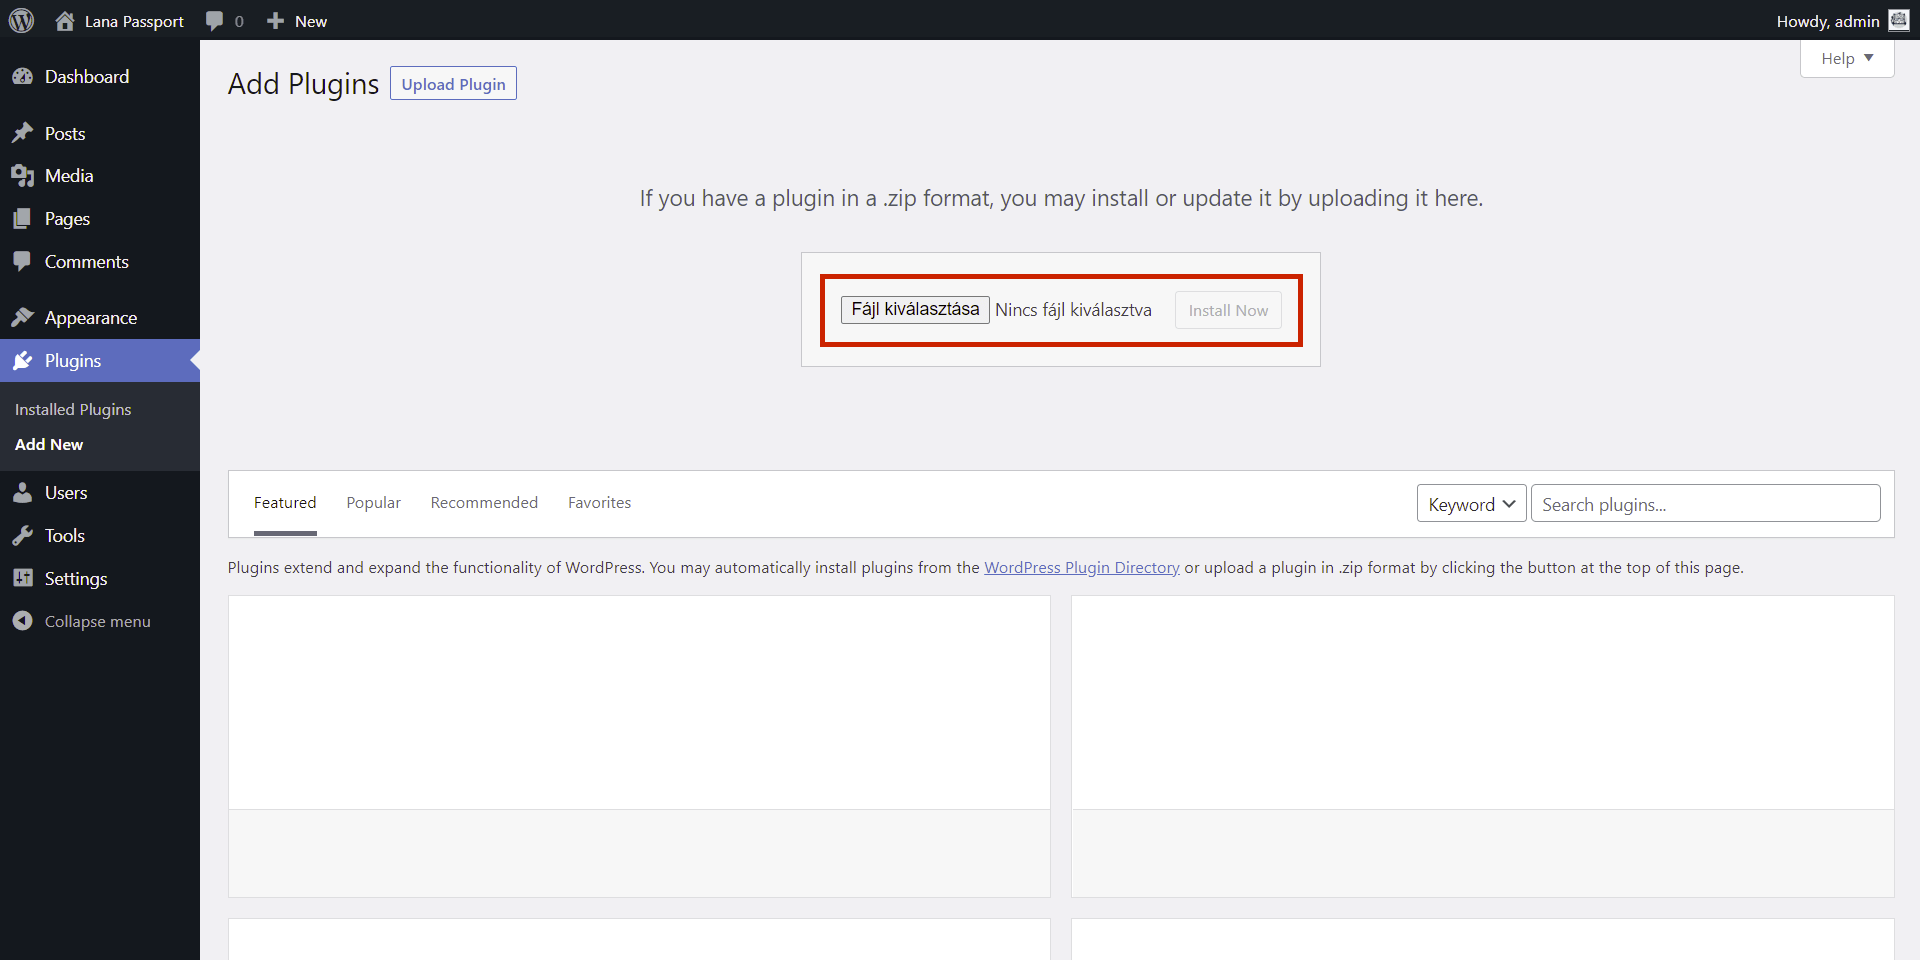
In WordPress Admin Panel go to Plugins > Add New > Upload Plugin and upload .zip plugin file.
3. Active plugin
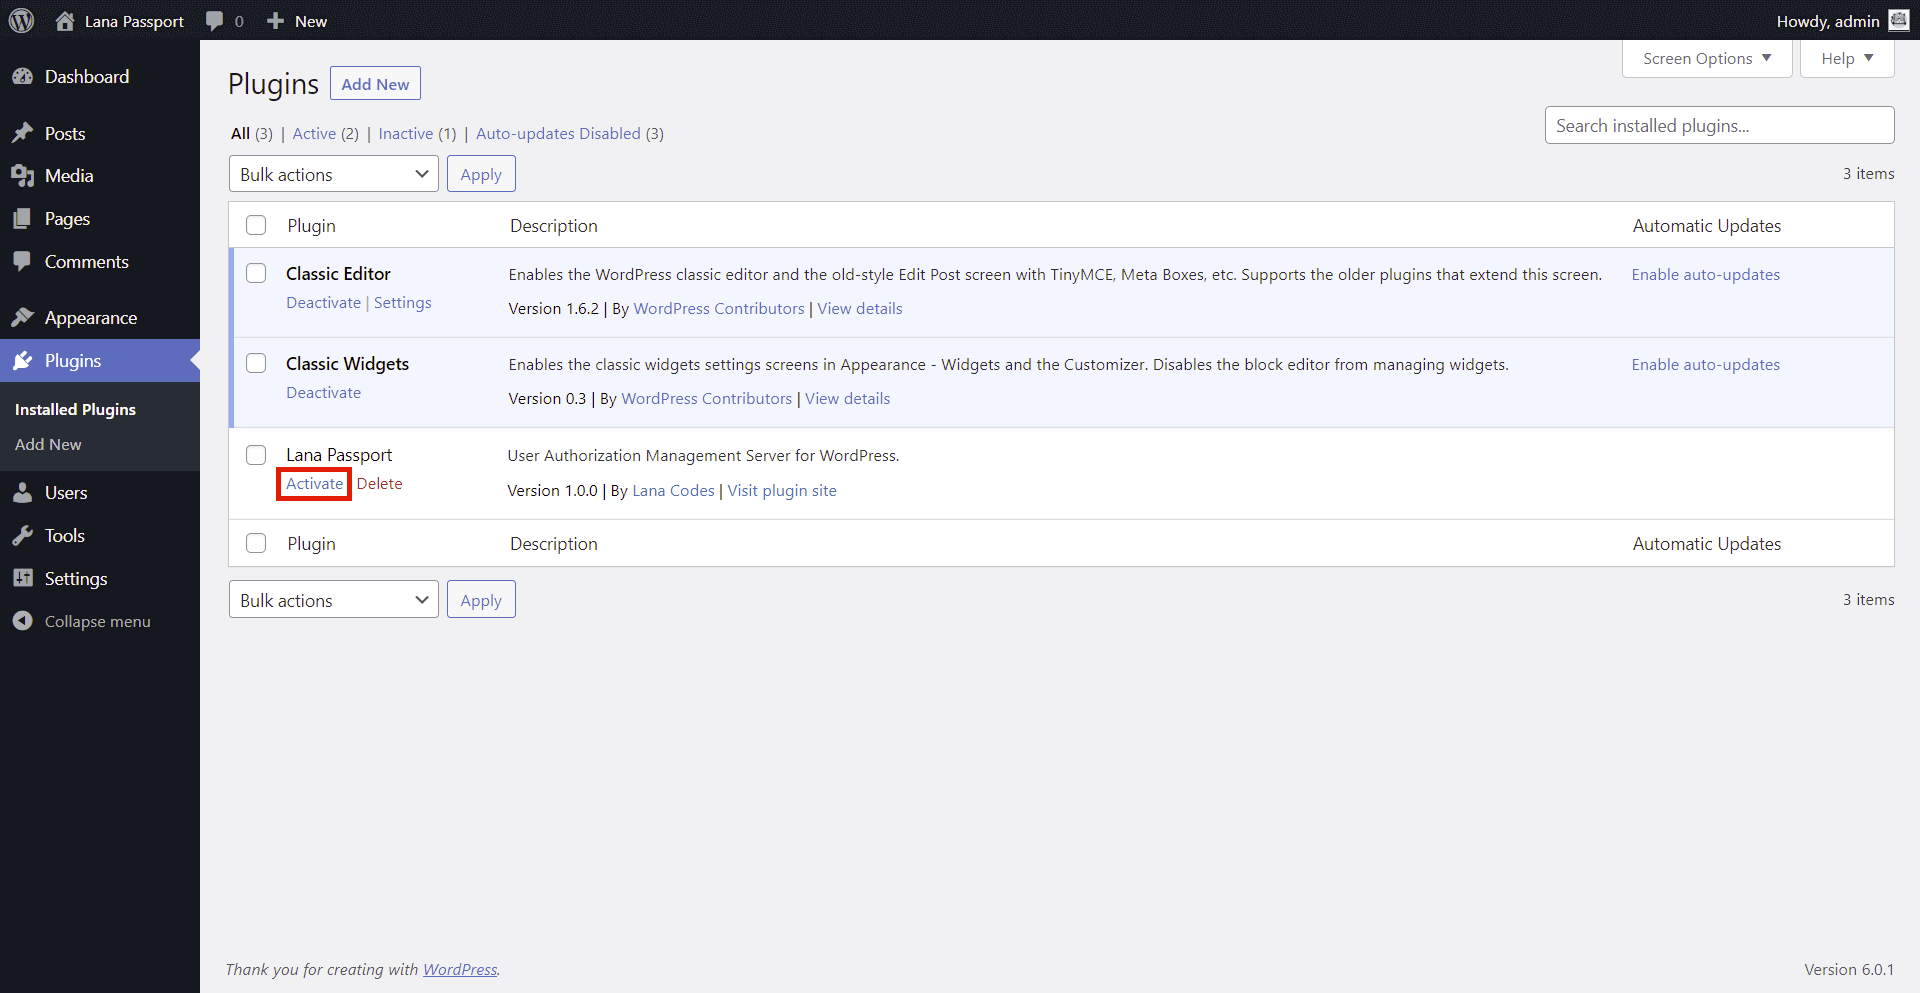
In WordPress Admin Panel go to Plugins > Installed Plugins.
Select "Lana Passport" theme and click Activate button.
Plugin files
"Lana Passport" plugin: /lana-passport.zip
"Lana Single Sign On" on WordPress.org: https://wordpress.org/plugins/lana-sso/
Overview
Lana Passport general overview
The basic structure is that you can add "Clients" to the "OAuth Server", and then you can connect to these different "Clients" with, for example, the "Lana Single Sign On" plugin or any other software.
"Lana Passport" supports all grant types.
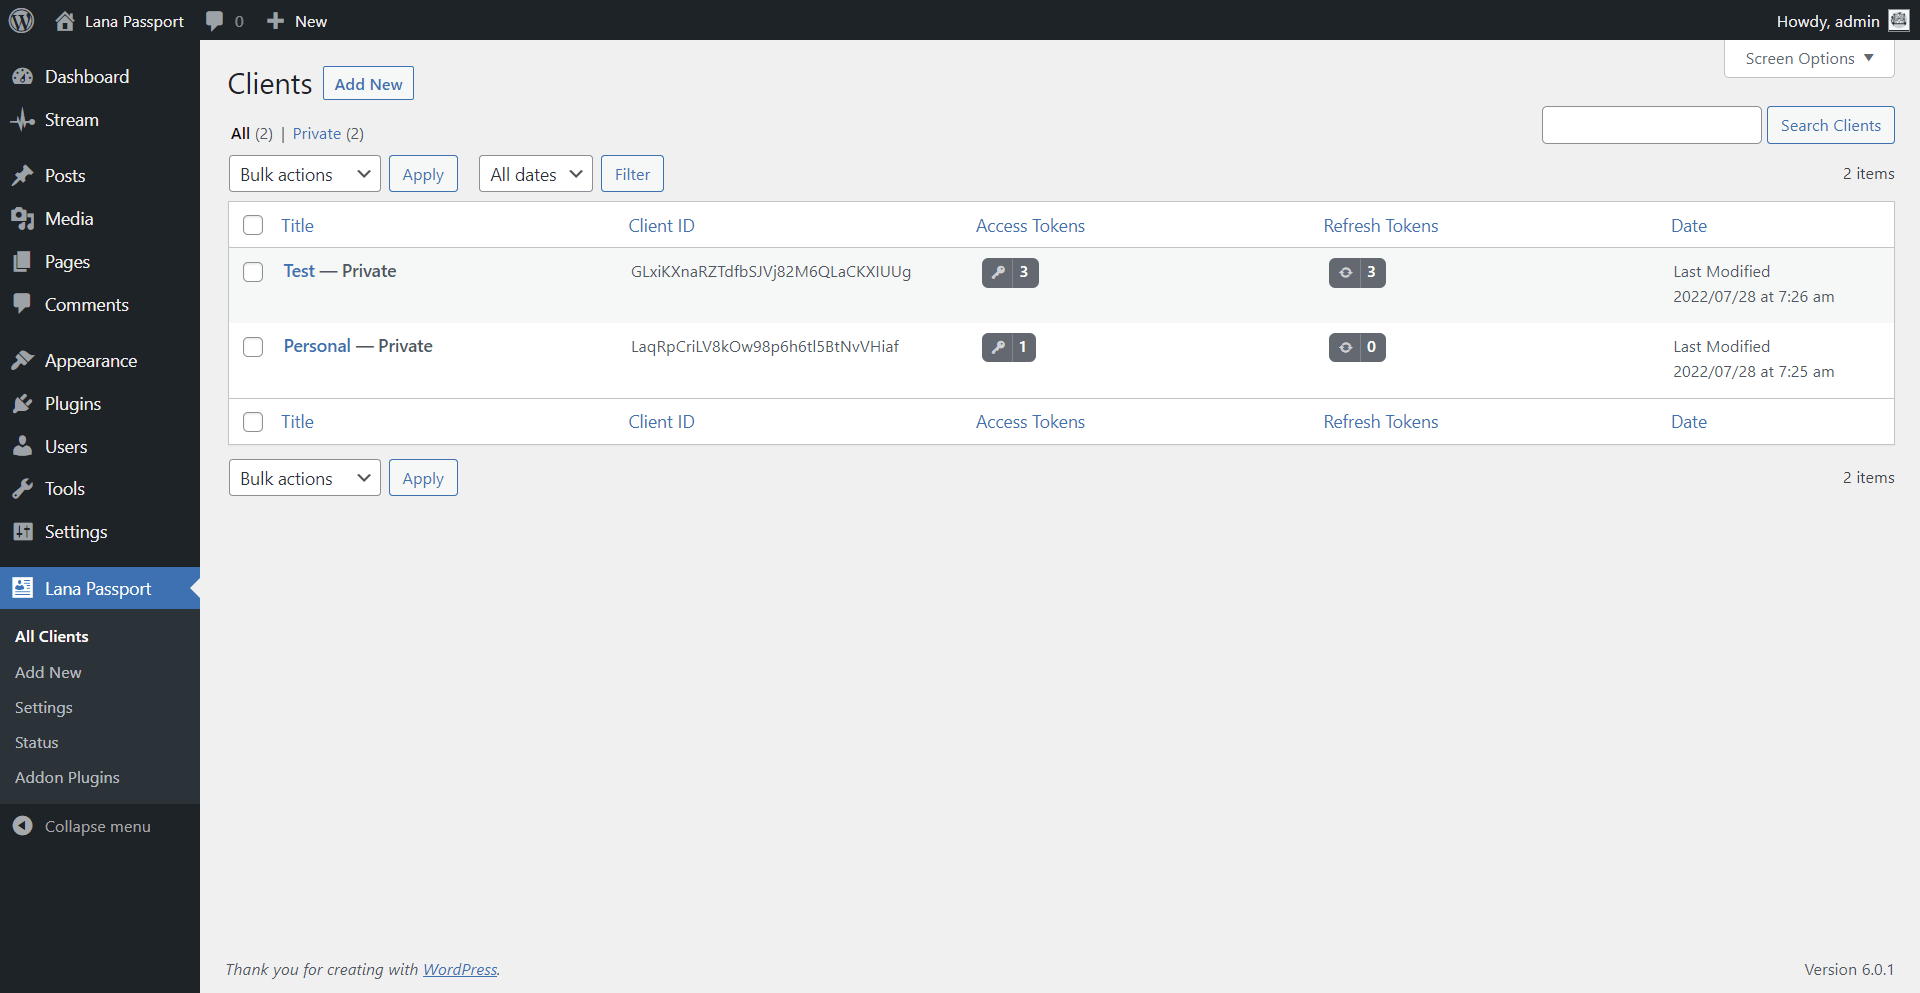
To view "Clients" go to the Lana Passport > All Clients page.
Here you can view and manage all added clients.

To view "Client" go to the Lana Passport > All Clients > Client (selected) > Edit page.
Here you can edit the client's settings.
We have the opportunity to manage the client's:
- Access Tokens
- Refresh Tokens
Settings
Lana Passport settings
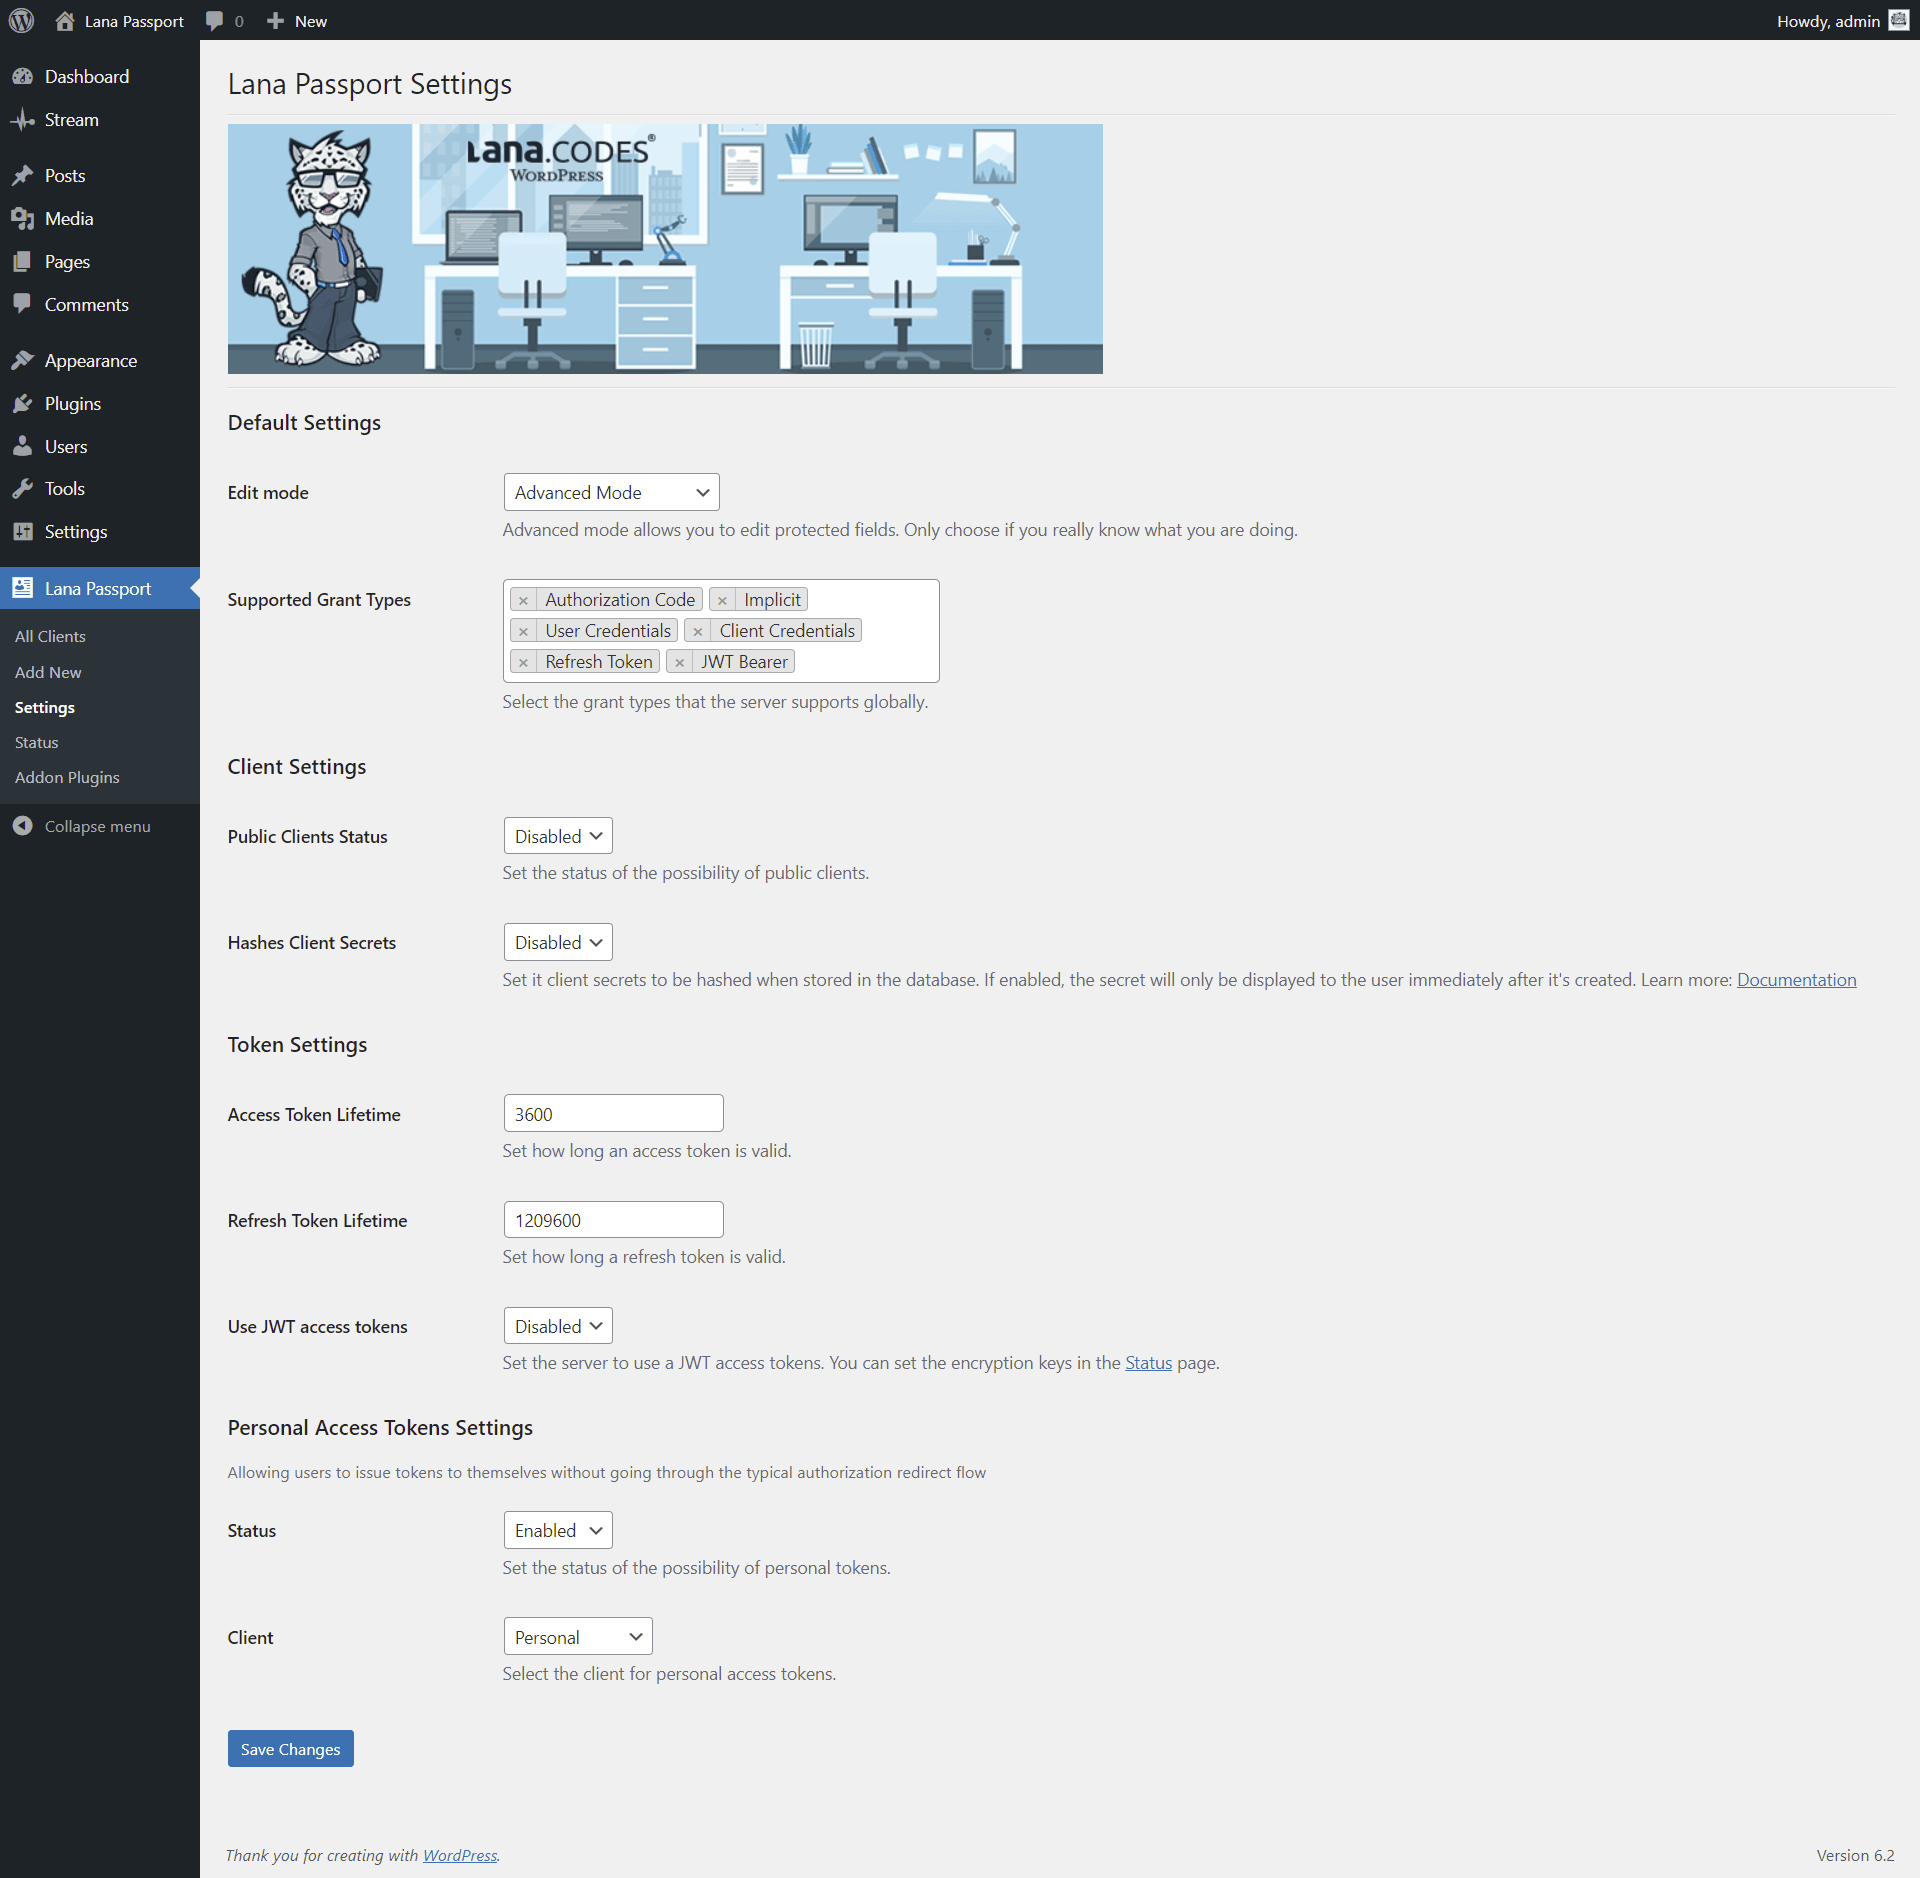
Default Settings
Edit mode: You can set the "Lana Passport" edit mode. Advanced mode
allows you to edit protected fields.
options: Simple Mode, Advanced Mode
default: Simple Mode
Supported Grant Types: You can select the grant types that the server supports
globally.
options: Authorization Code, Implicit, User Credentials, Client Credentials, Refresh
Token, JWT Bearer
default: Authorization Code
documentation:
rfc6749#section-1.3
Server Encryption Keys Settings
Storage Method: You can set where the server encryption keys are stored.
options: File, Option
default: File
Unique Filename Prefix: You can set to use a unique prefix in encryption key
filenames.
options: Disabled, Enabled
default: Enabled
note: If enabled, random string will be added as prefix to key filenames.
Client Settings
Public Clients Status: You can set the status of the possibility of public
clients.
options: Disabled, Enabled
default: Disabled
documentation:
rfc6749#section-2.1
Hashes Client Secrets: You can set it client secrets to be hashed when stored in
the database.
options: Disabled, Enabled
default: Disabled
note: If enabled, the secret will only be displayed to the user immediately after it's
created.
Token Settings
Access Token Lifetime: You can set how long an access token is valid for.
default: 3600
Refresh Token Lifetime: You can set how long a refresh token is valid for.
default: 1209600
Use JWT access tokens: You can set the server to use a JWT access tokens.
options: Disabled, Enabled
default: Disabled
OpenID Connect Settings
Use OpenID Connect: You can set the server to use OpenID Connect.
options: Disabled, Enabled
default: Disabled
ID Token Lifetime: You can set how long an ID token is valid for.
default: 3600
Personal Access Tokens Settings
Status: You can set the status of the possibility of personal tokens.
options: Disabled, Enabled
default: Disabled
Client: You can select the client for personal access tokens.
Status
Lana Passport Status
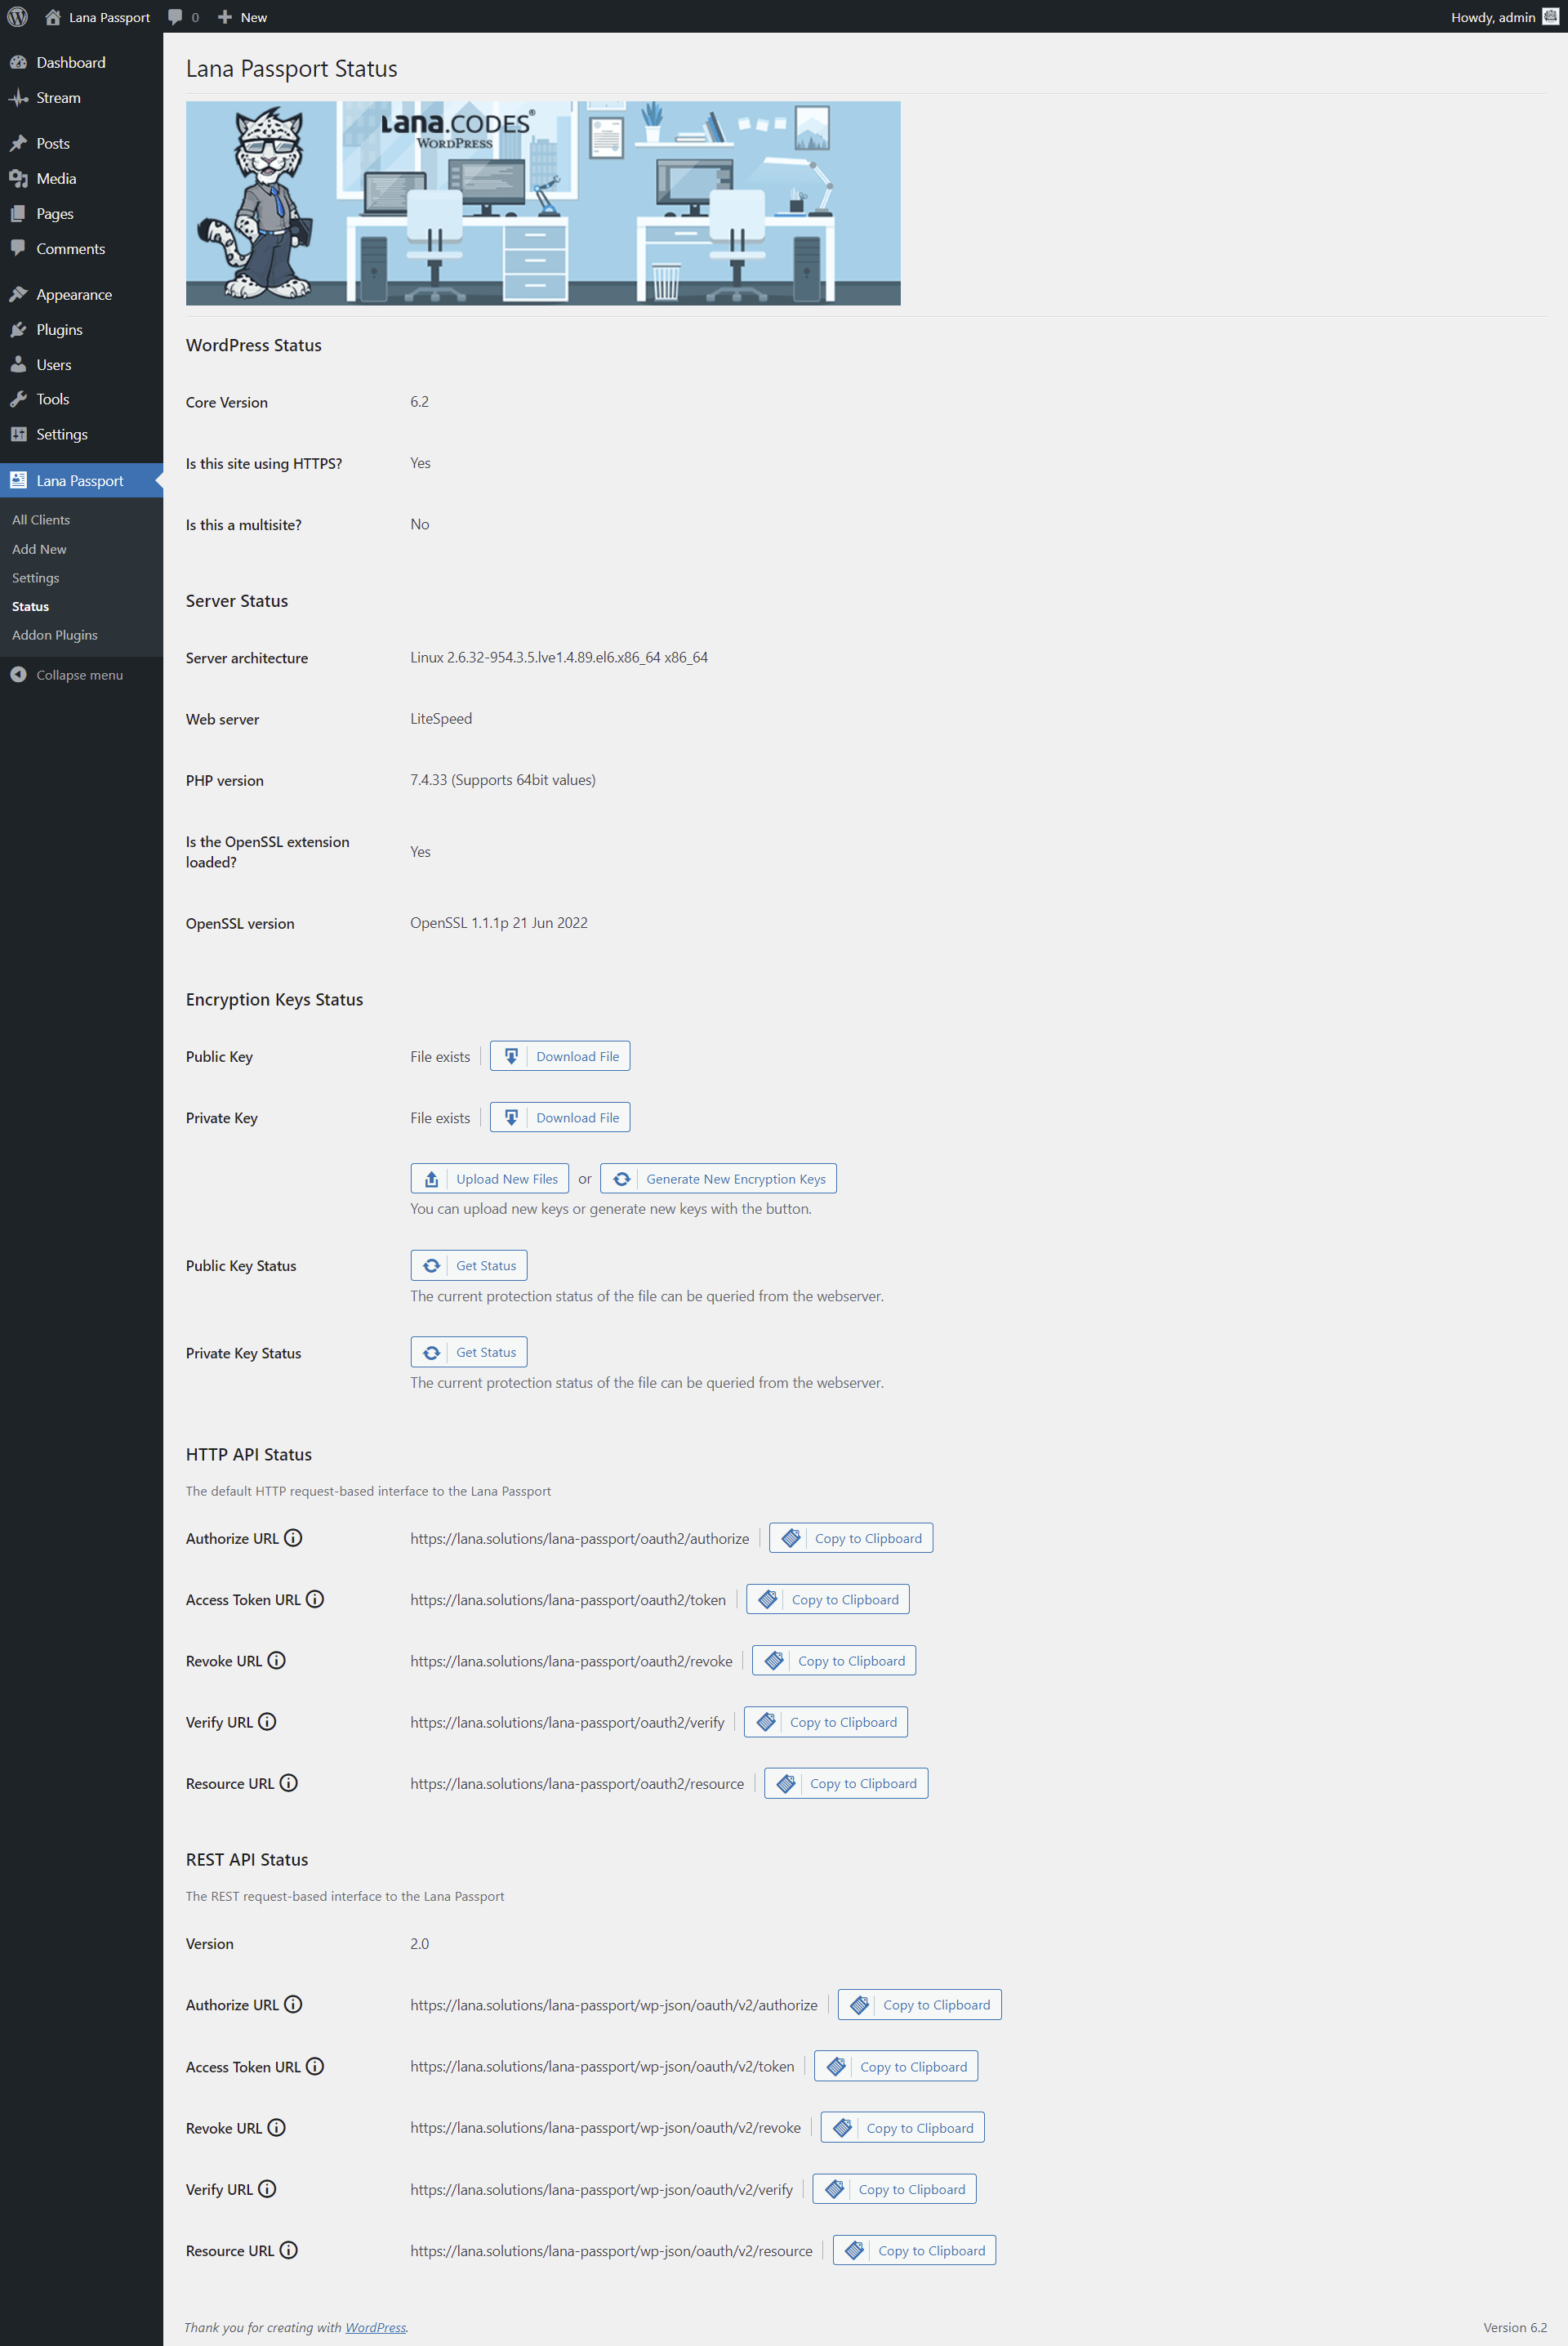
WordPress Status
General information about WordPress.
Server Status
General information about Webserver.
Encryption Keys Status
You can manage encryption keys. These are the keys used by default by the OAuth server.
- Public Key
- Private Key
You can query the current protection status of the encryption key files from the webserver.
HTTP API Status
Default HTTP URLs for the OAuth server.
- Auth URL - This is used to get the authorization code.
- Access Token URL - This is used to exchange the authorization code for an access token.
- Revoke URL - This is used to revoke the access or refresh token.
- Verify URL - This is used to verify the access token.
- Resource URL - This is used to get the user information.
- UserInfo URL - This is used to get the user information with OpenID Connect. Note: This endpoint is only available if OpenID Connect is enabled in the settings.
Note: If the HTTP API is not working properly, you can update the URL structures in WordPress by clicking the "Save Changes" button on the Settings > Permalink page.
REST API Status
WordPress REST request-based URLs for the OAuth server.
- Auth URL - This is used to get the authorization code.
- Access Token URL - This is used to exchange the authorization code for an access token.
- Revoke URL - This is used to revoke the access or refresh token.
- Verify URL - This is used to verify the access token.
- Resource URL - This is used to get the user information.
- UserInfo URL - This is used to get the user information with OpenID Connect. Note: This endpoint is only available if OpenID Connect is enabled in the settings.
Only available if the REST version of WordPress supports it. It requires at least WordPress version 4.7.
Well-Known URLs
- Authorization Server Metadata URL - The Authorization Server Metadata (also known as OAuth Discovery) endpoint provides a standardized way for clients to retrieve configuration information about the OAuth server.
- JWKS URL - The JSON Web Key Set (JWKS) endpoint provides public keys in a standardized format for clients to verify JSON Web Tokens (JWTs).
If the URLs are not working, you can refresh the WordPress core URLs and permalink structure from the Settings > Permalinks page. Simply click the "Save Changes" button to update them.
How to Add New Client
This is how you can add new Client to OAuth2 Server
1. Click "Add New"
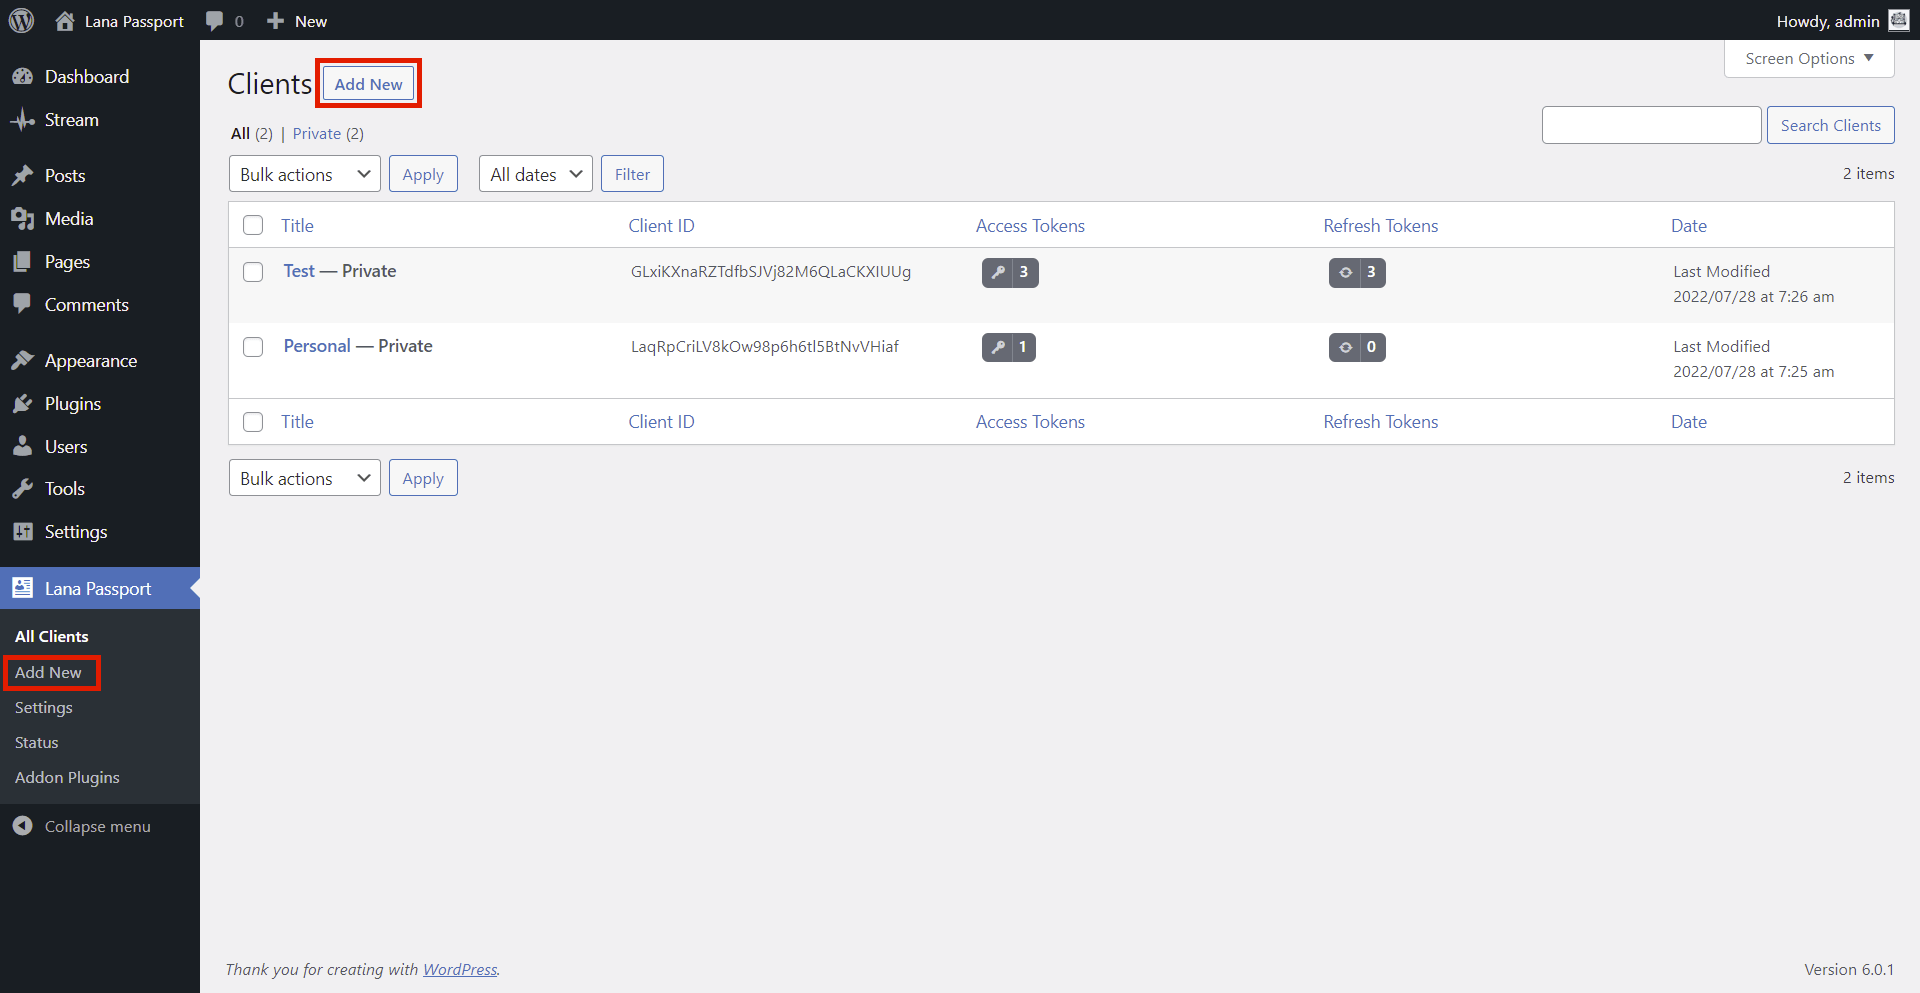
To add new "Client" just click the "Add New" button on "All Clients" page, or click to the Lana Passport > Add New page link.
2. Set the Client

Set the following properties of the client:
- Title - The name of the client, which can be anything
- Redirect URI - After the user is logged in, the server redirects to this client URL. This URL is usually found in the client plugin.
- Scope - Used to limit the authorization granted to the client by the resource owner.
Client ID and Client Secret will be automatically generated when adding a client.
Note: It is not possible to set the grant type when adding a new client. You can only make this setting when editing the client.
How to Edit Client
This is how you can edit Client in OAuth2 Server
1. Choose the Client
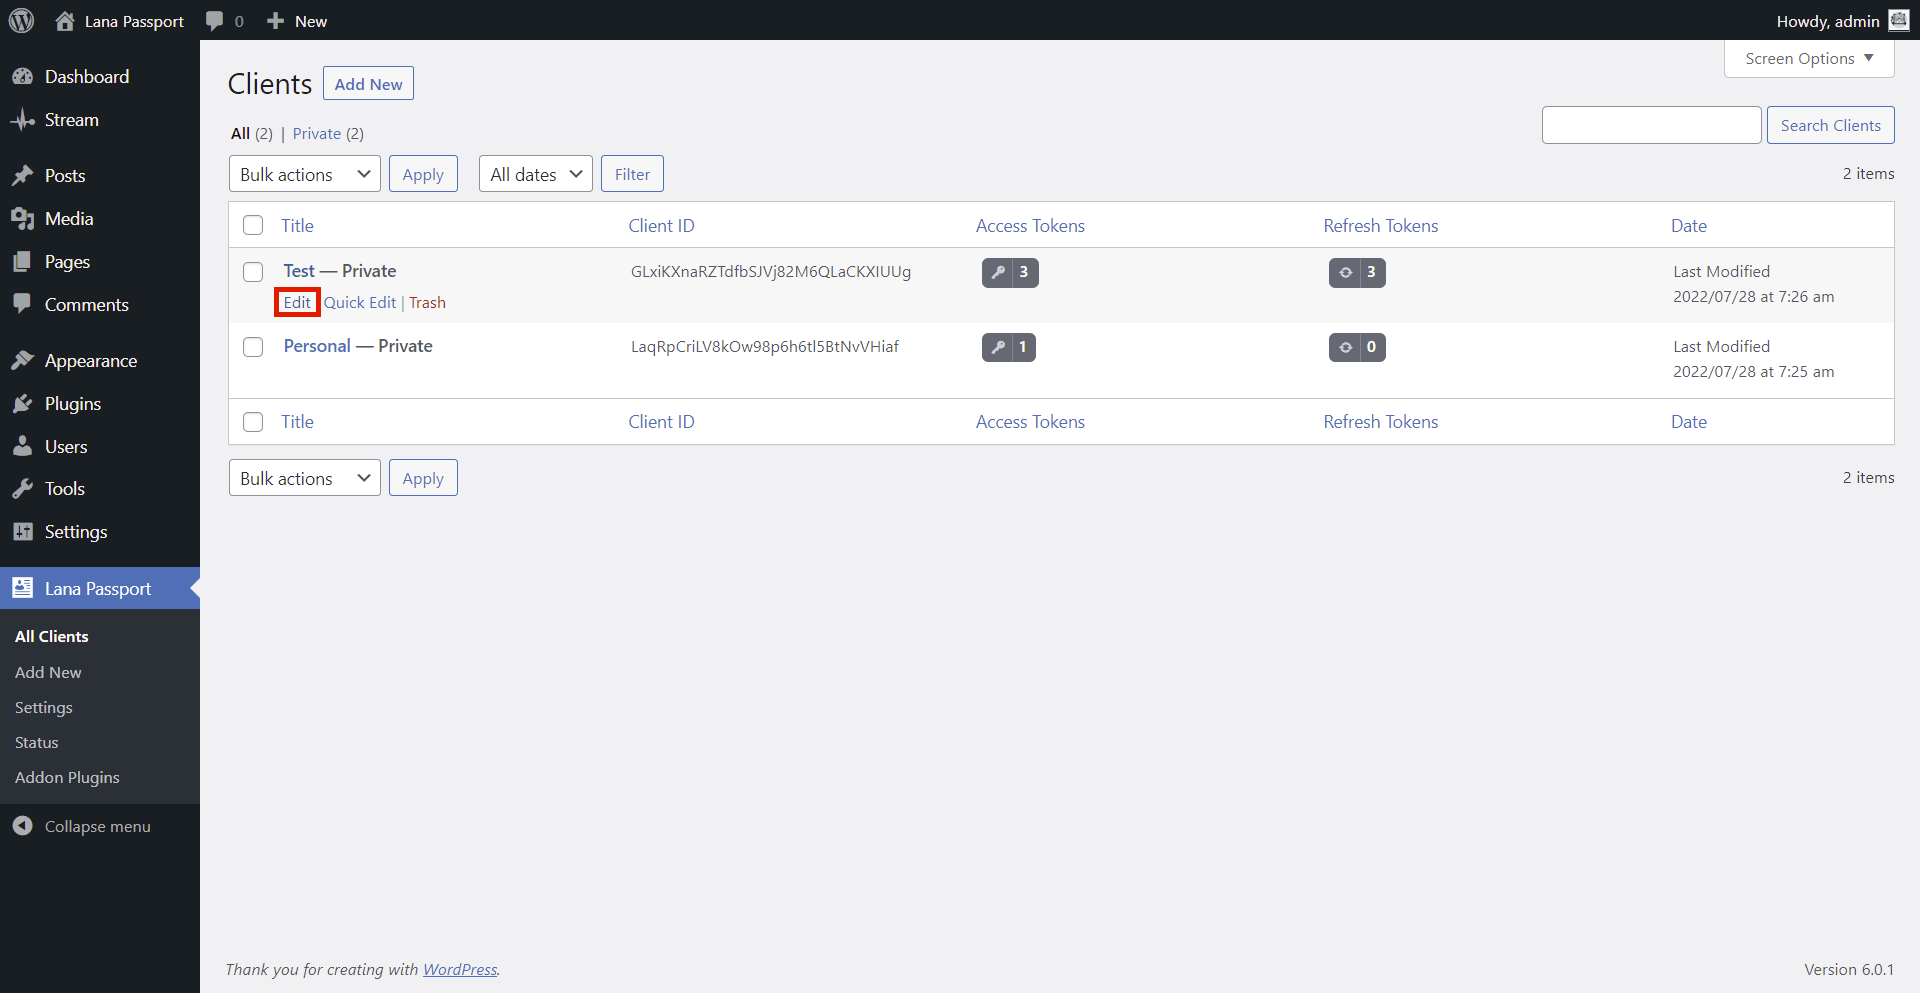
Choose the "Client" and click to the "Edit" button on "All Clients" page.
2. Edit the Client
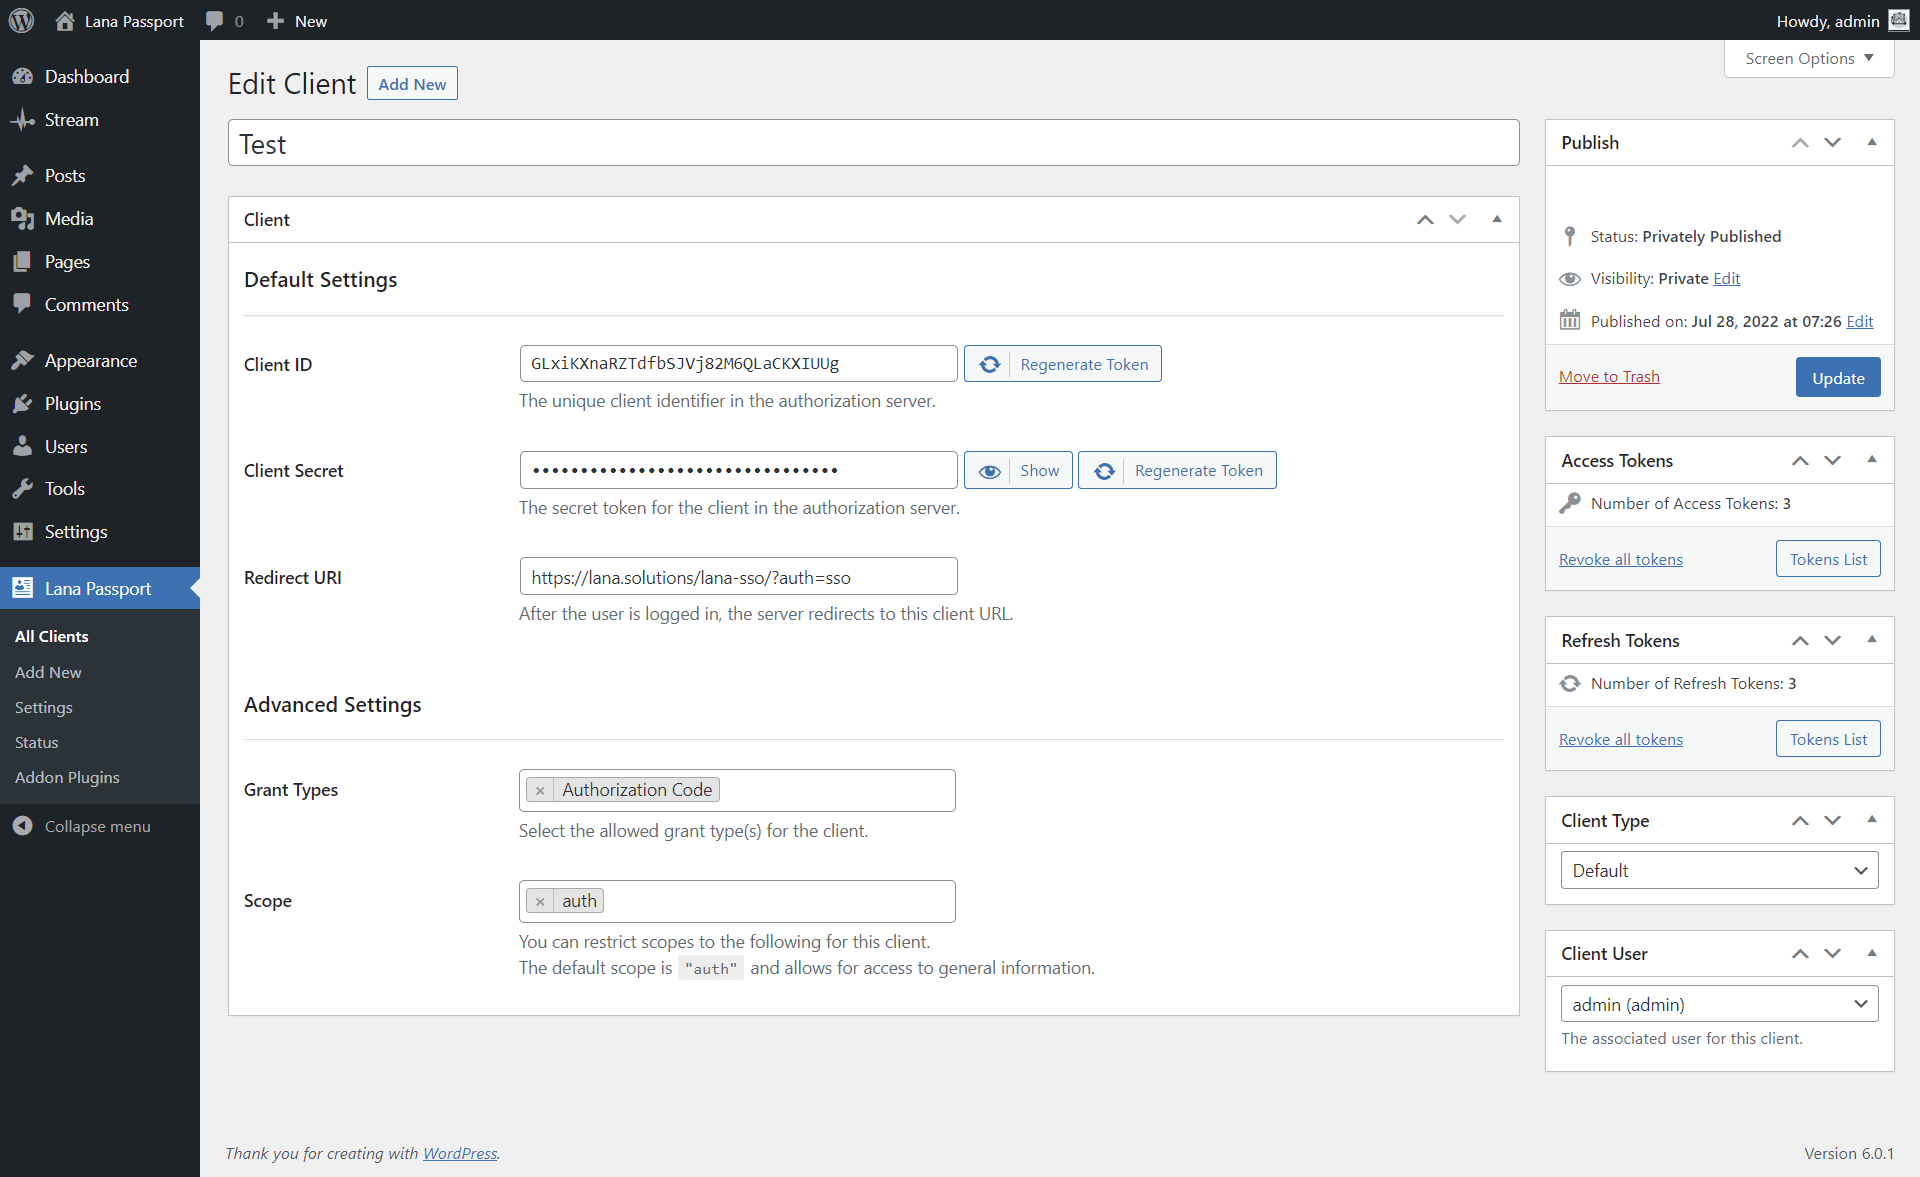
You can set the following properties of the client:
- Title - The name of the client, which can be anything
- Client ID - The unique client identifier in the authorization server.
- Client Secret - The secret token for the client in the authorization server.
- Redirect URI - After the user is logged in, the server redirects to this client URL.
- Grant Types - The allowed grant types for the client.
- Scope - Used to limit the authorization granted to the client by the resource owner.
Note: You can only edit the Client ID and Client Secret in Advanced mode.
Authorized Clients
This is how you can authorize client in OAuth2 Server
1. Click on the Single Sign On button

Click on the "Single Sign On" button on the client WordPress login page.
2. Authorize
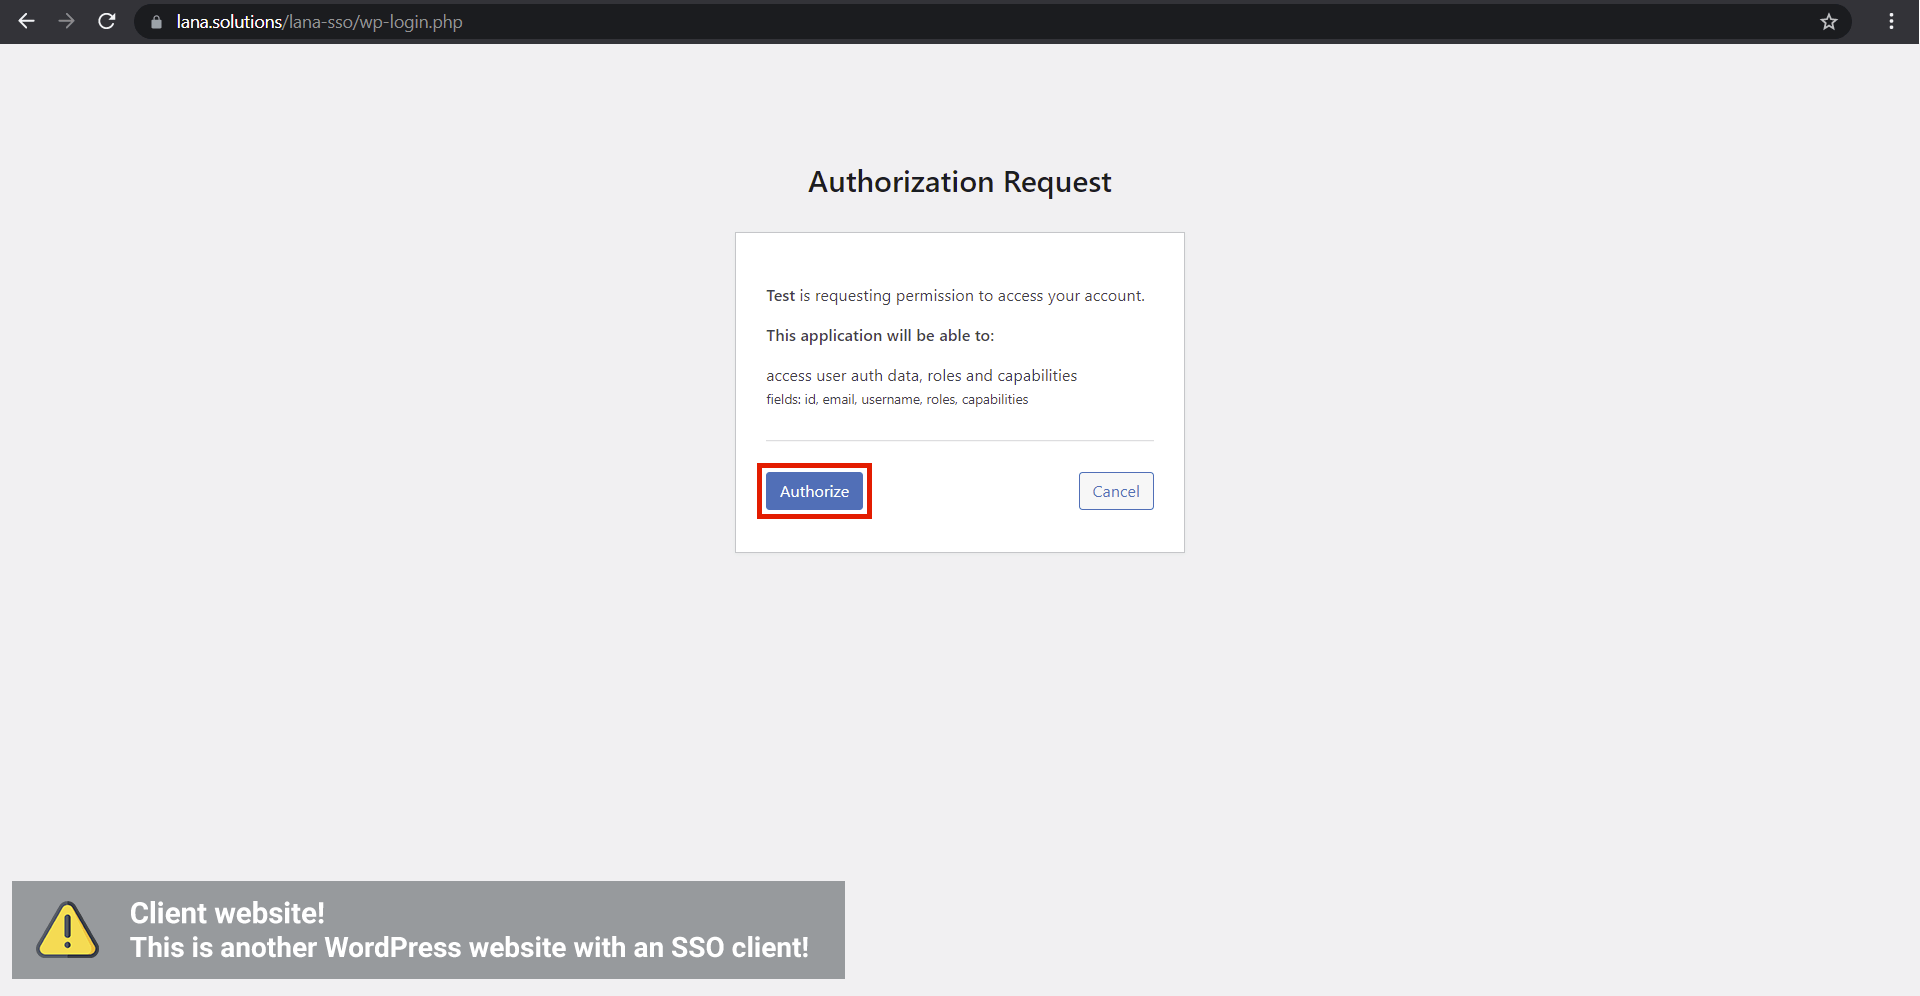
Click on the "Authorize" button on the Authorization Request page.
This is how you can view authorized clients in OAuth2 Server
1. Go to the Profile page
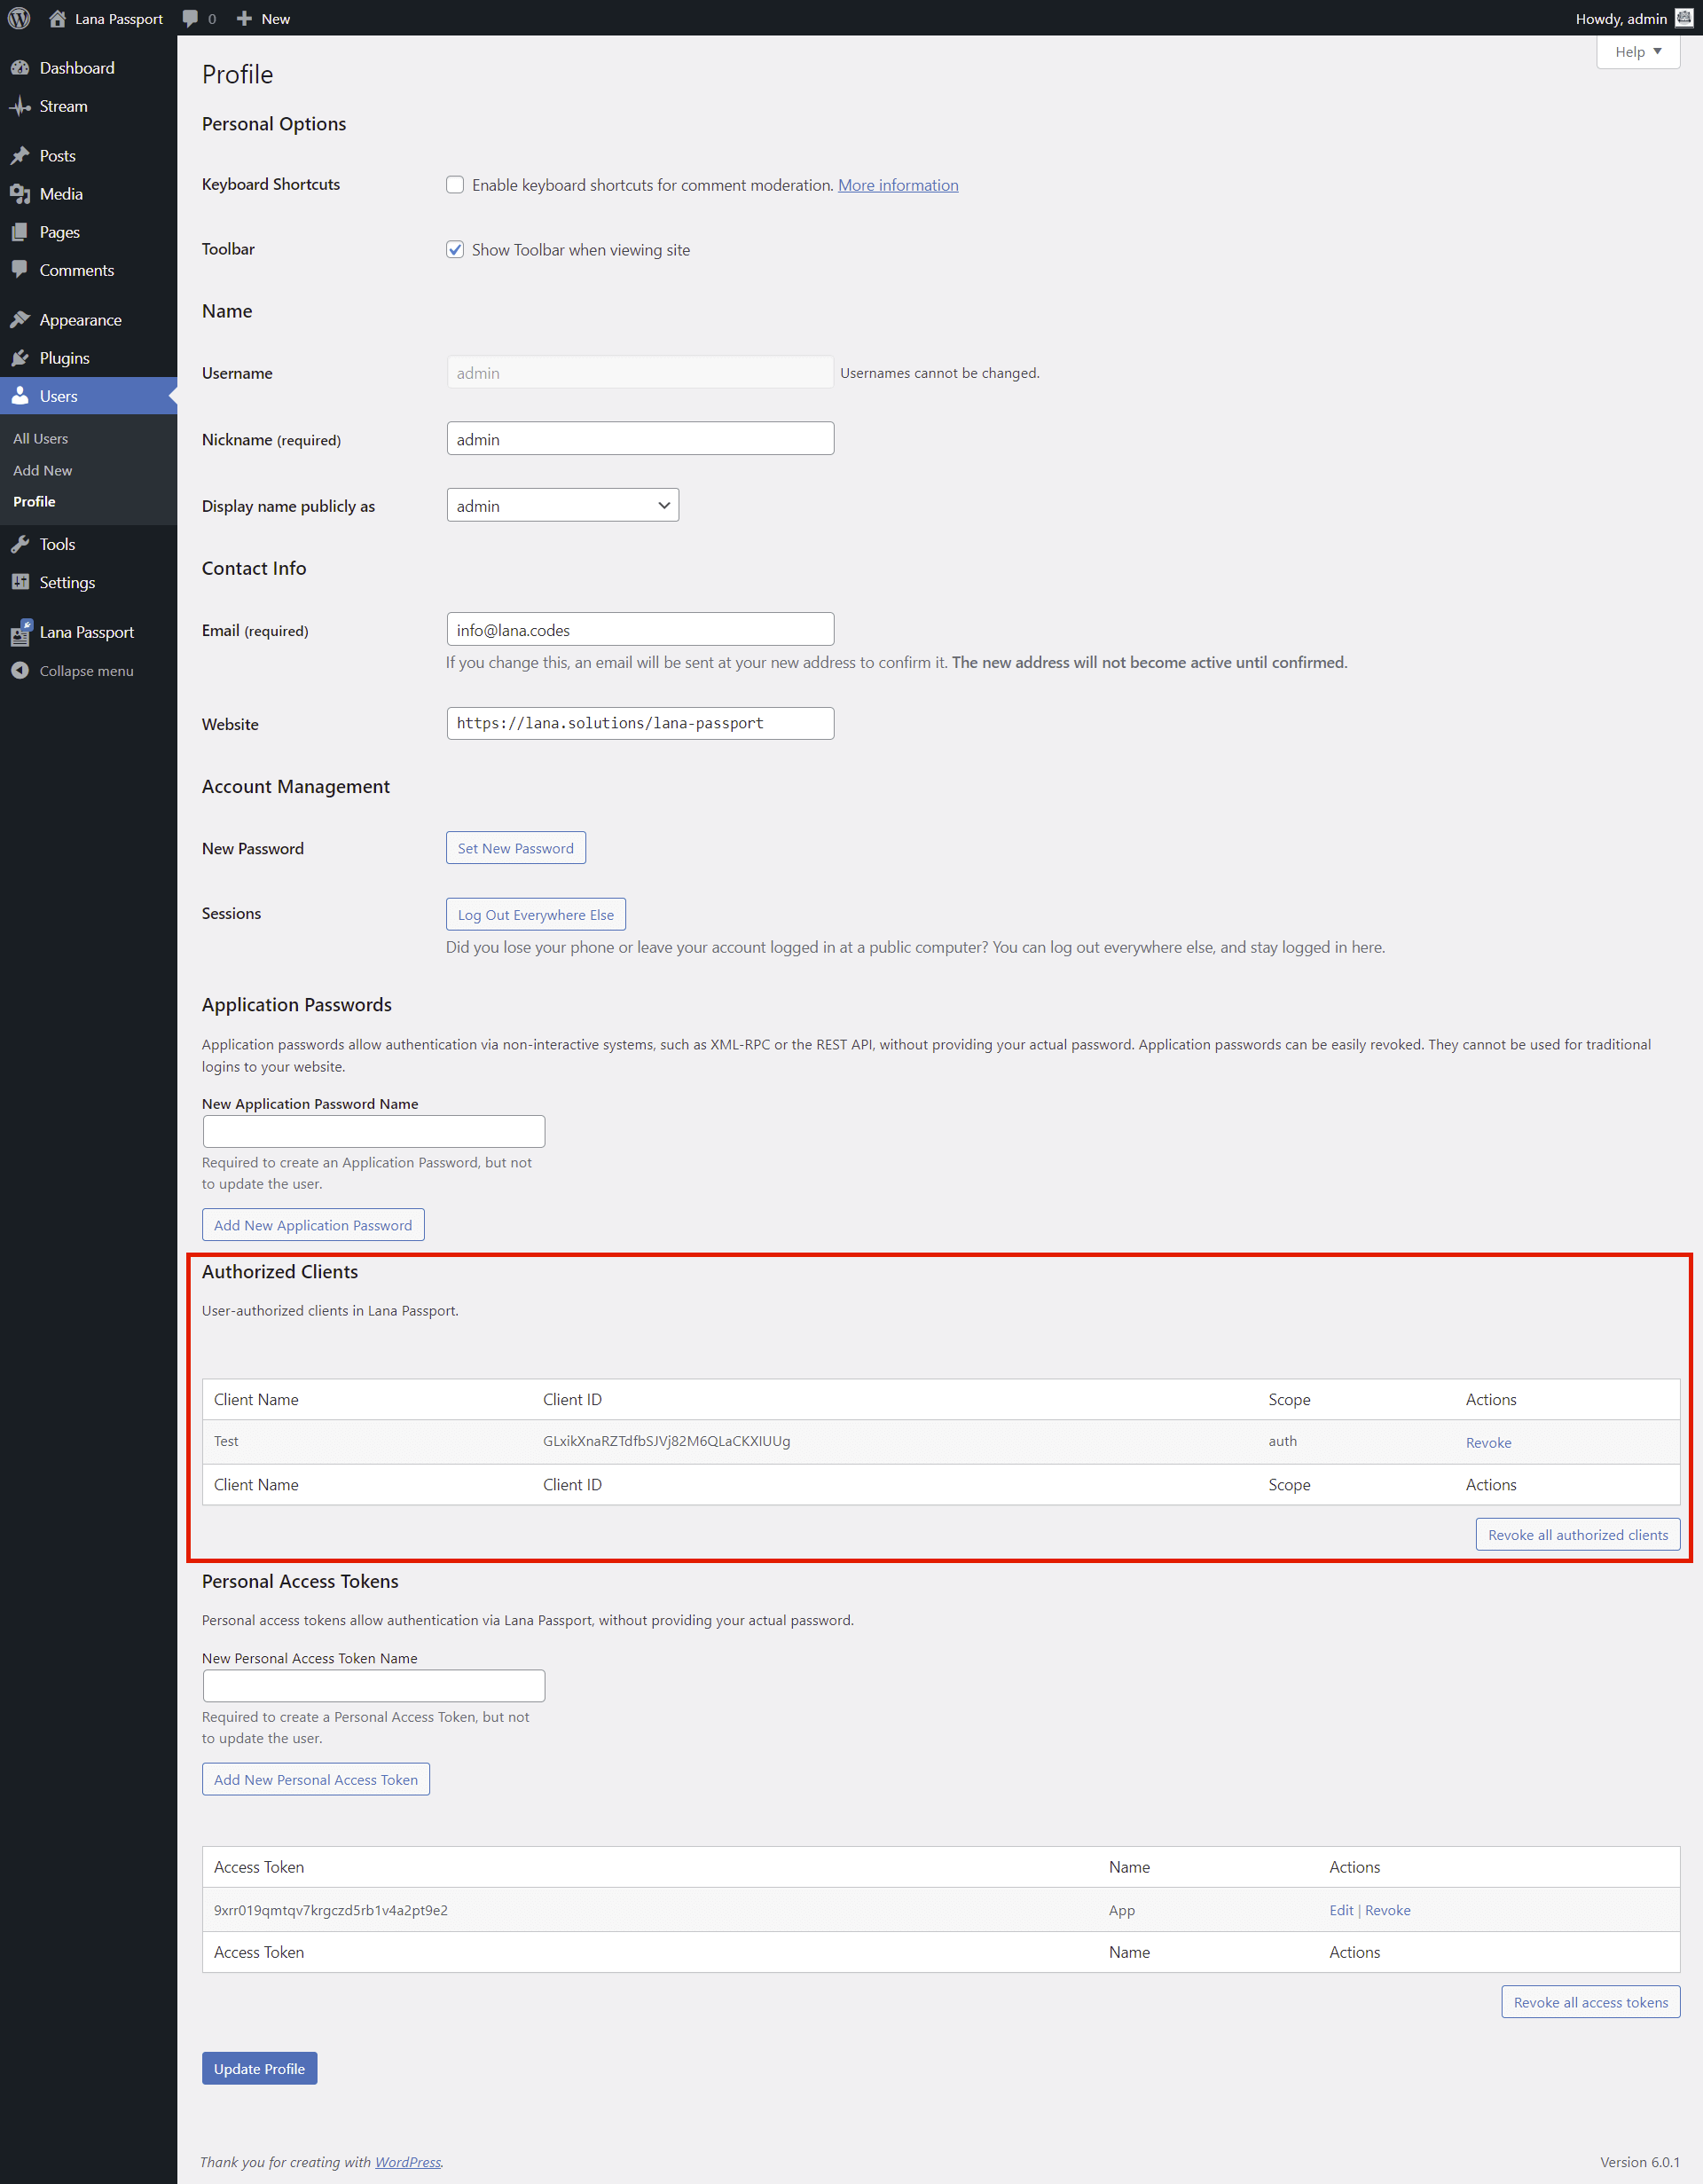
You can view the authorized clients on the profile page.
You have the option to Revoke the permissions.
JWT Access Tokens
This is how you can use JWT access tokens in OAuth2 Server
1. Enable in Settings
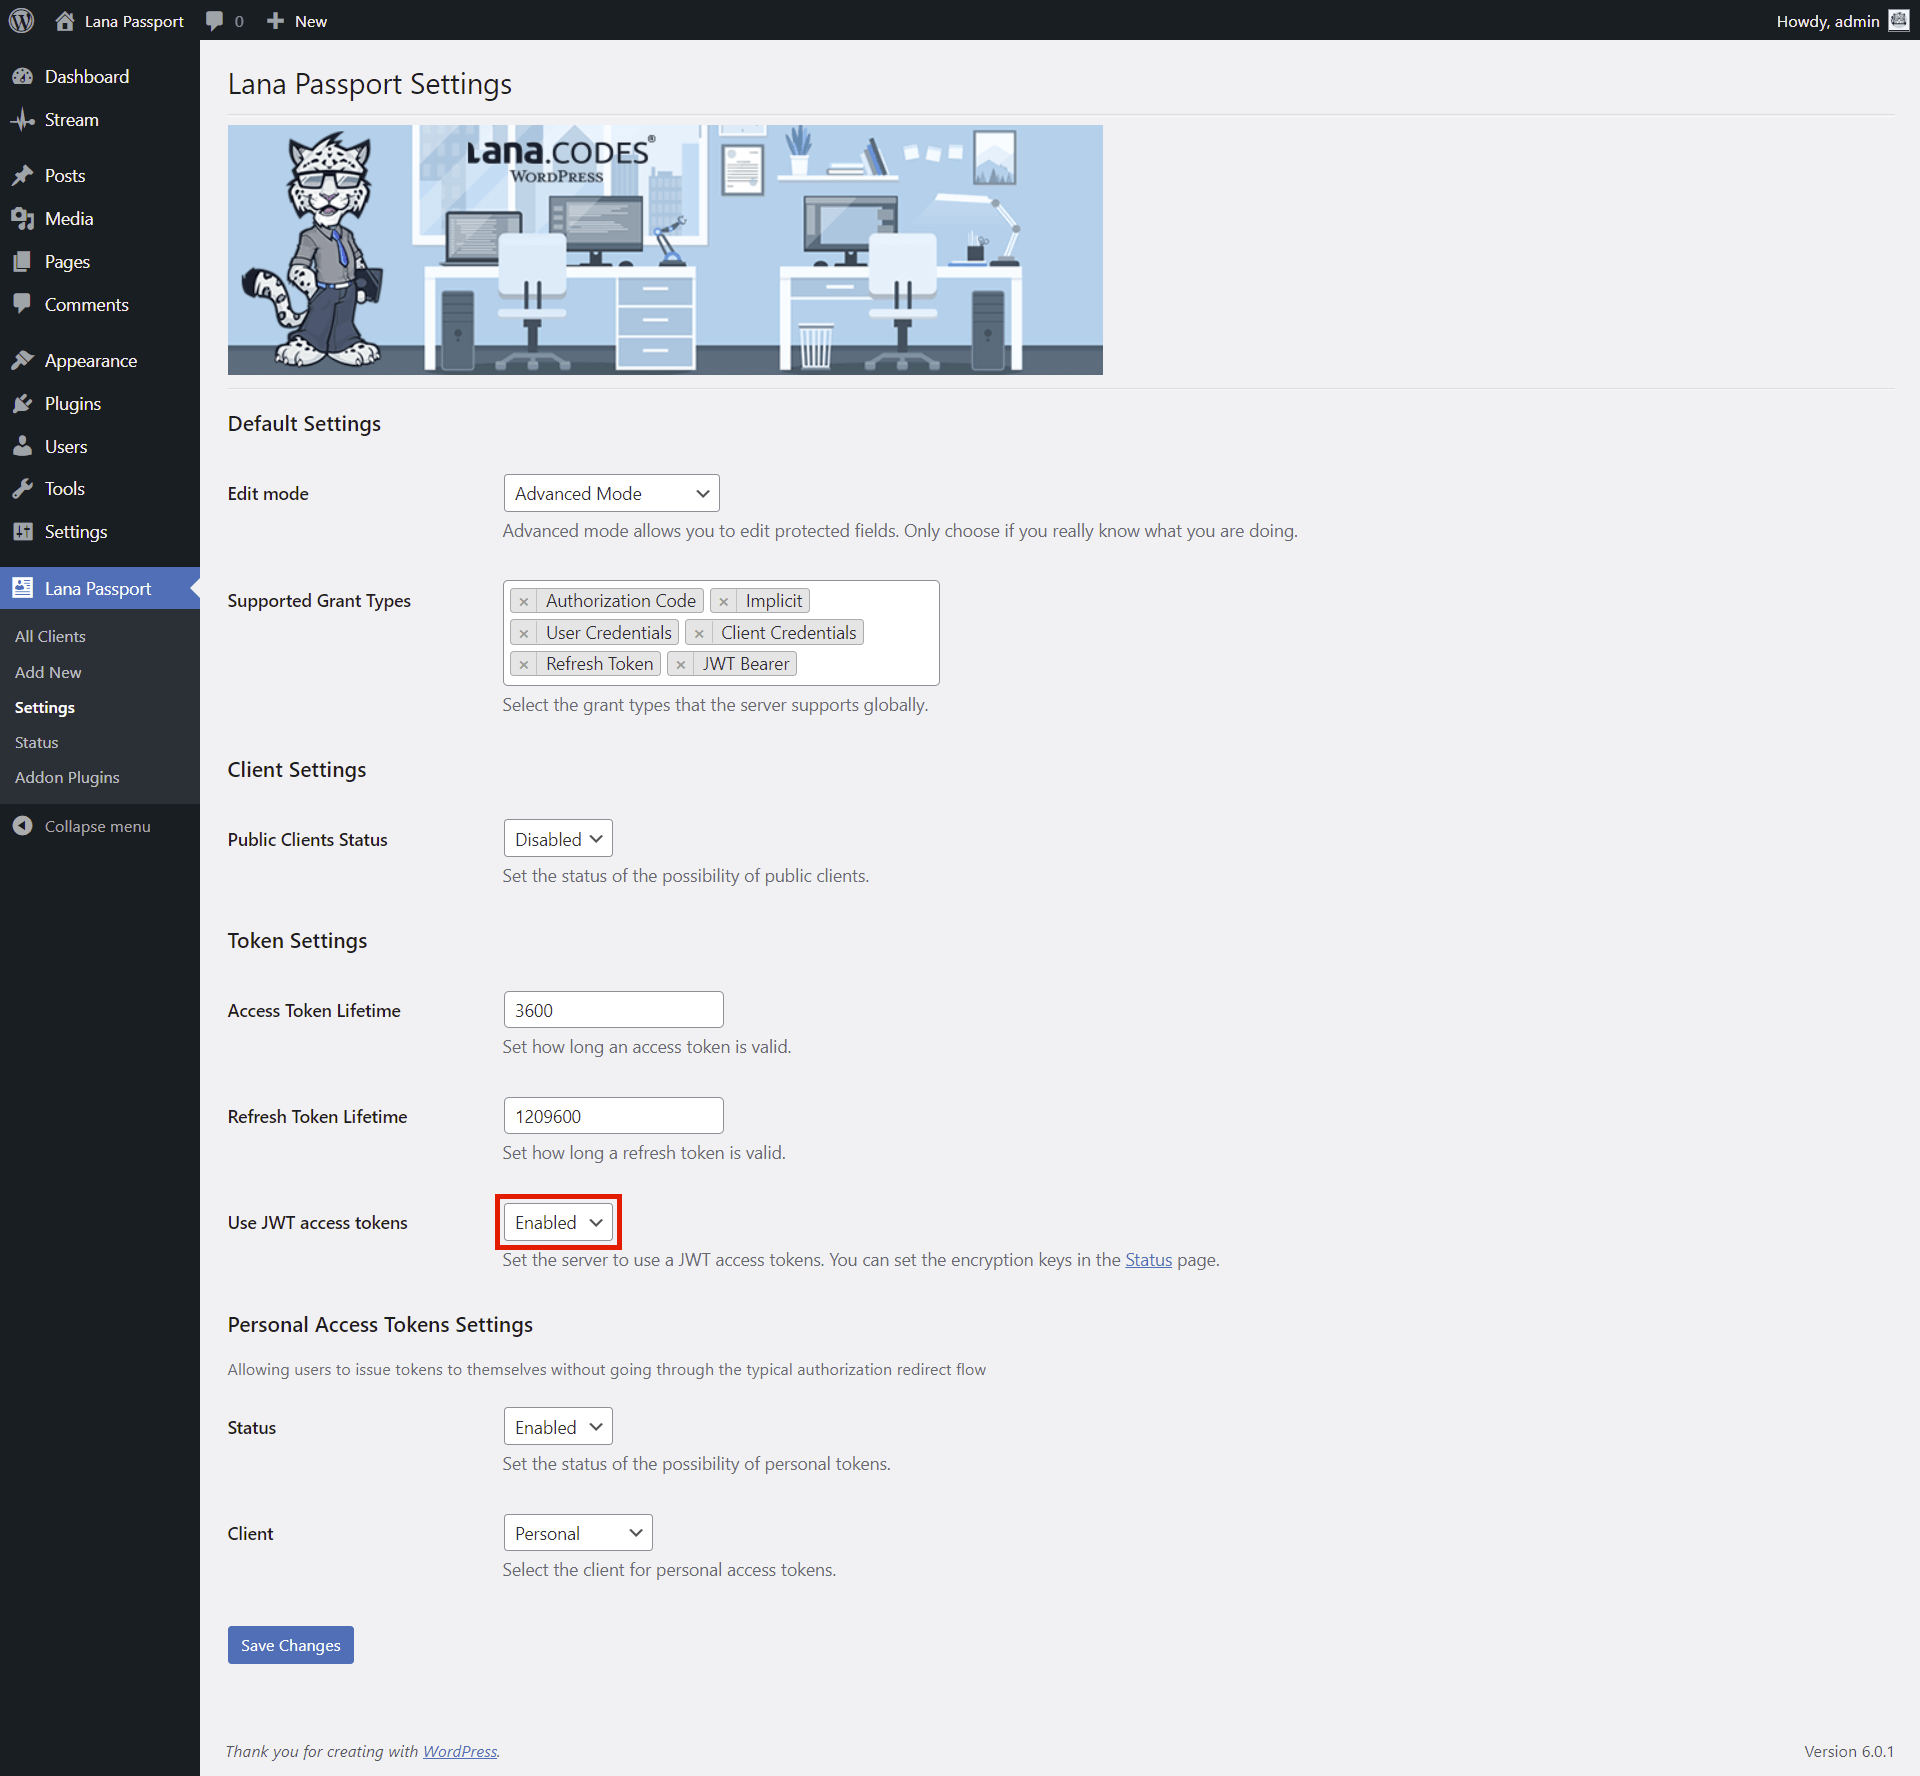
First you have to enable it in the Settings.
1. Select "Enabled" for Use JWT access tokens in Token Settings section.
2. Click on the "Save Changes" button.
2. Use Encryption Keys
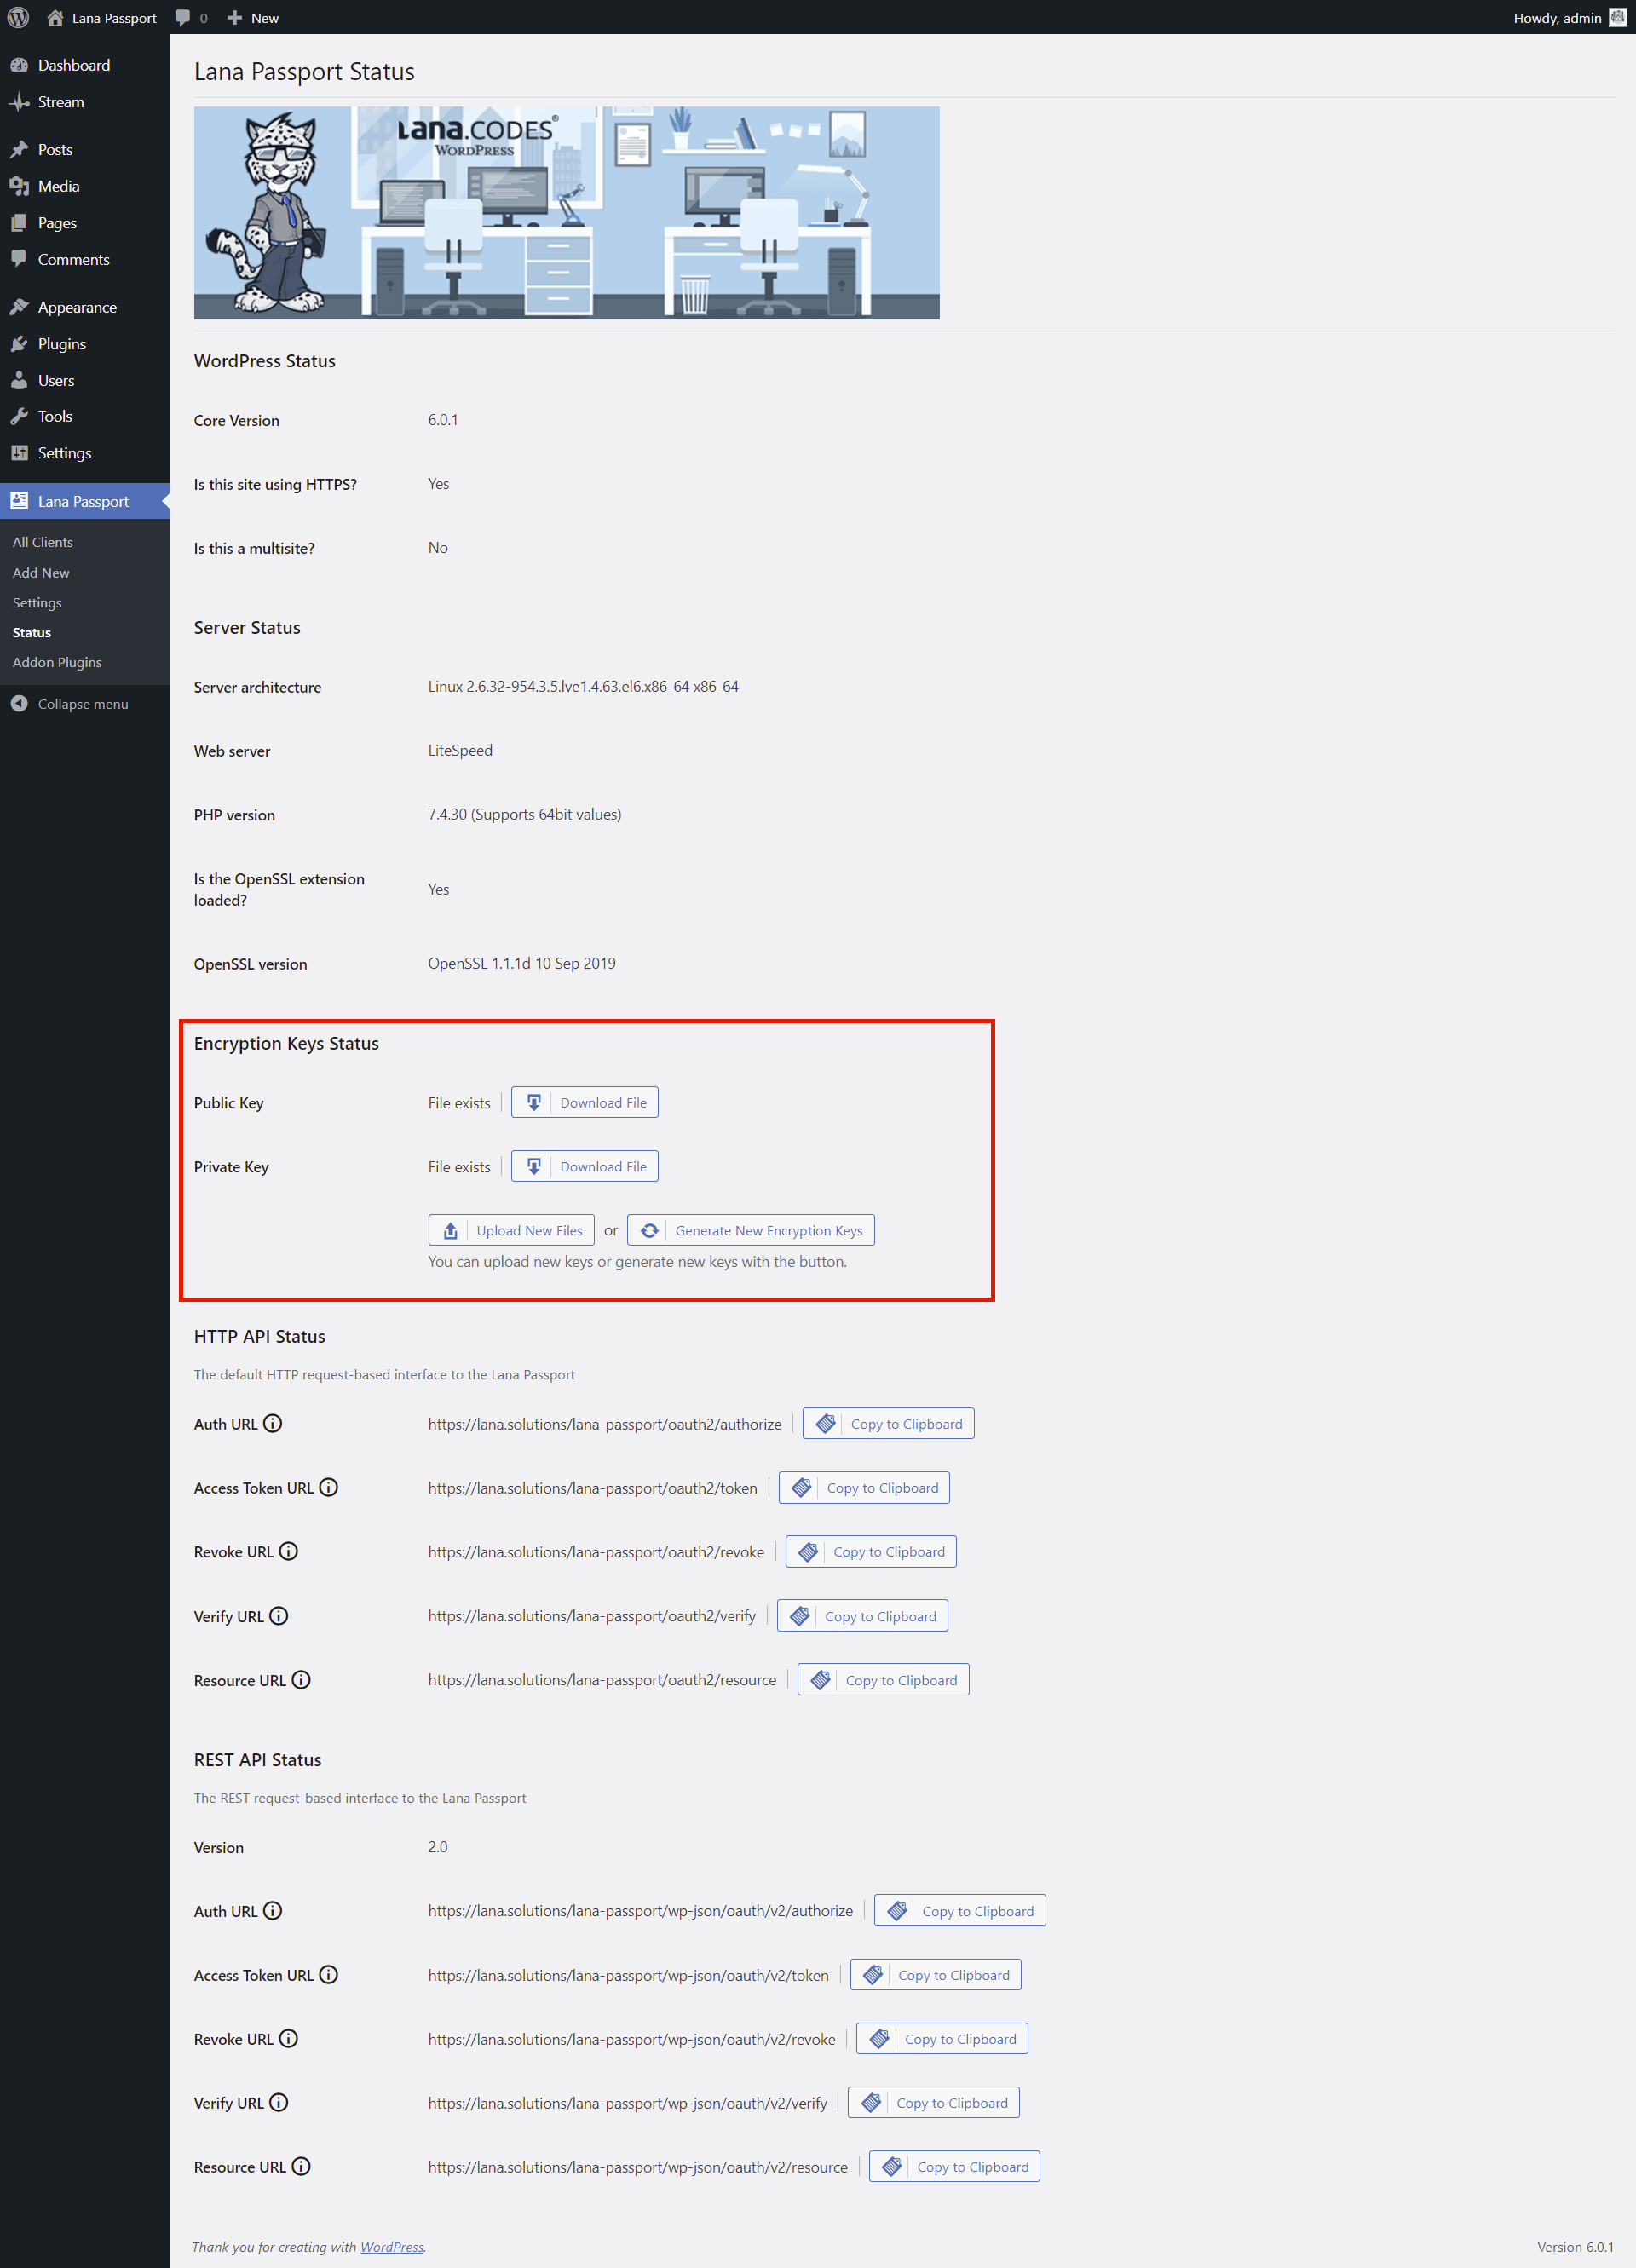
By default, the plugin uses the server's encryption keys for JWT access tokens.
You can download the encryption keys on the Lana Passport > Status page.
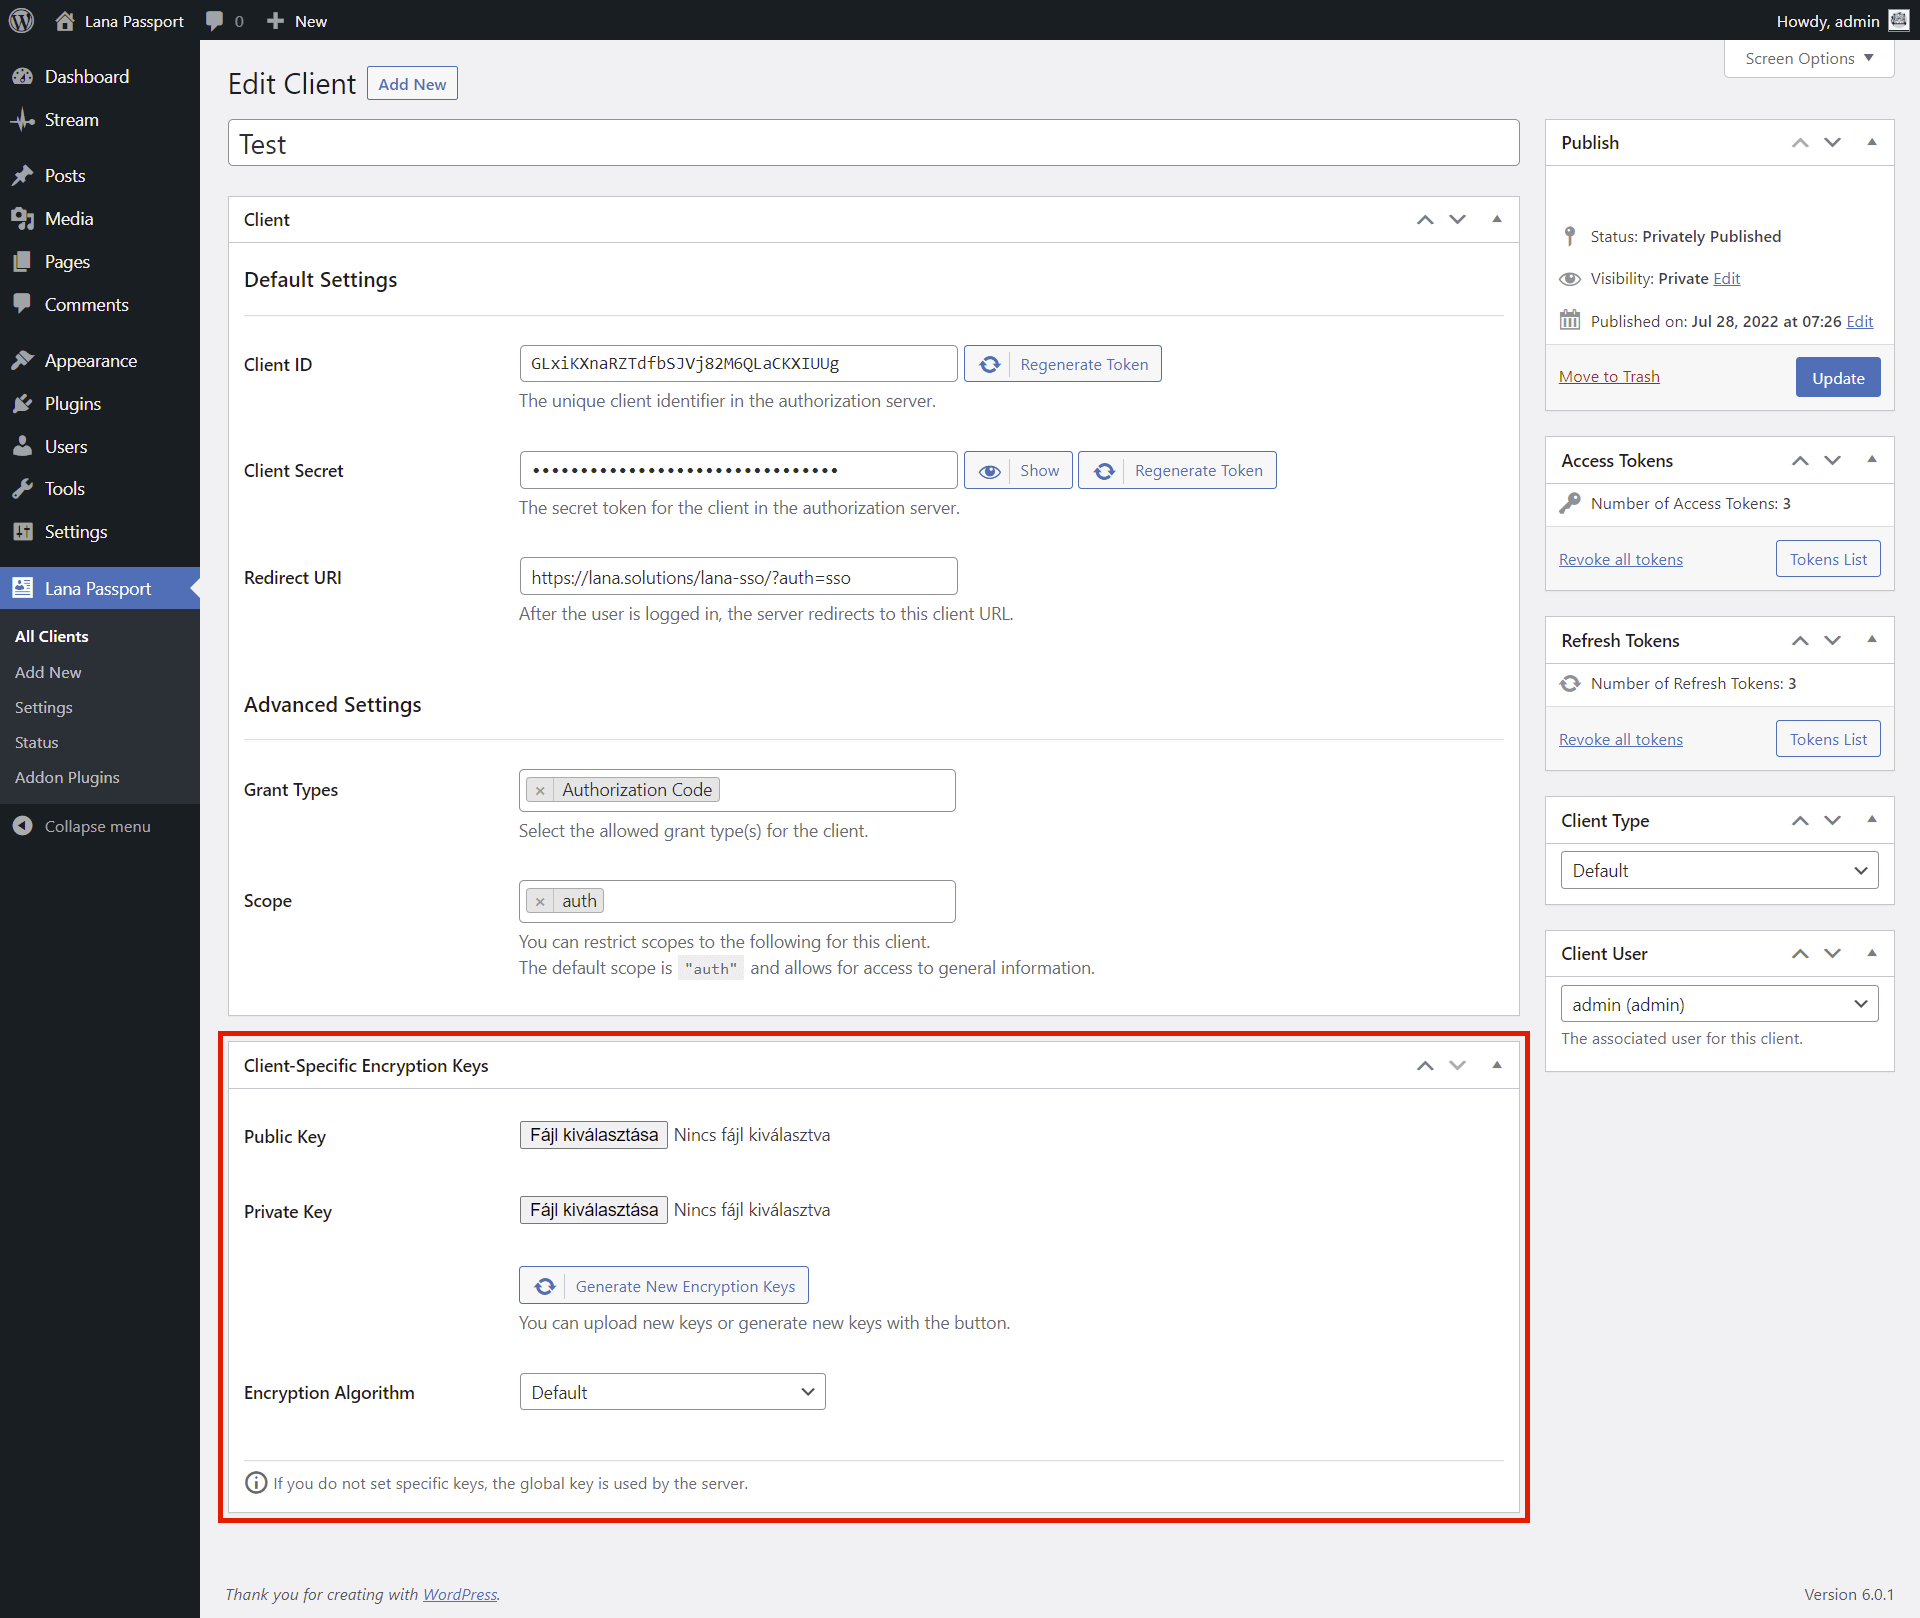
You can set Client-Specific Encryption Keys in "Edit Client" page.
In this case, the client will use these encryption keys.
Personal Access Tokens
This is how you can use Personal Access Tokens in OAuth2 Server
1. Enable in Settings
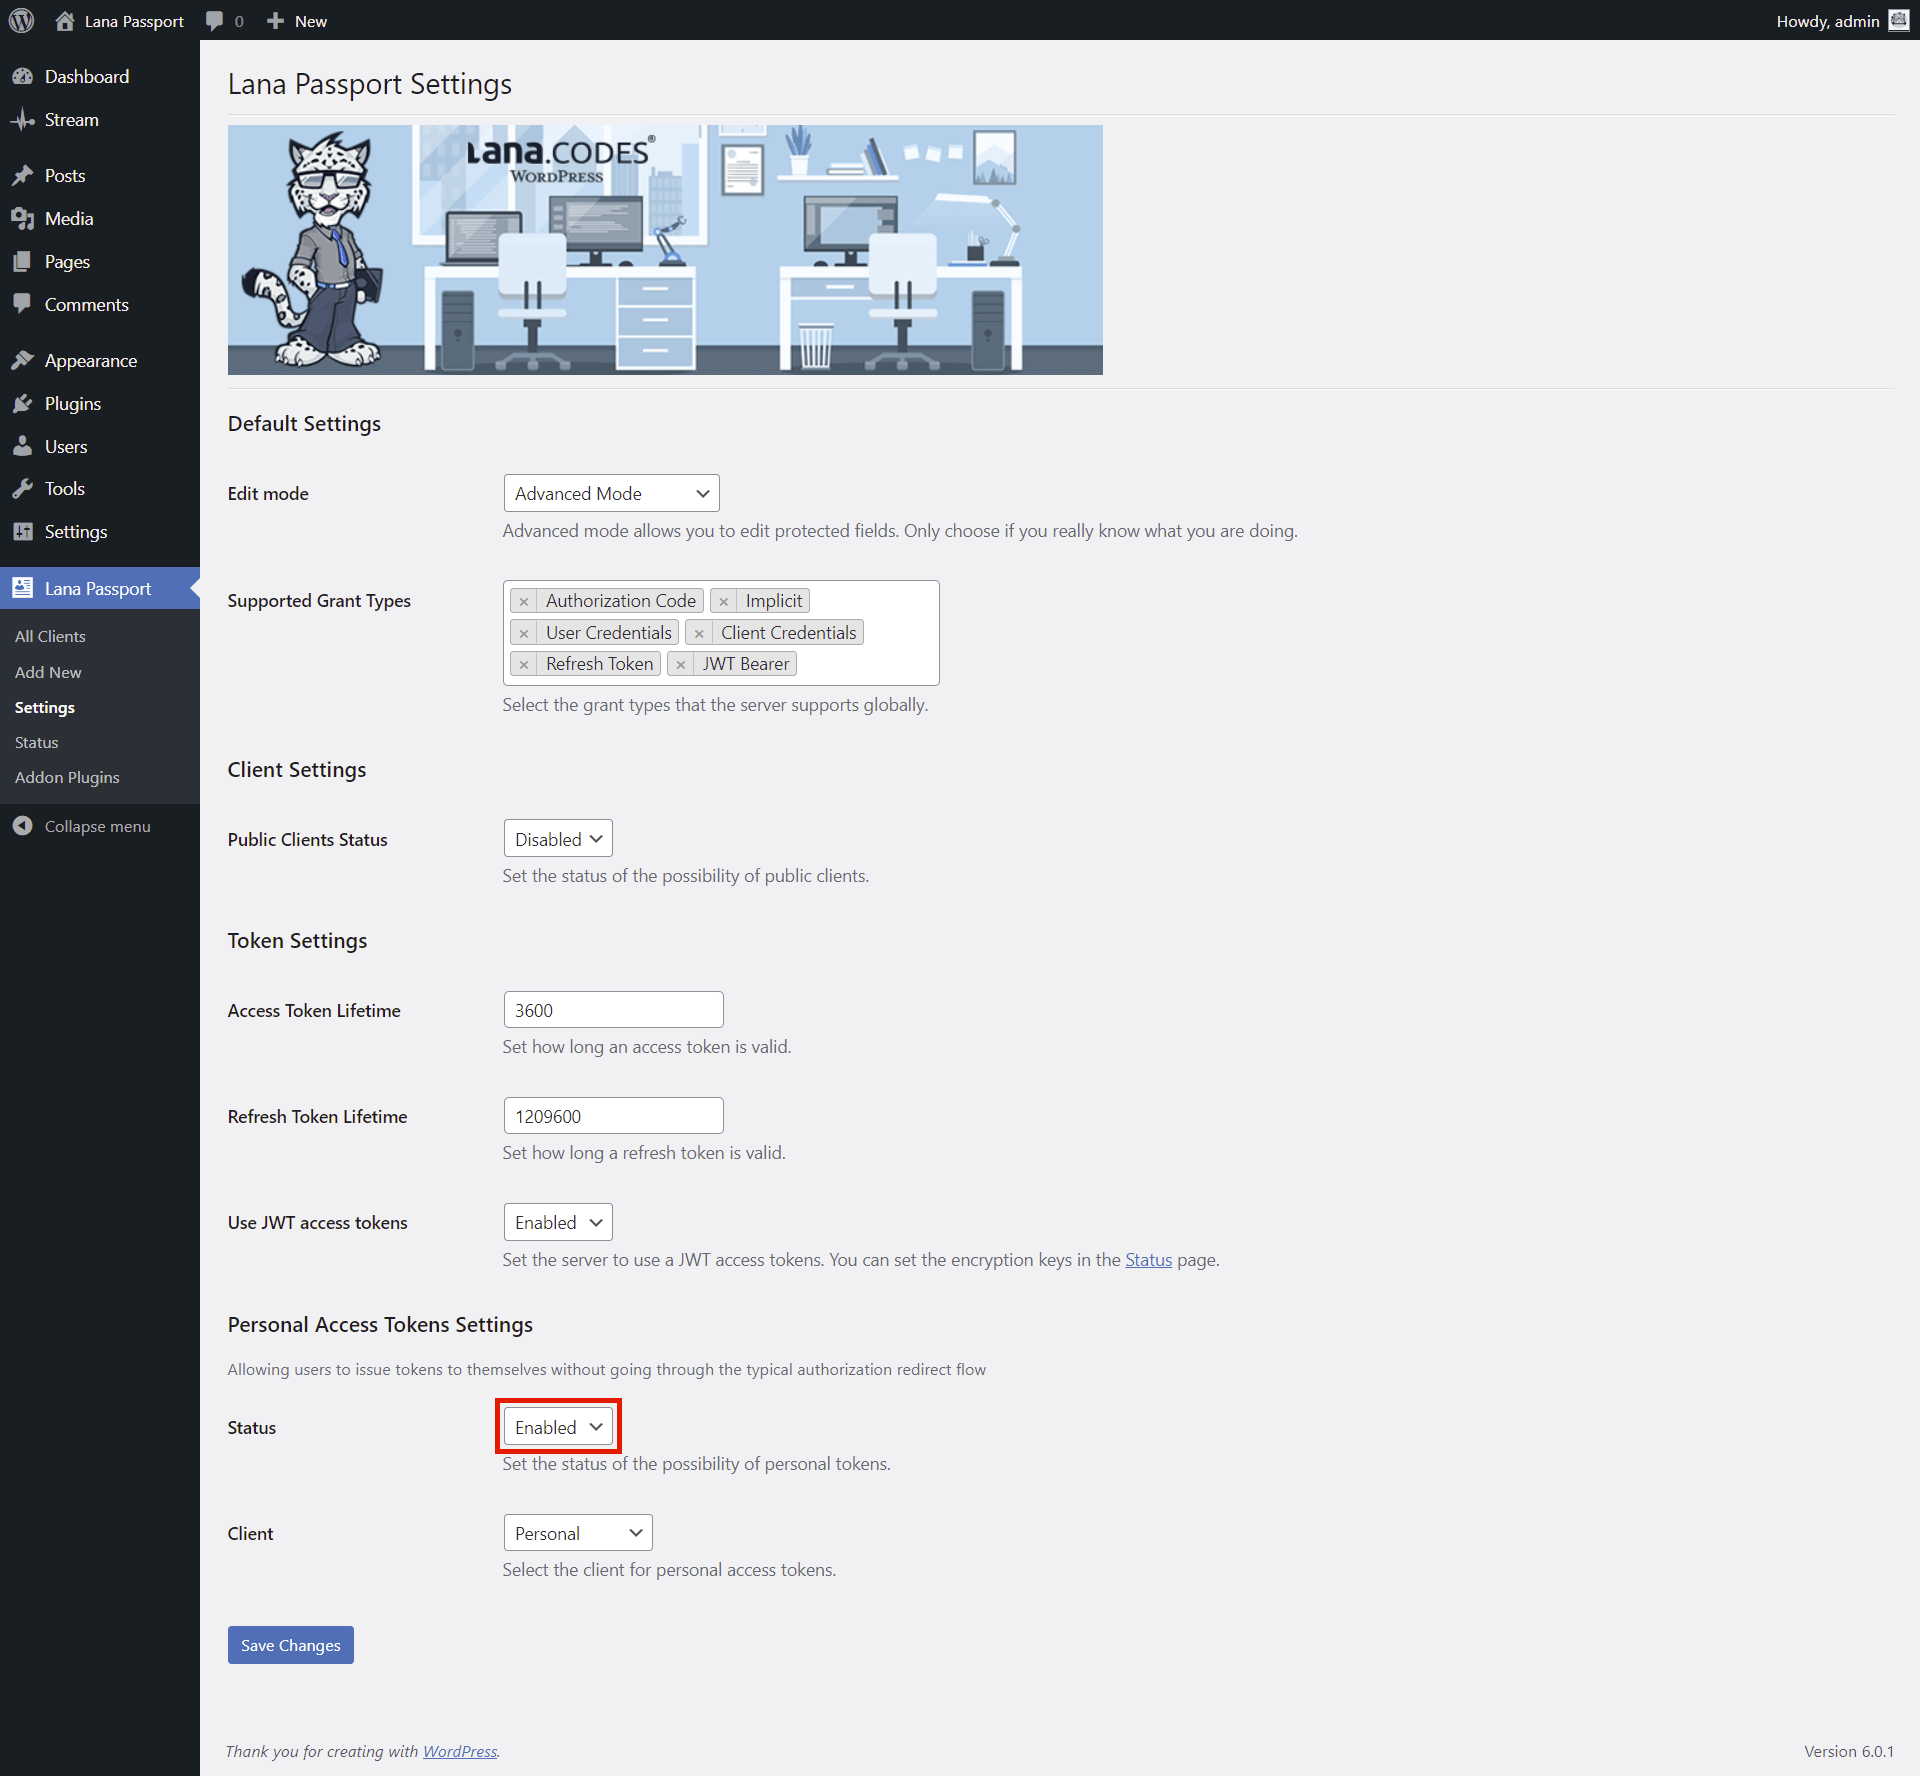
First you have to enable it in the Settings.
1. Select "Enabled" for Status in Personal Access Tokens Settings section.
2. Click on the "Save Changes" button.
2. Set Client Type to Personal
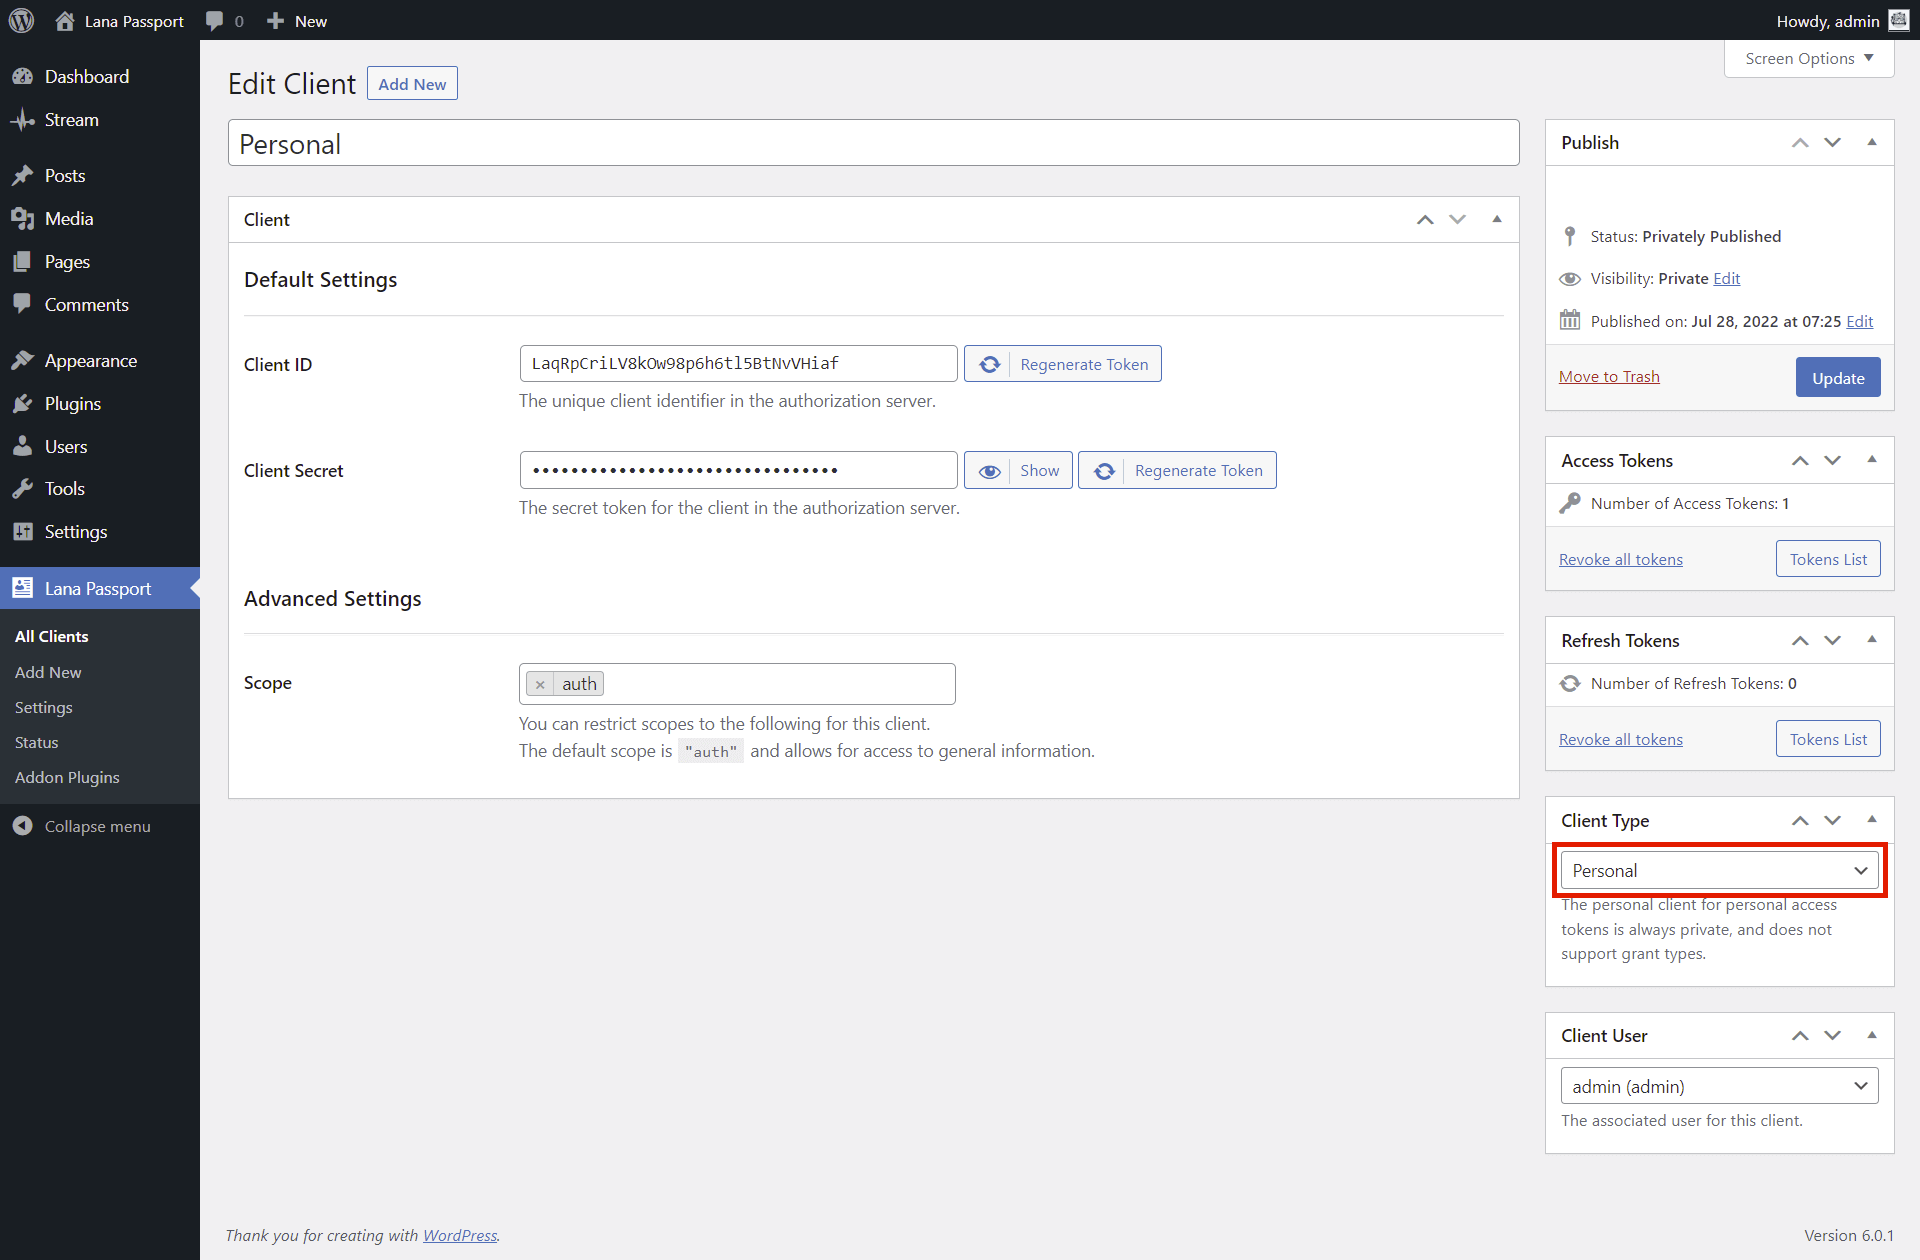
You have to set the client type to personal in "Client Edit" page.
Any client can be configured to handle personal access tokens, but note that this is a special type that has limited functionality specifically for personal access tokens.
Only one client needs to be set to personal, because the OAuth server can handle only one, and only one can be set in the settings.
3. Select Client in Settings

You have to select client for Personal Access Tokens it in the Settings.
If there is no client, you must first add one to the OAuth Server.
Note: Only Personal type clients are listed in the setting.
4. Manage Personal Access Tokens in Profile
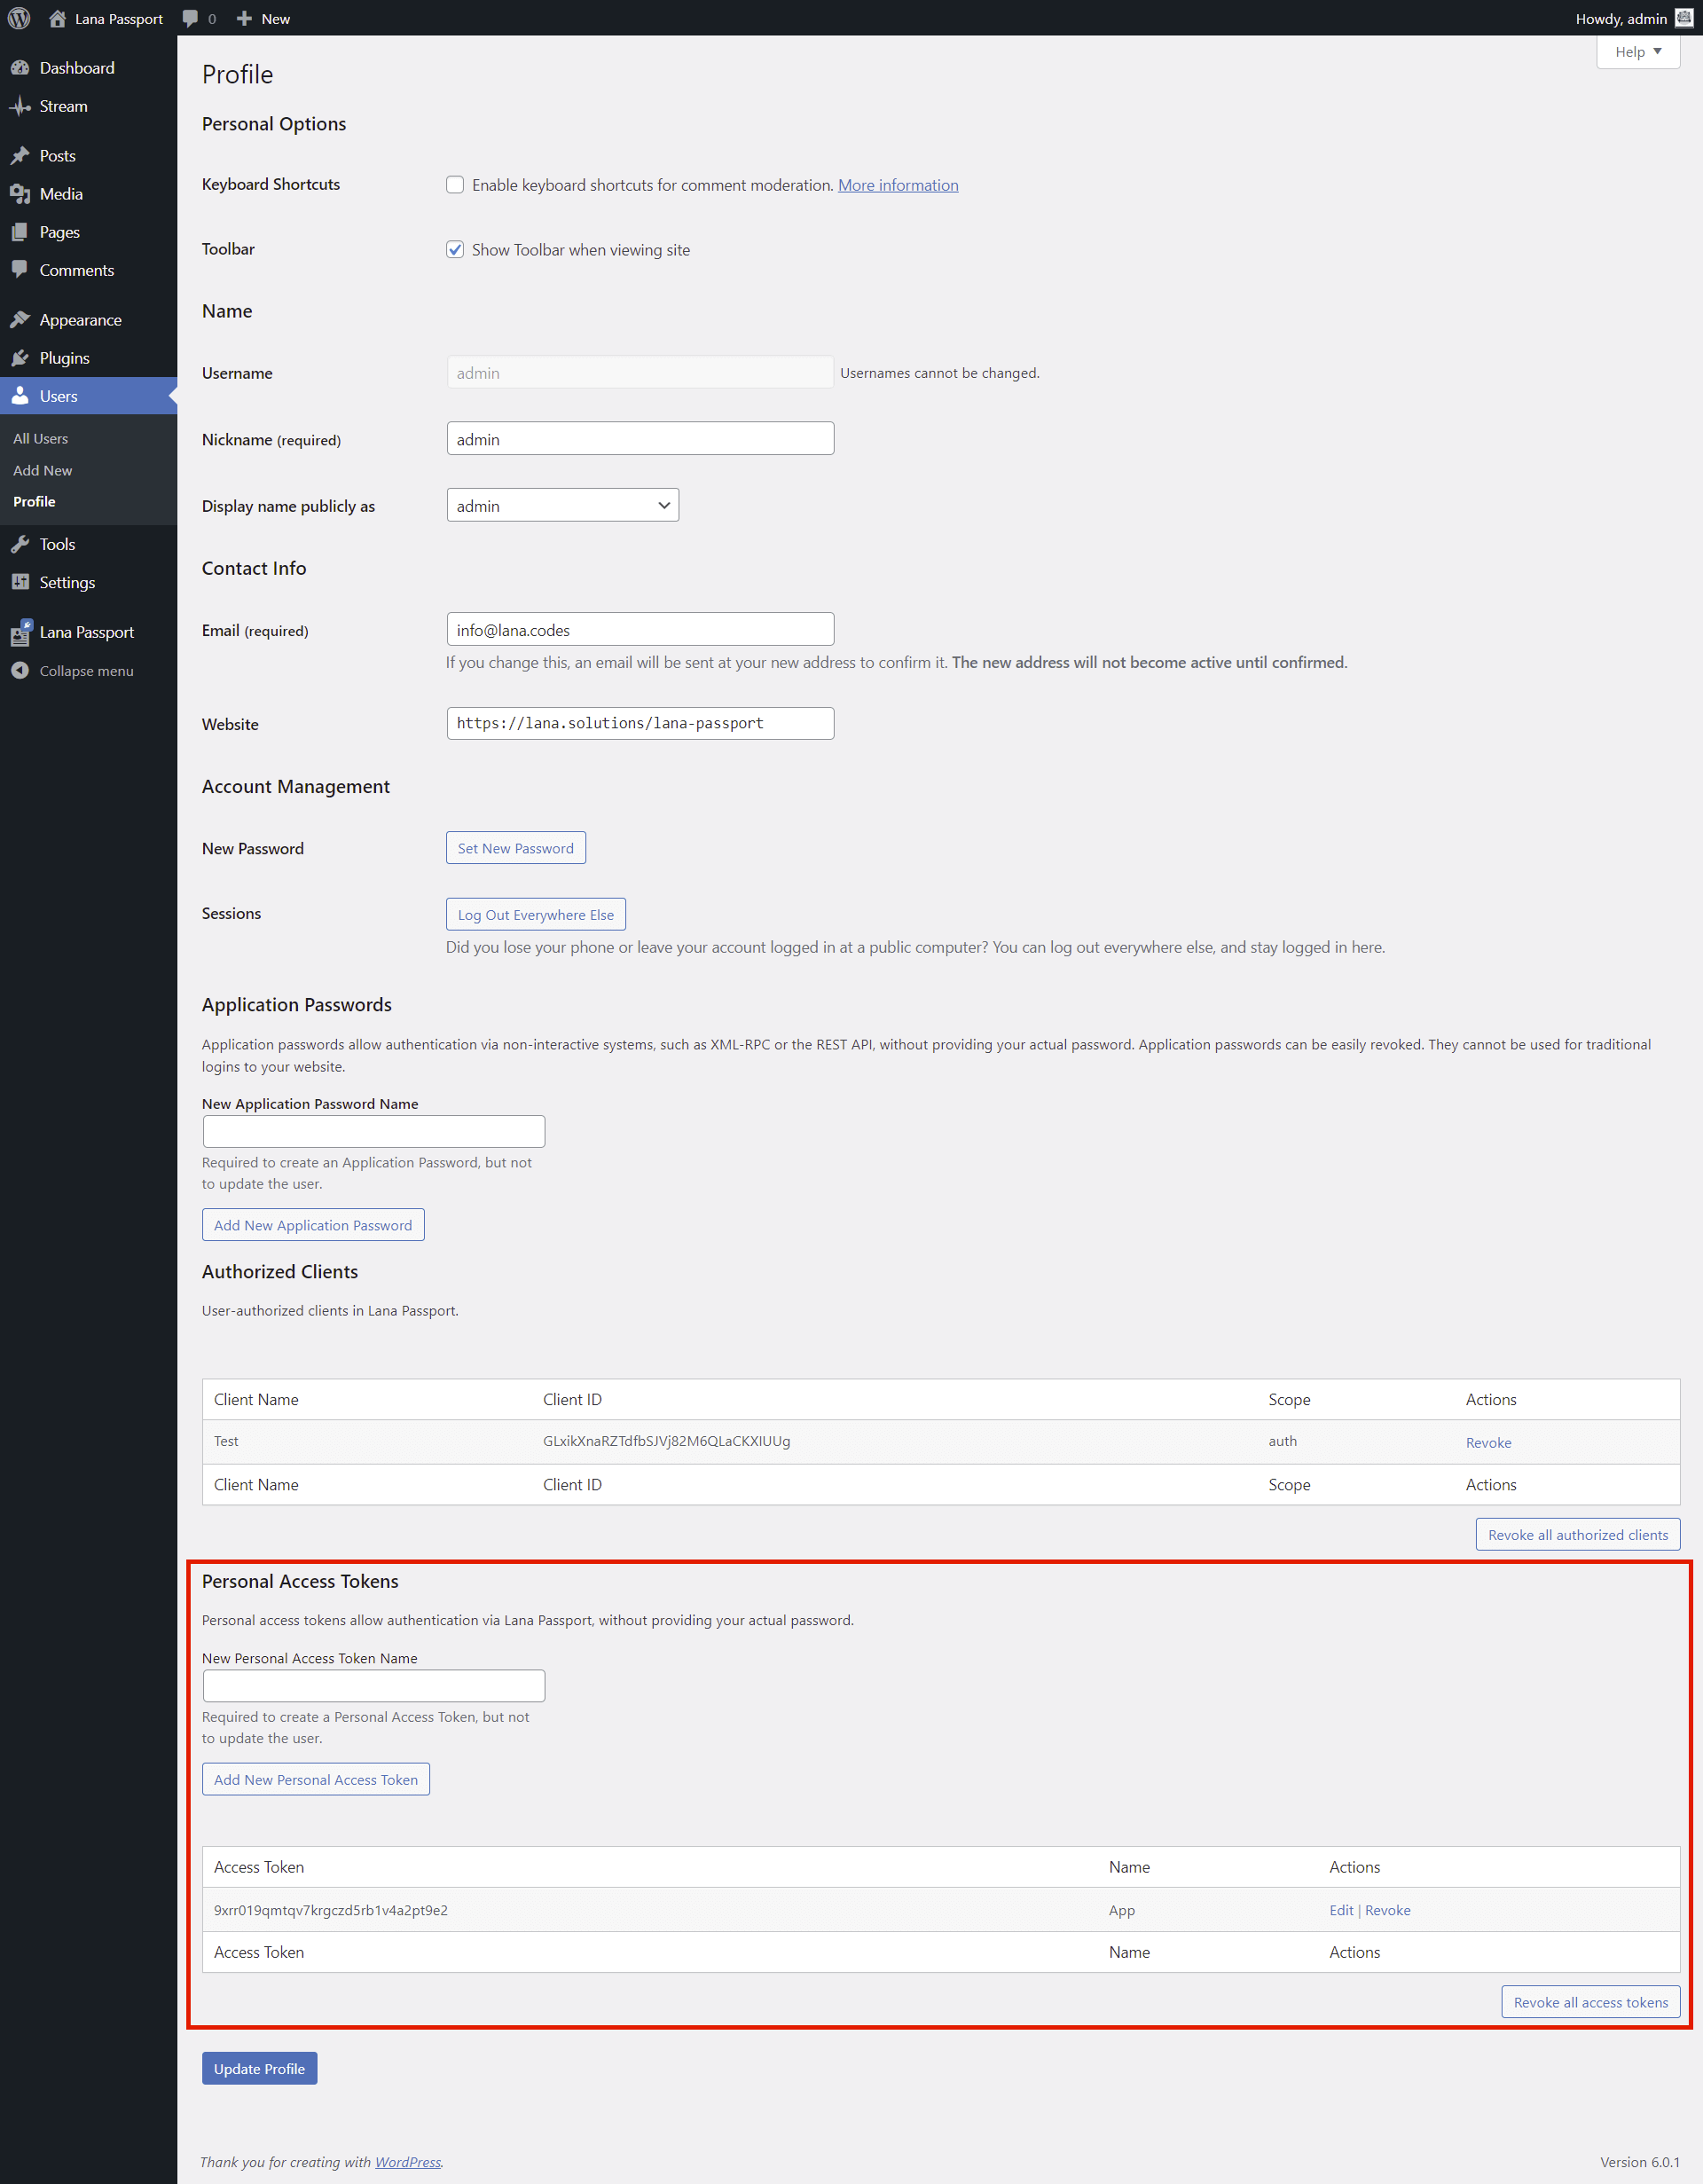
You can manage personal access tokens in the user profile.
To add a new token, we need to enter the name, and then the access token will be generated.
If the access token has been compromised, you have the option to revoke it.
Note: The client selected for Personal Access Tokens will have a special status. No grant type
is supported.
You can only access the client with manually added access tokens in WordPress admin.
Client Secret Hashing
This is how you can enable client secret hashing and store the client's secrets hashed in the database
1. Enable in Settings
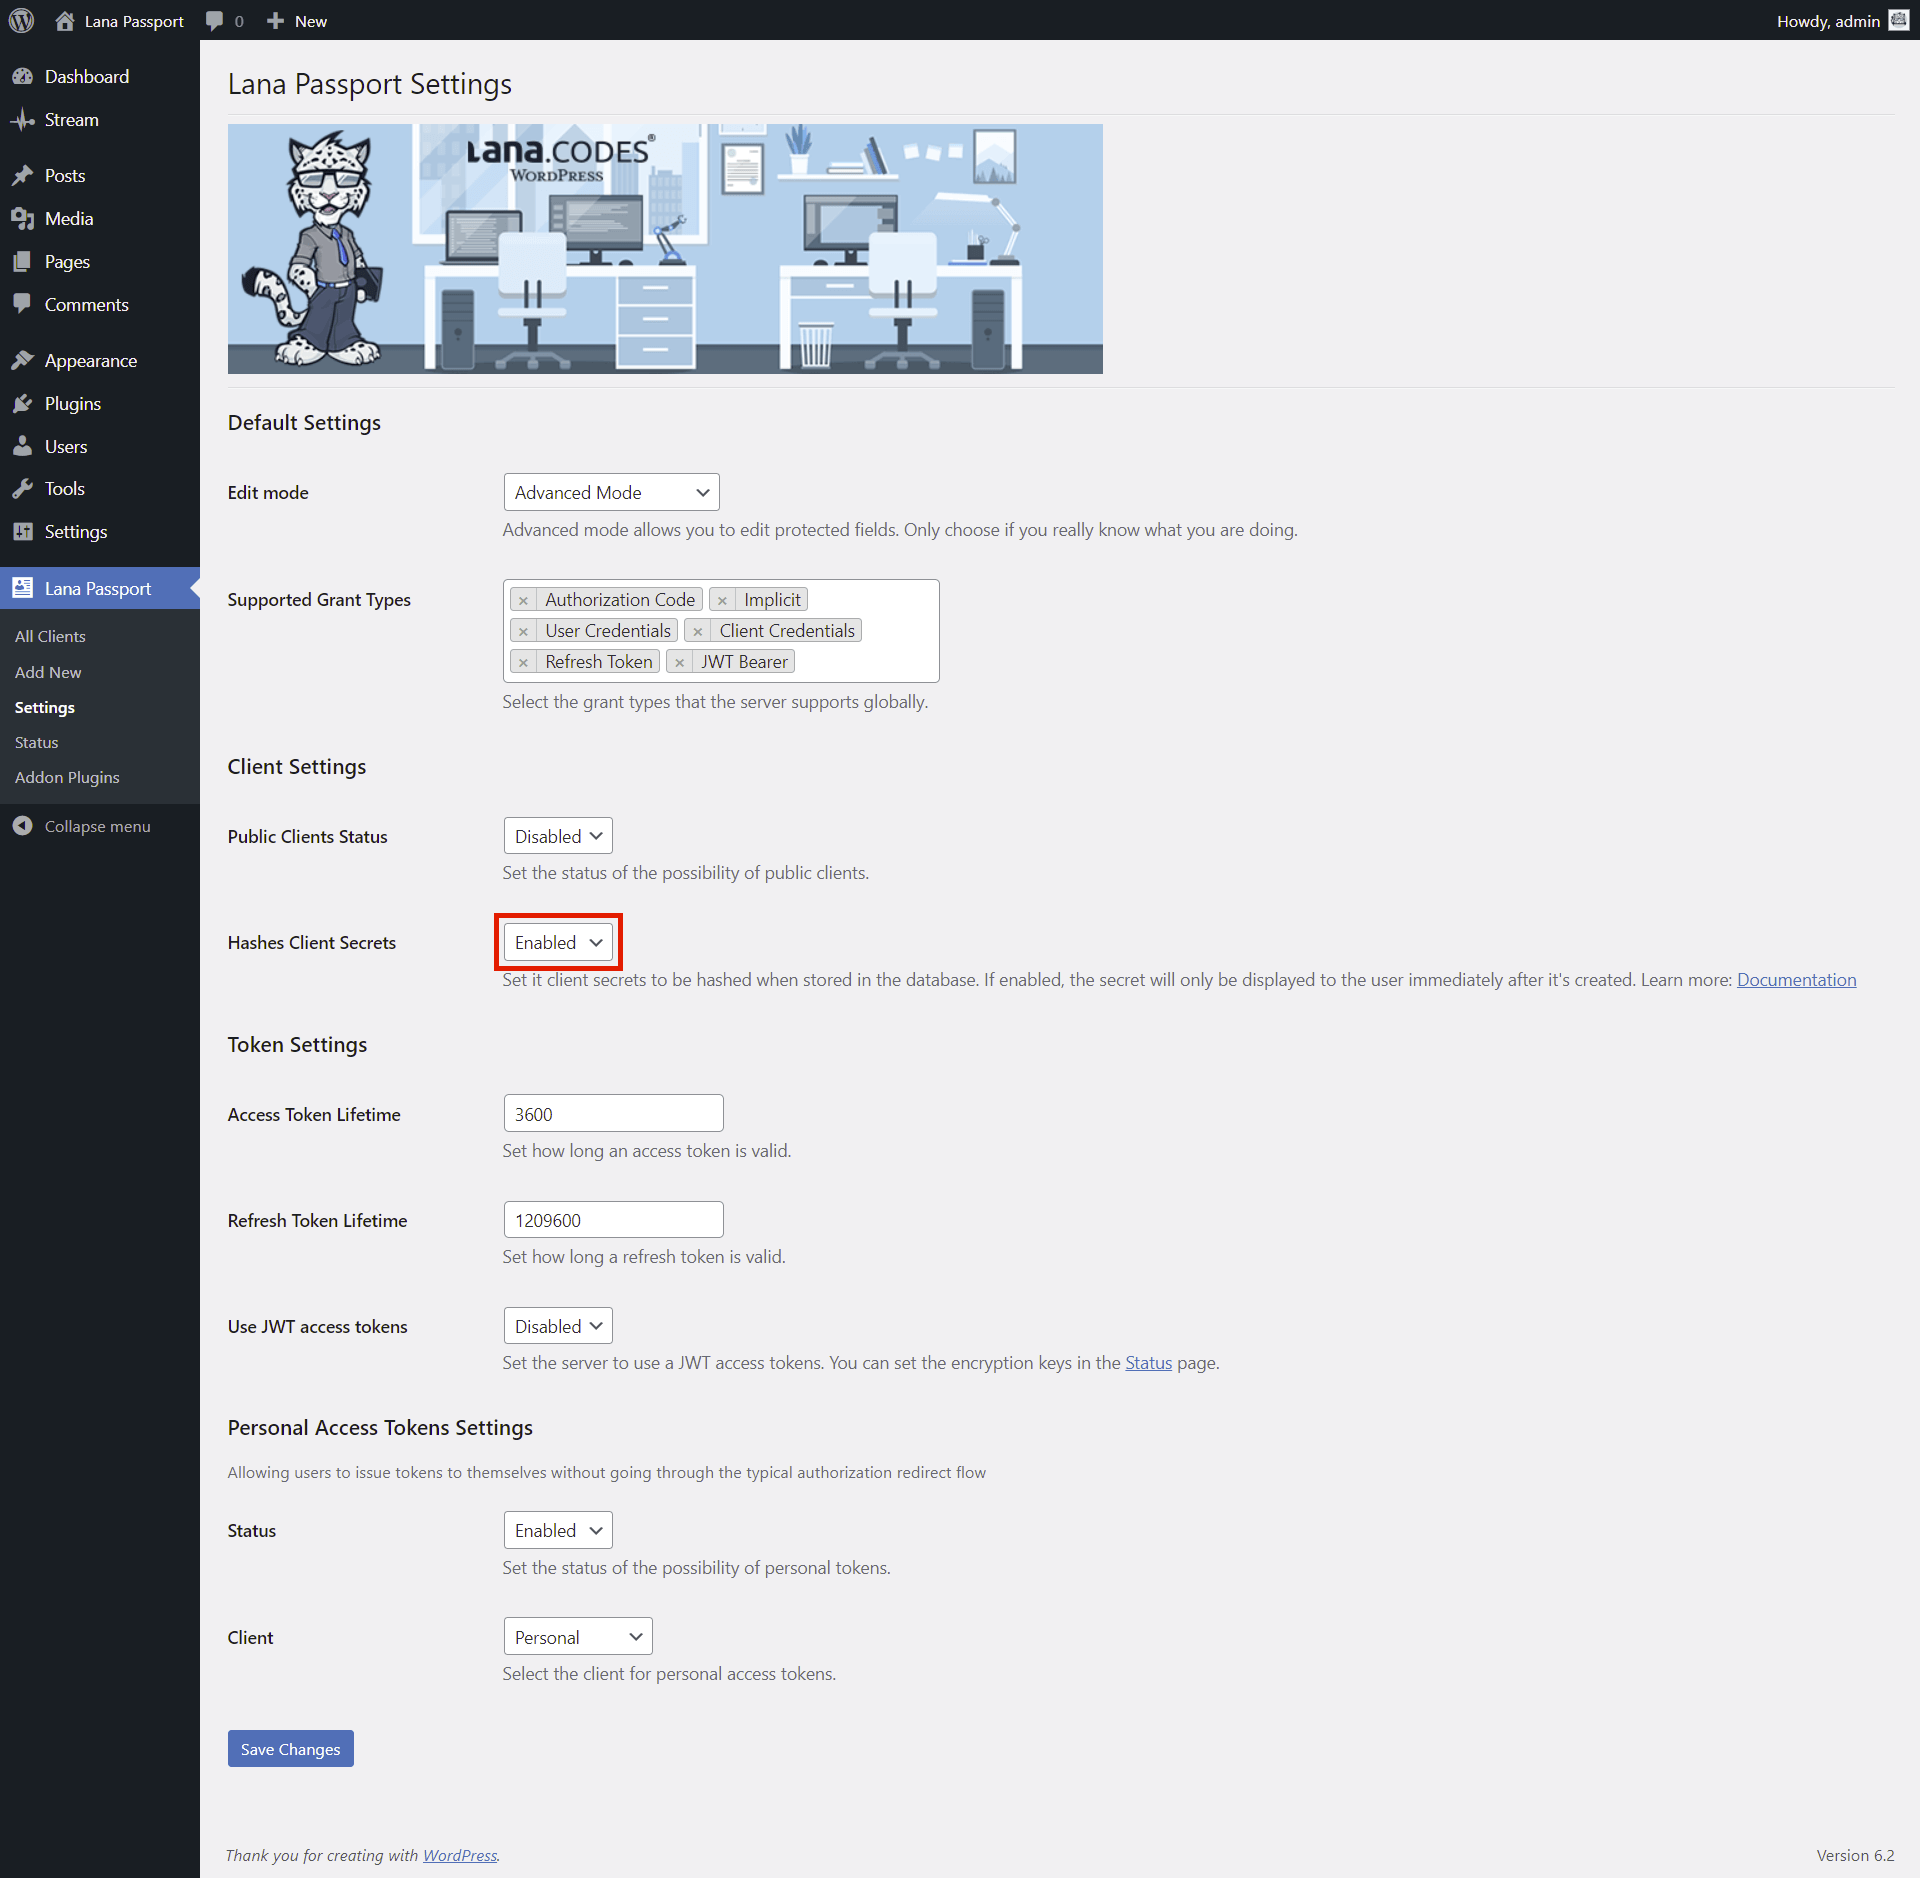
First you have to enable it in the Settings.
1. Select "Enabled" for Hashes Client Secrets in Client Settings section.
2. Click on the "Save Changes" button.
2. Hash the Client Secret
Client secret hashing has two different cases, when you add a new client and when you edit an existing client.
When you add a new client:

The client secret is immediately and automatically stored hashed in the database and will only be displayed to you after creation.
There is no need to perform any configuration when adding a client.
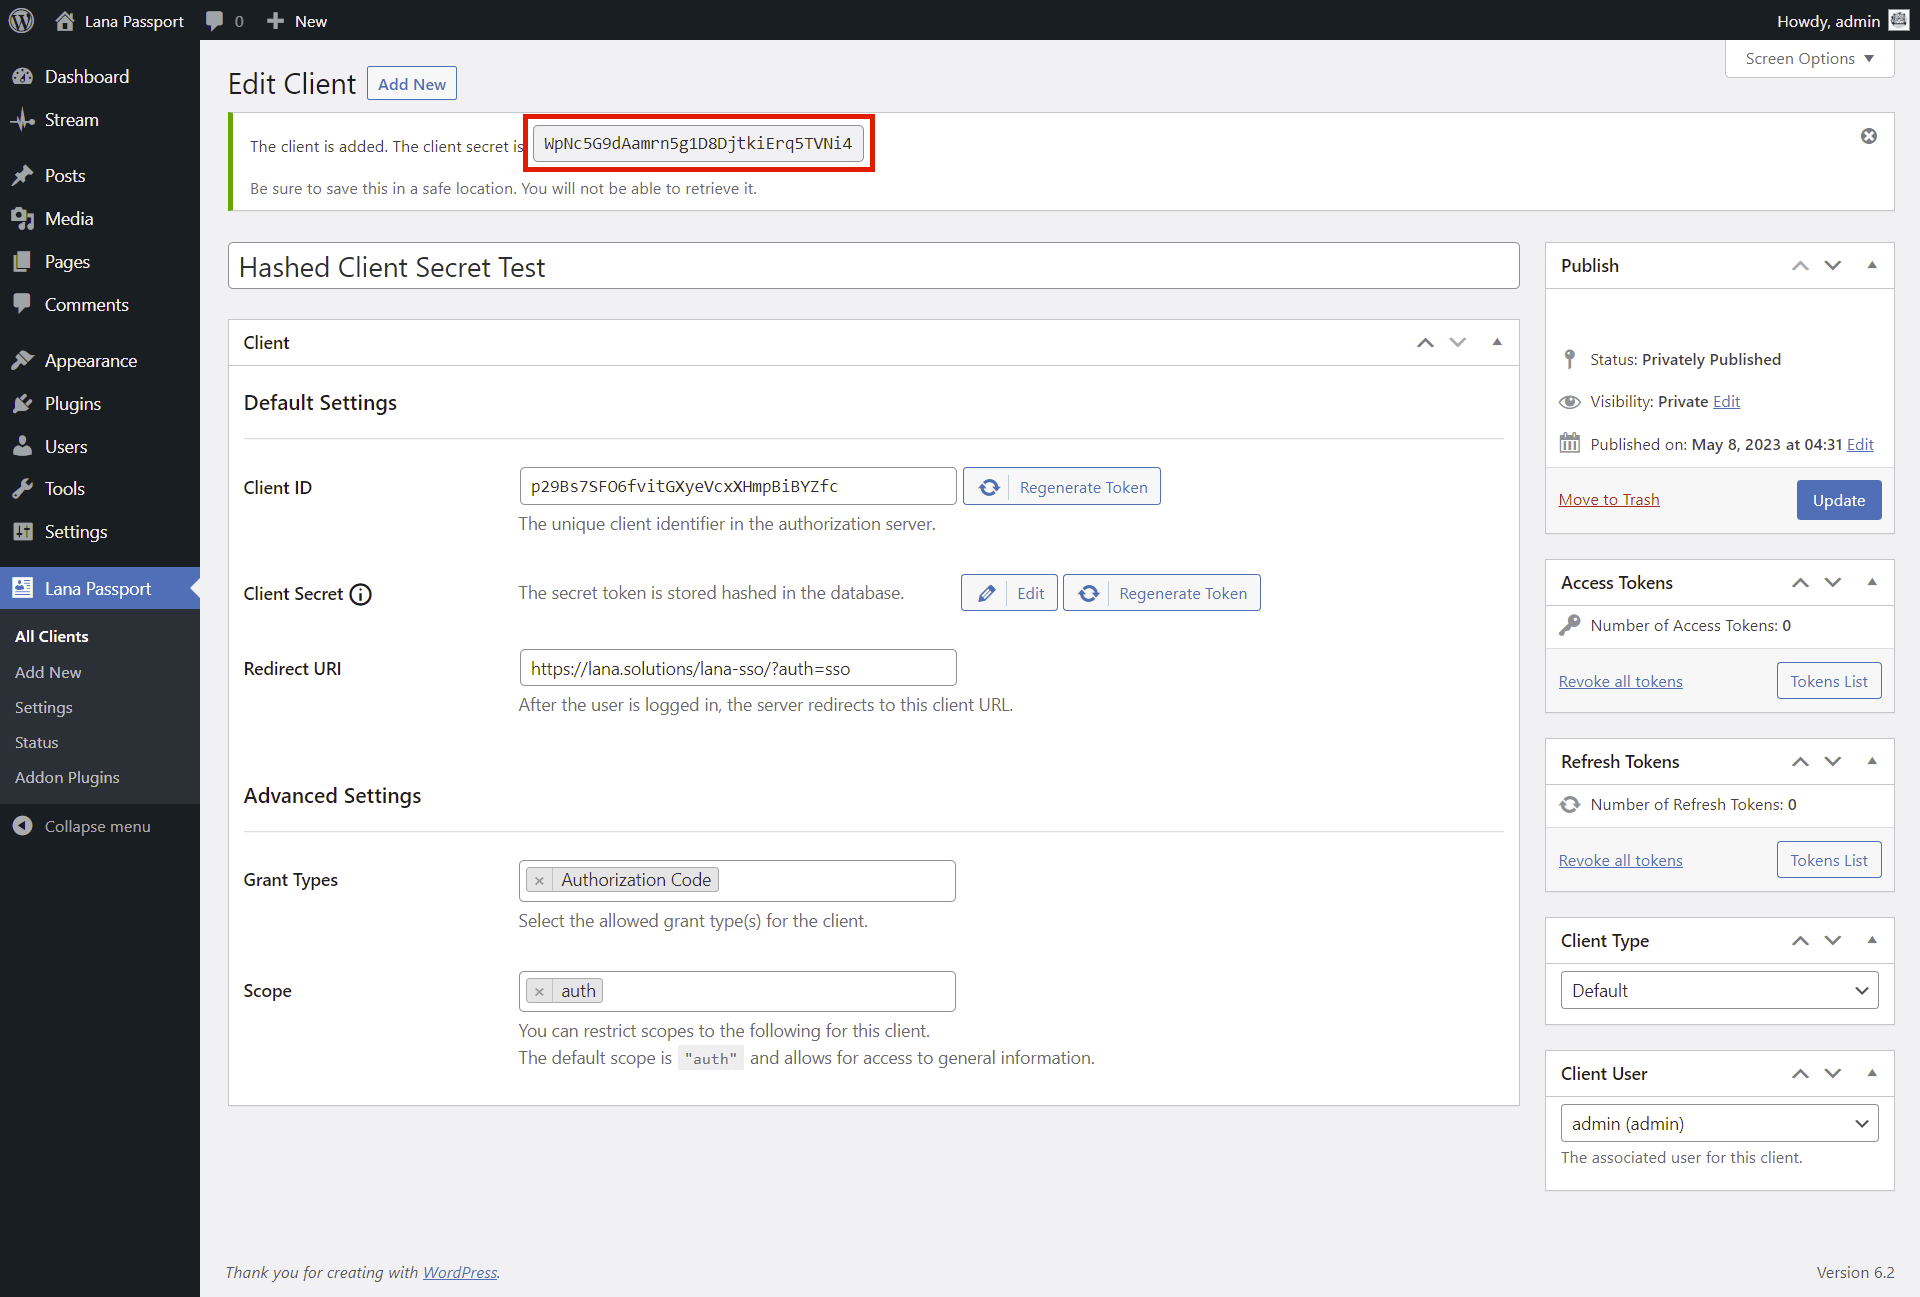
The hashed client secret displayed in the notice.
Be sure to save this in a safe location. You will not be able to retrieve it.
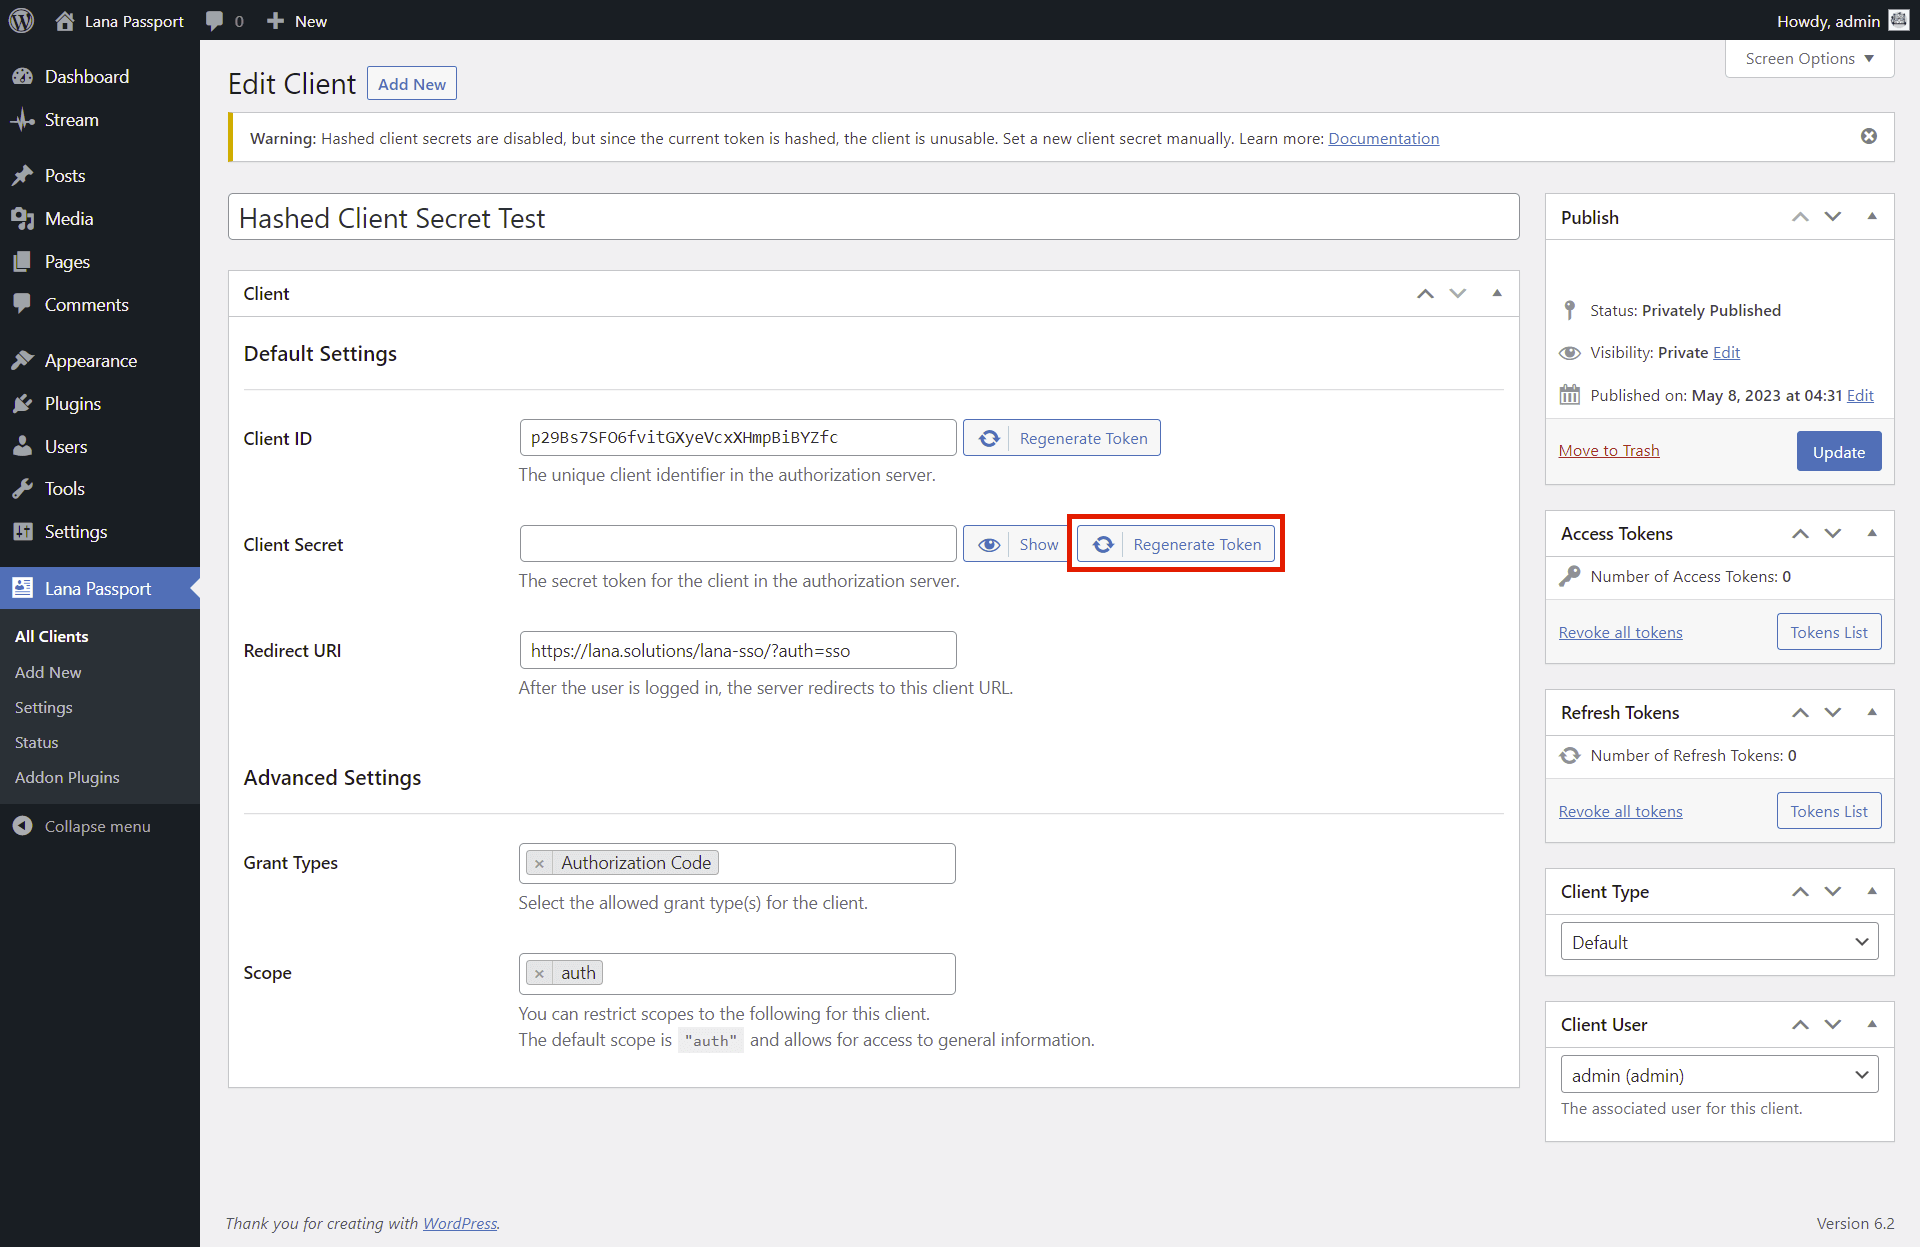
When edit an existing client:
A warning message will display that the client is unusable since the current token is not hashed. You have several options for hashing the client secret:
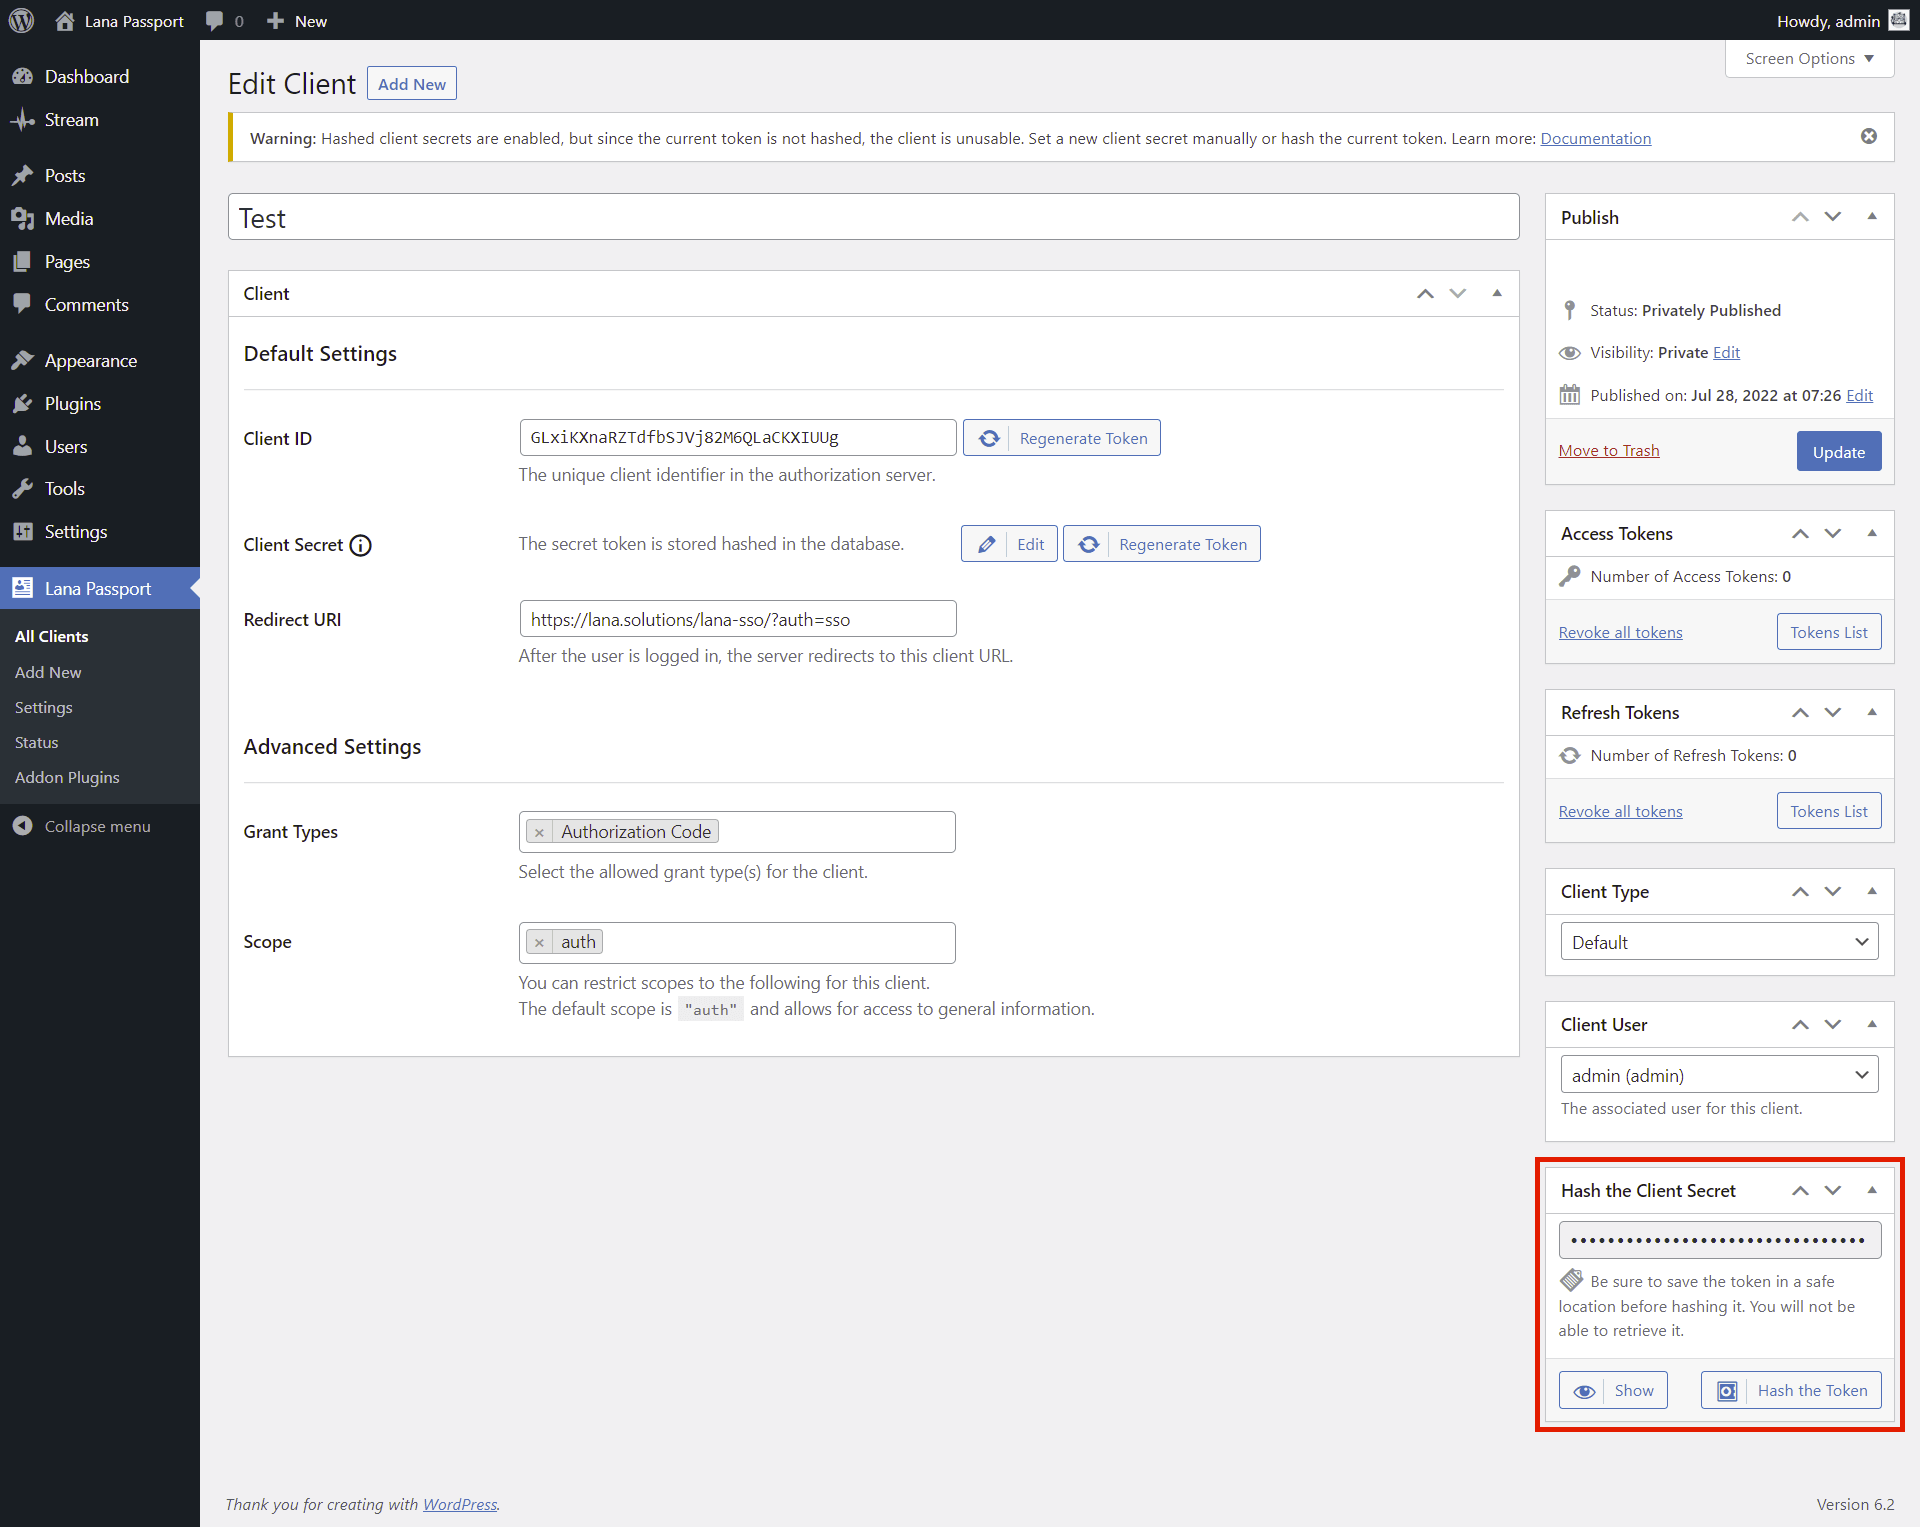
Hash the Client Secret
You can hash the previous token by clicking the "Hash the Token" button in the "Hash the Client Secret" section. You have the option to view the current token before hashing it.
This is the recommended solution.
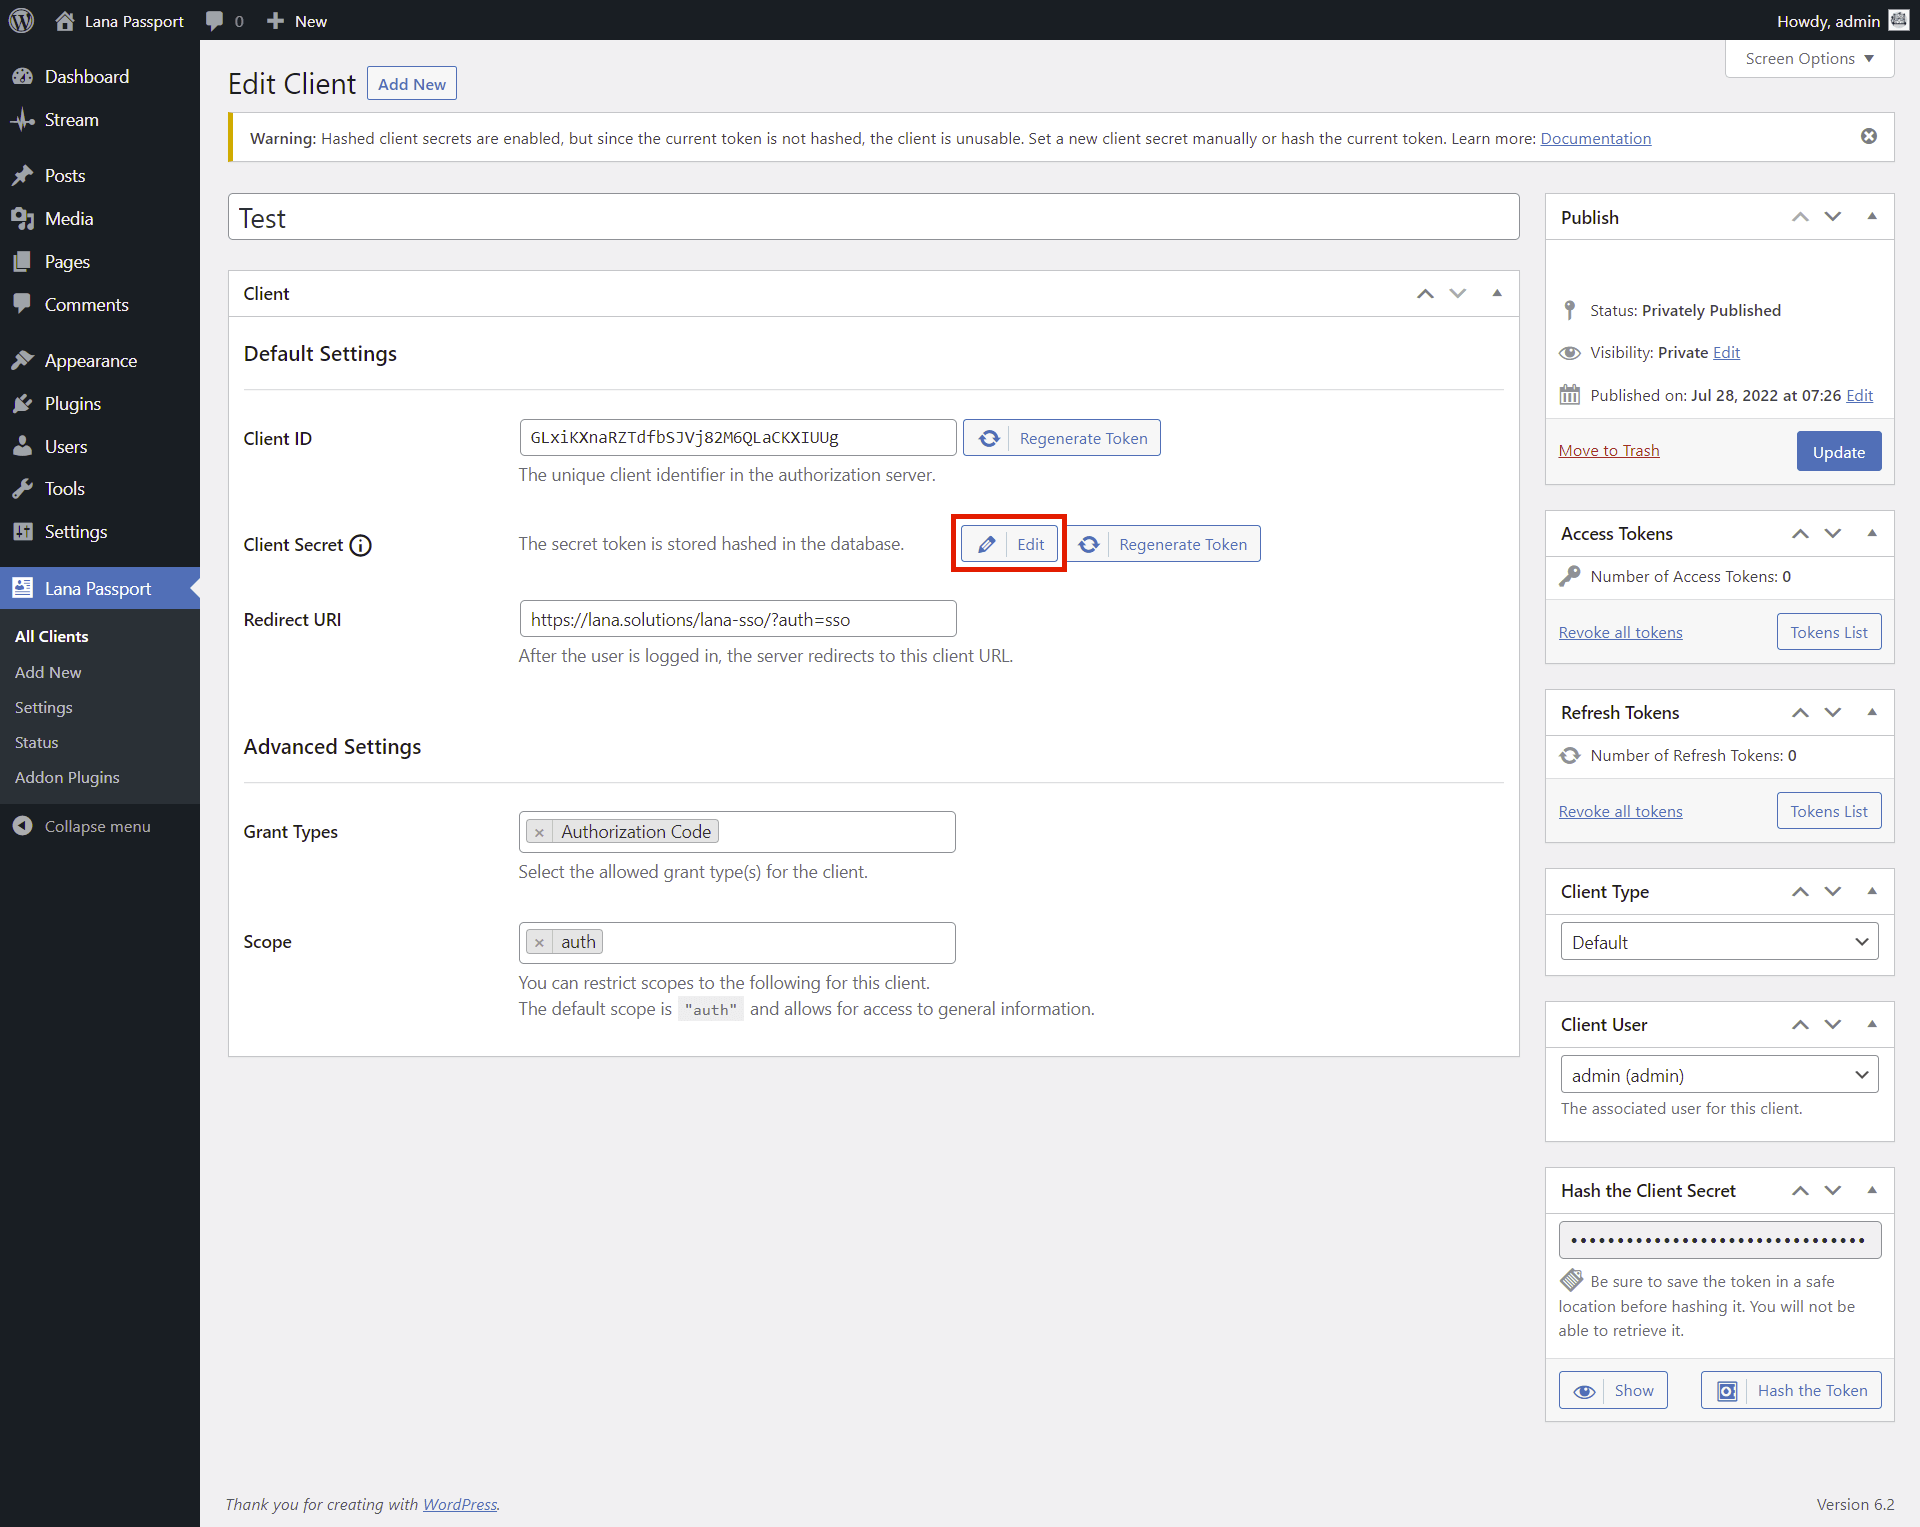
Edit Client Secret
You can edit the client secret and enter a new token, which is saved as a hash.
Click the Edit button.

The input field displayed, where you can enter the new client secret.
Note that in this case a new client secret is set, so the previous value cannot be used, if you have already used it elsewhere, you need to set it again.
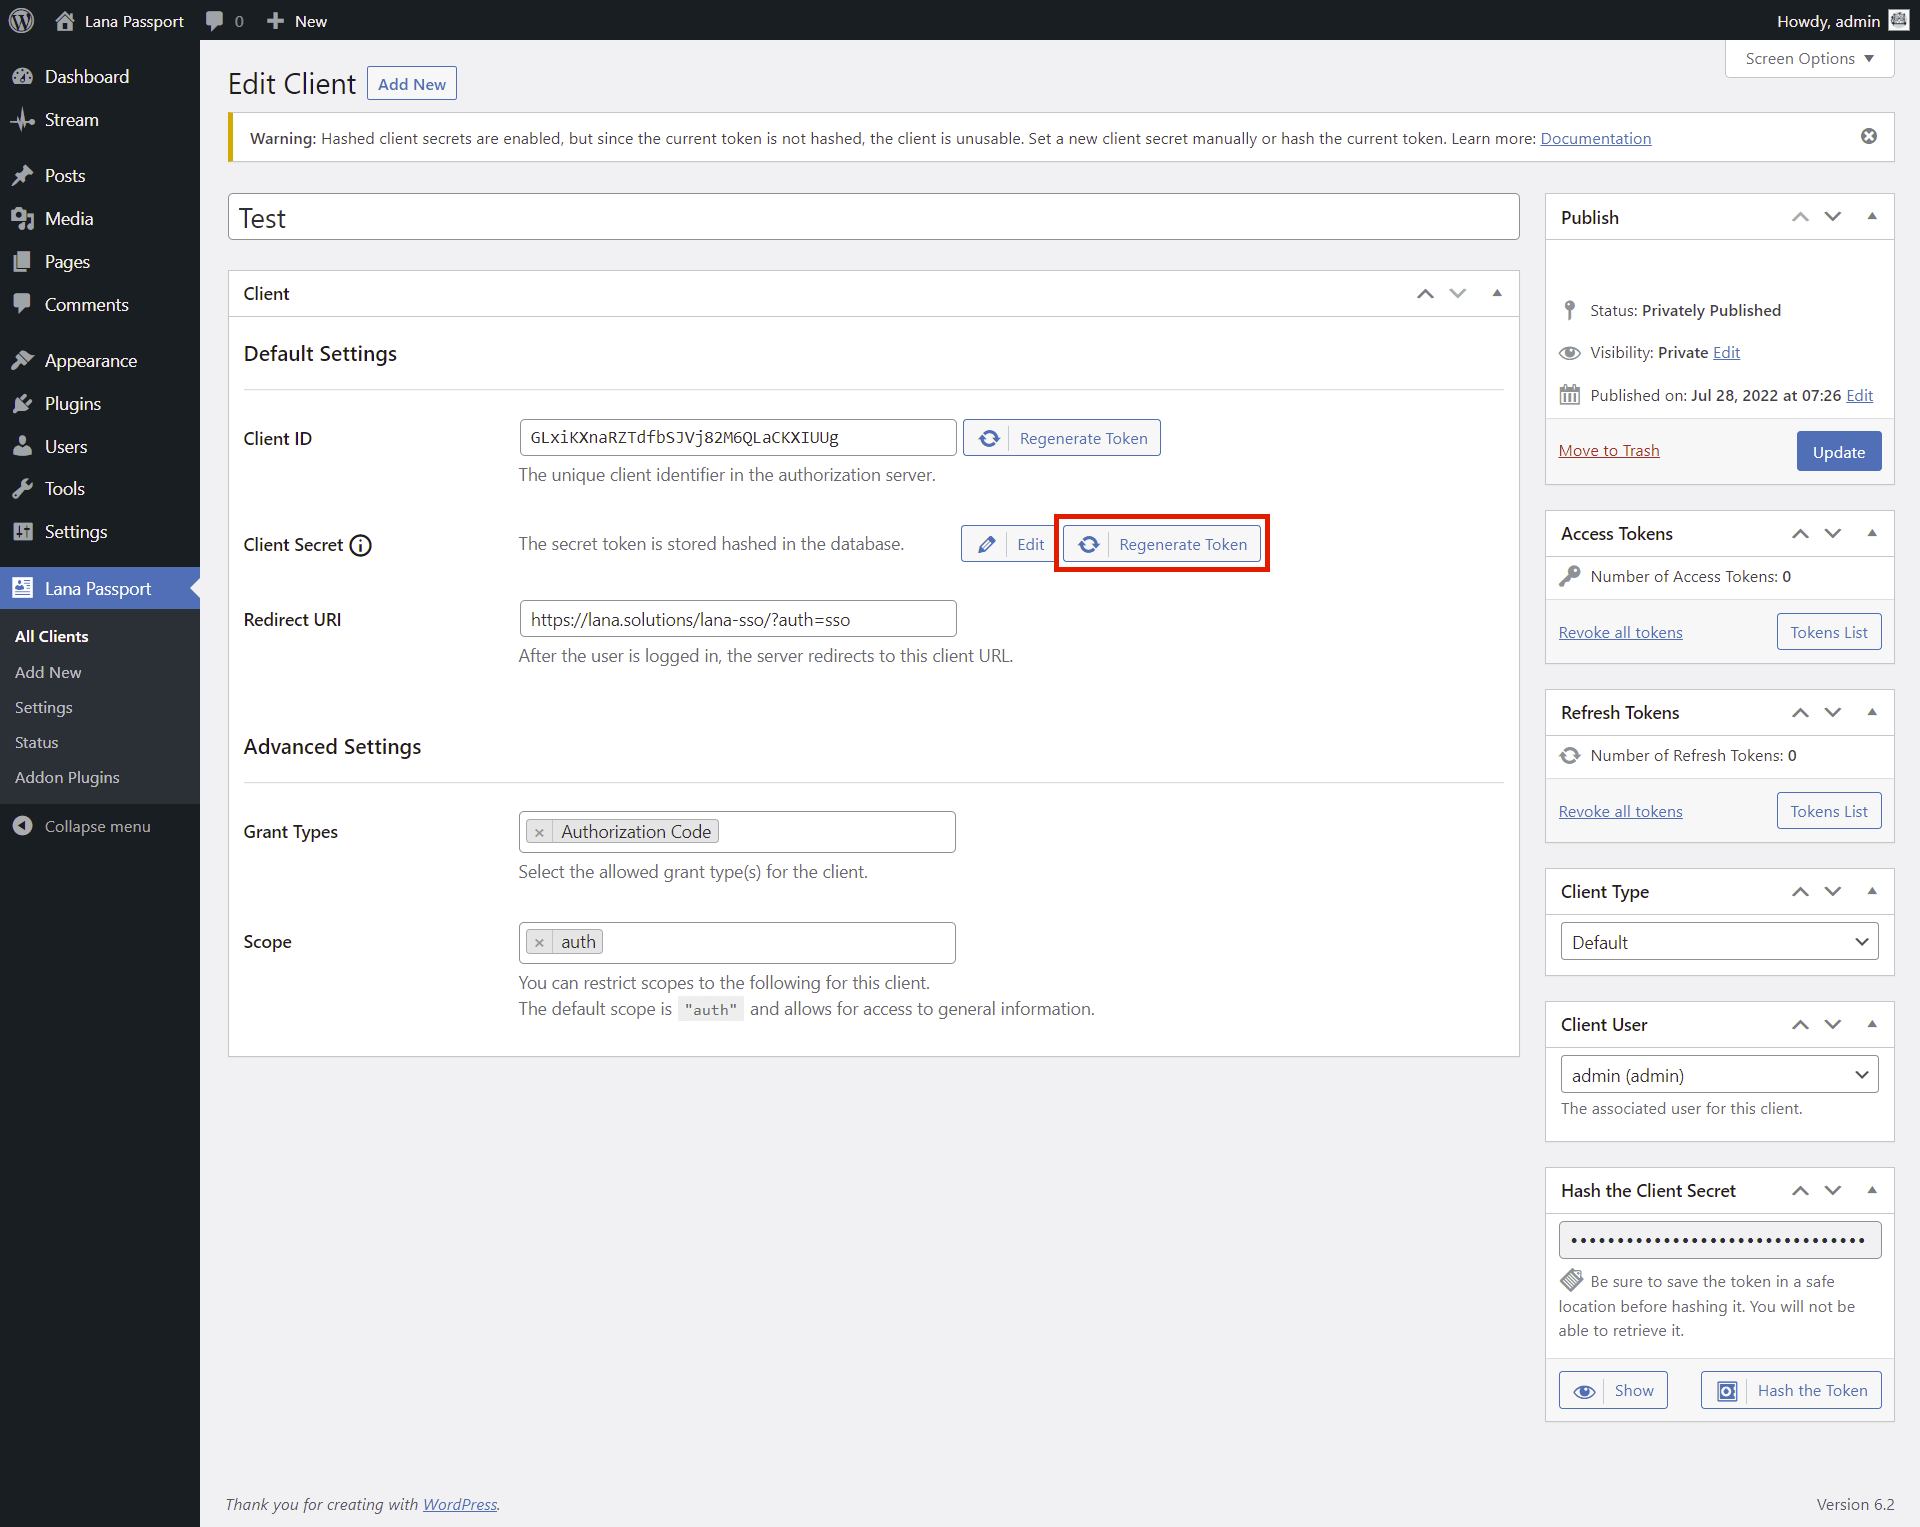
Regenerate Client Secret
You can generate a new token, which is saved as a hash.
Note that in this case a new client secret is set, so the previous value cannot be used, if you have already used it elsewhere, you need to set it again.
This is what you should do if you have disabled client secret hashing
Note that if you disable the hashed client secrets, the previously hashed clients will be unusable. In such cases, you will need to reconfigure the client secret for those clients.
Since hashed client secrets cannot be restored, in this case you have only two options:
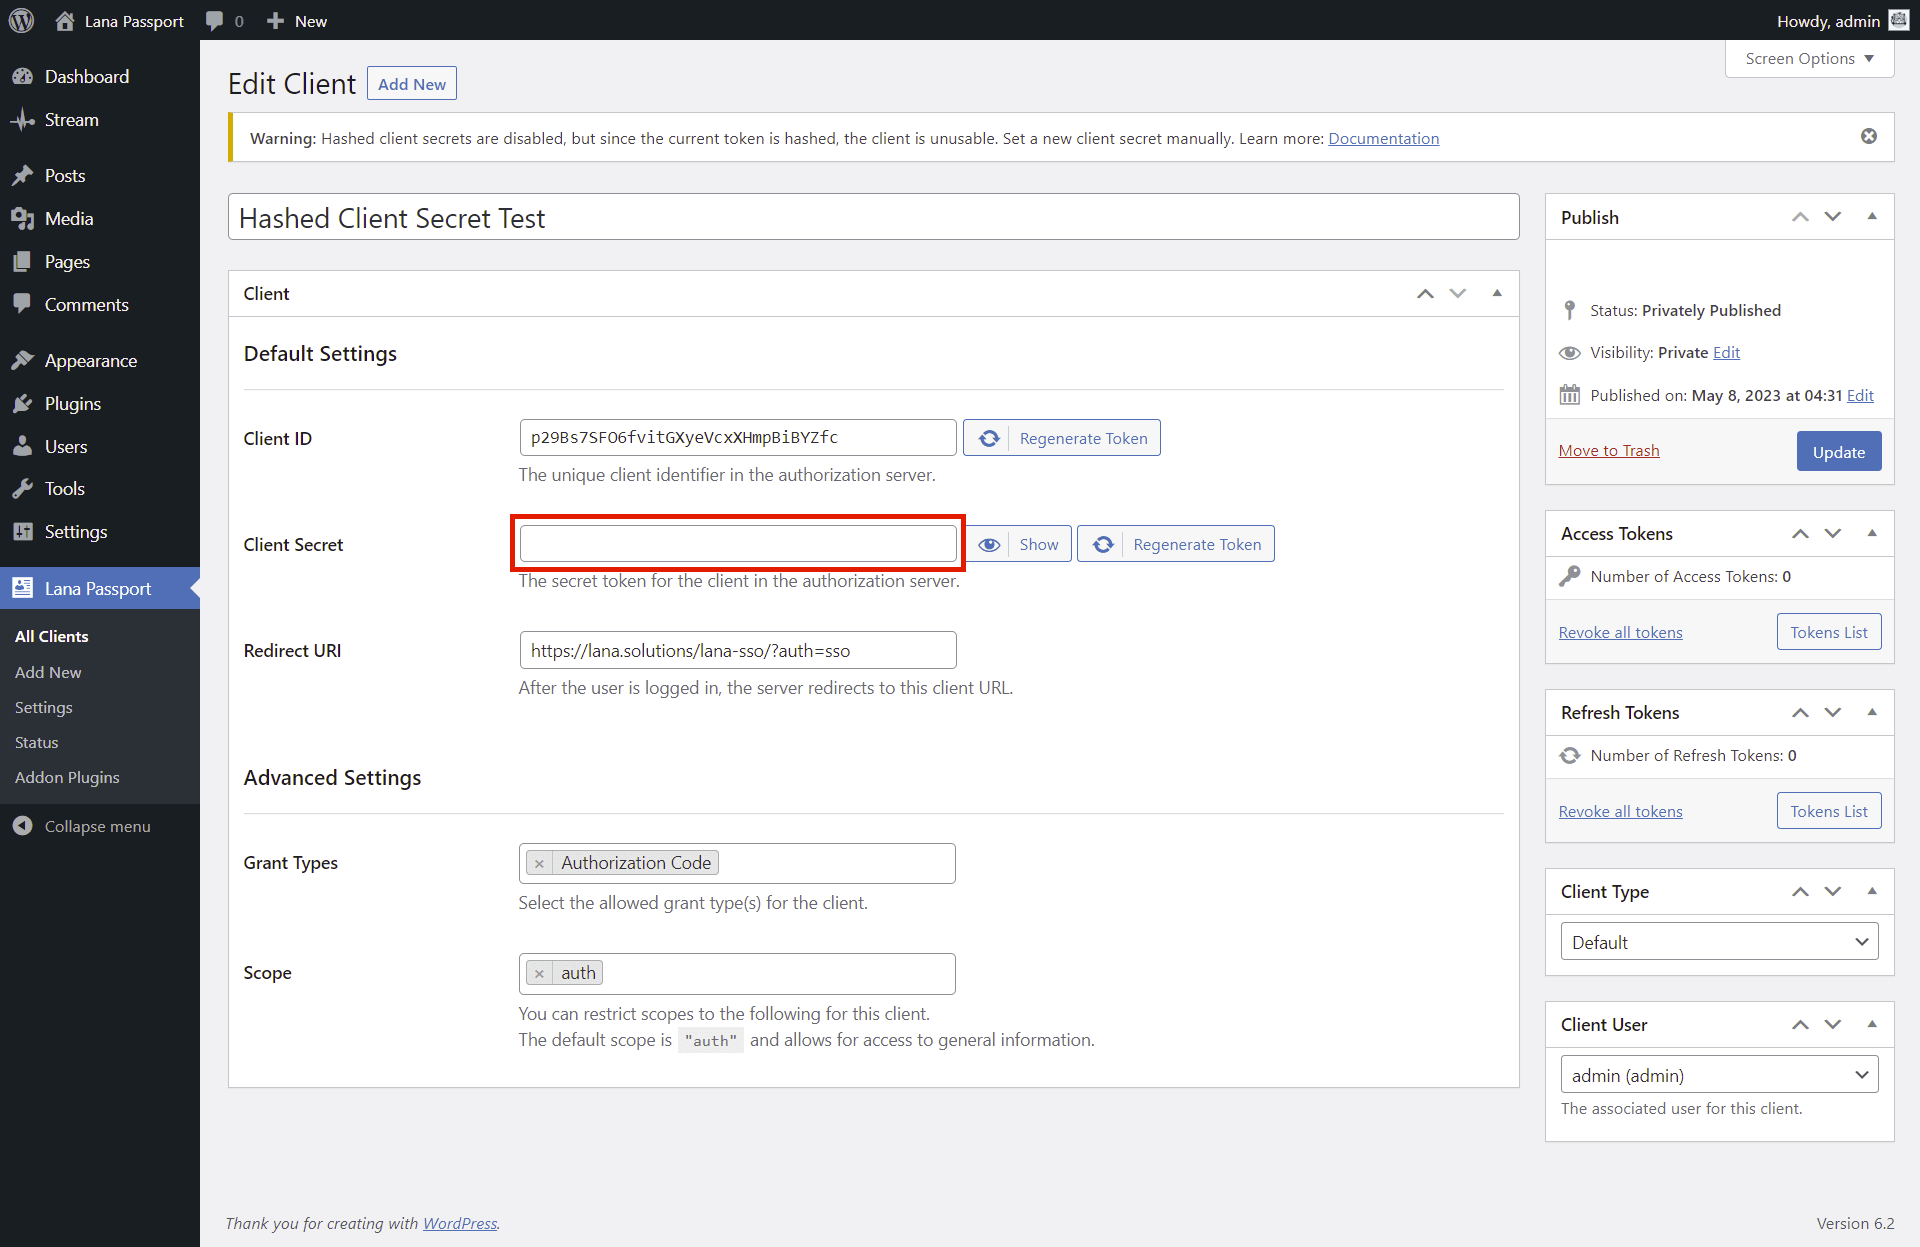
Edit Client Secret
You can edit the client secret and enter a new token.
Regenerate Client Secret
You can generate a new token.
How to configure Server and Client
This is how you can configure an OAuth server using the "Lana Passport" WordPress plugin and an OAuth client using the "Lana Single Sign On" WordPress plugin.
For this you will need two different WordPress websites:
OAuth Server with Lana Passport plugin
In the example in the documentation, the OAuth Server WordPress website URL:
https://lana.solutions/lana-passport/
This website provides the authentication server.
OAuth Client with Lana Single Sign On plugin
In the example in the documentation, the OAuth Client WordPress website URL:
https://lana.solutions/lana-sso/
This website will connect to the other website using OAuth and use Single Sign On.
Note: At the bottom right of the screenshots, it is marked from which website.
The settings step by step:
1. Copy the endpoints from the OAuth Server
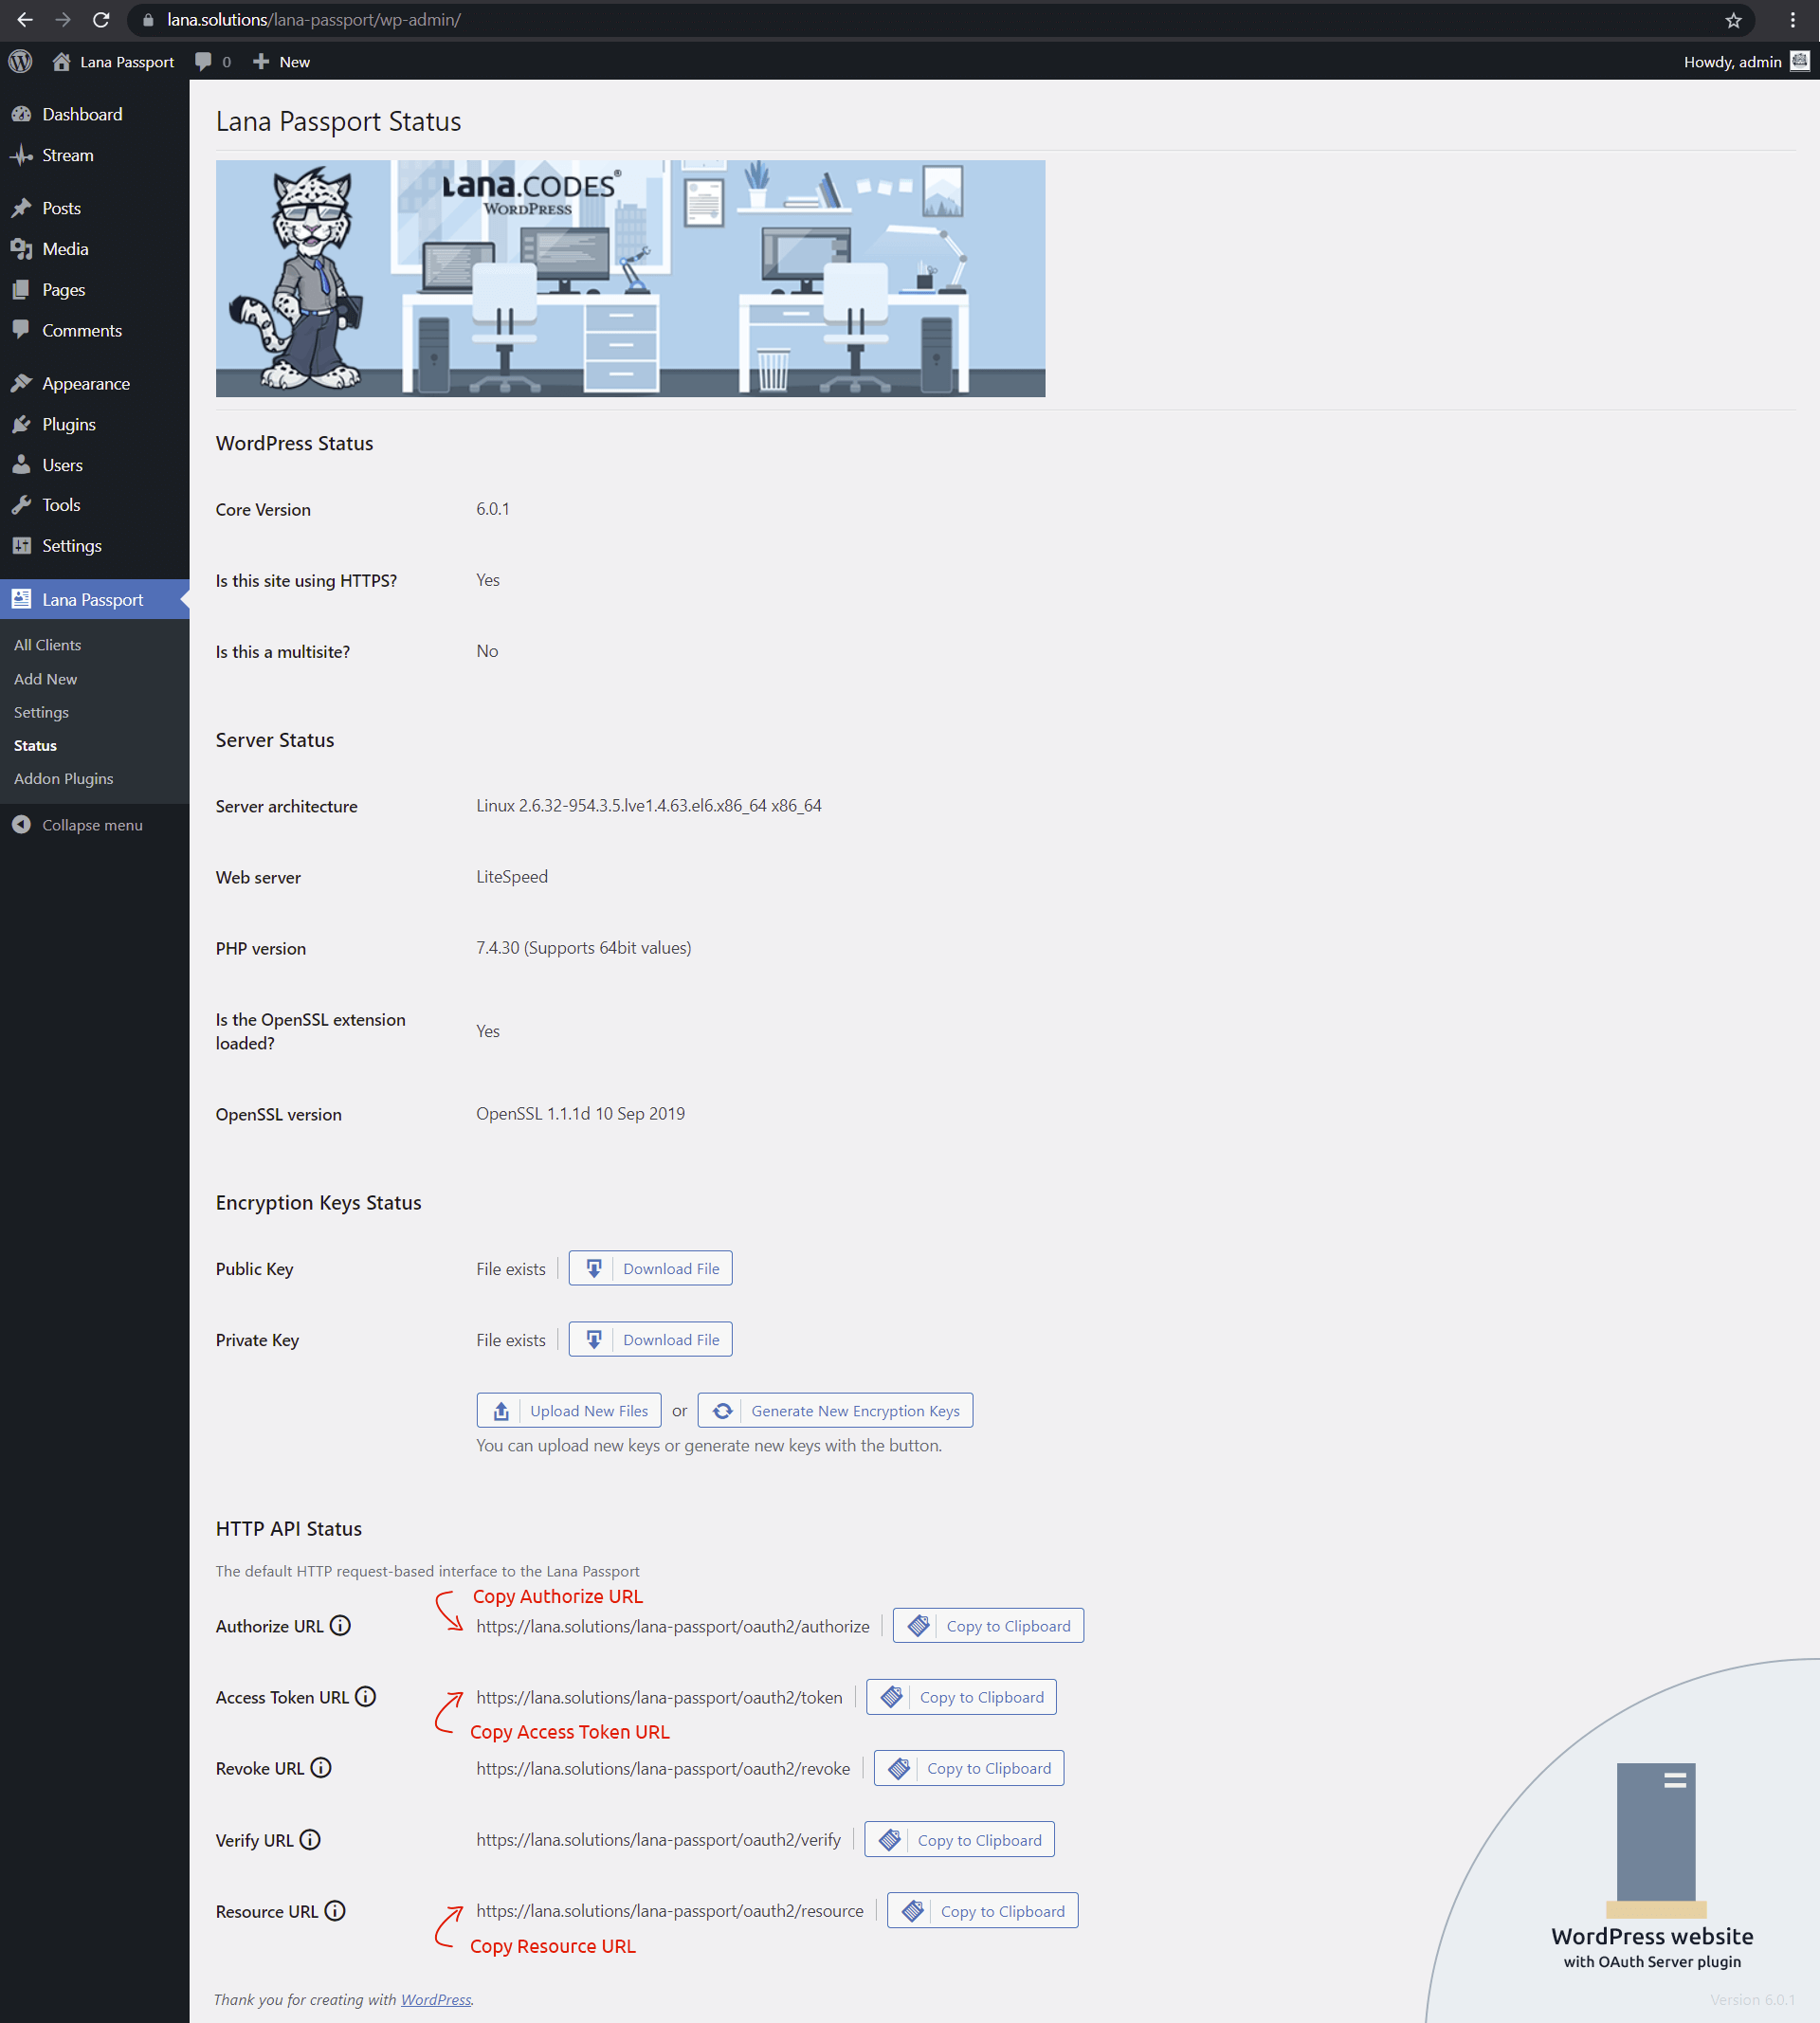
You need to copy three URLs from the "Lana Passport" Status page:
- Authorize URL
- Access Token URL
- Resource URL
These are required in the client settings.
2. Set the endpoints in the OAuth Client
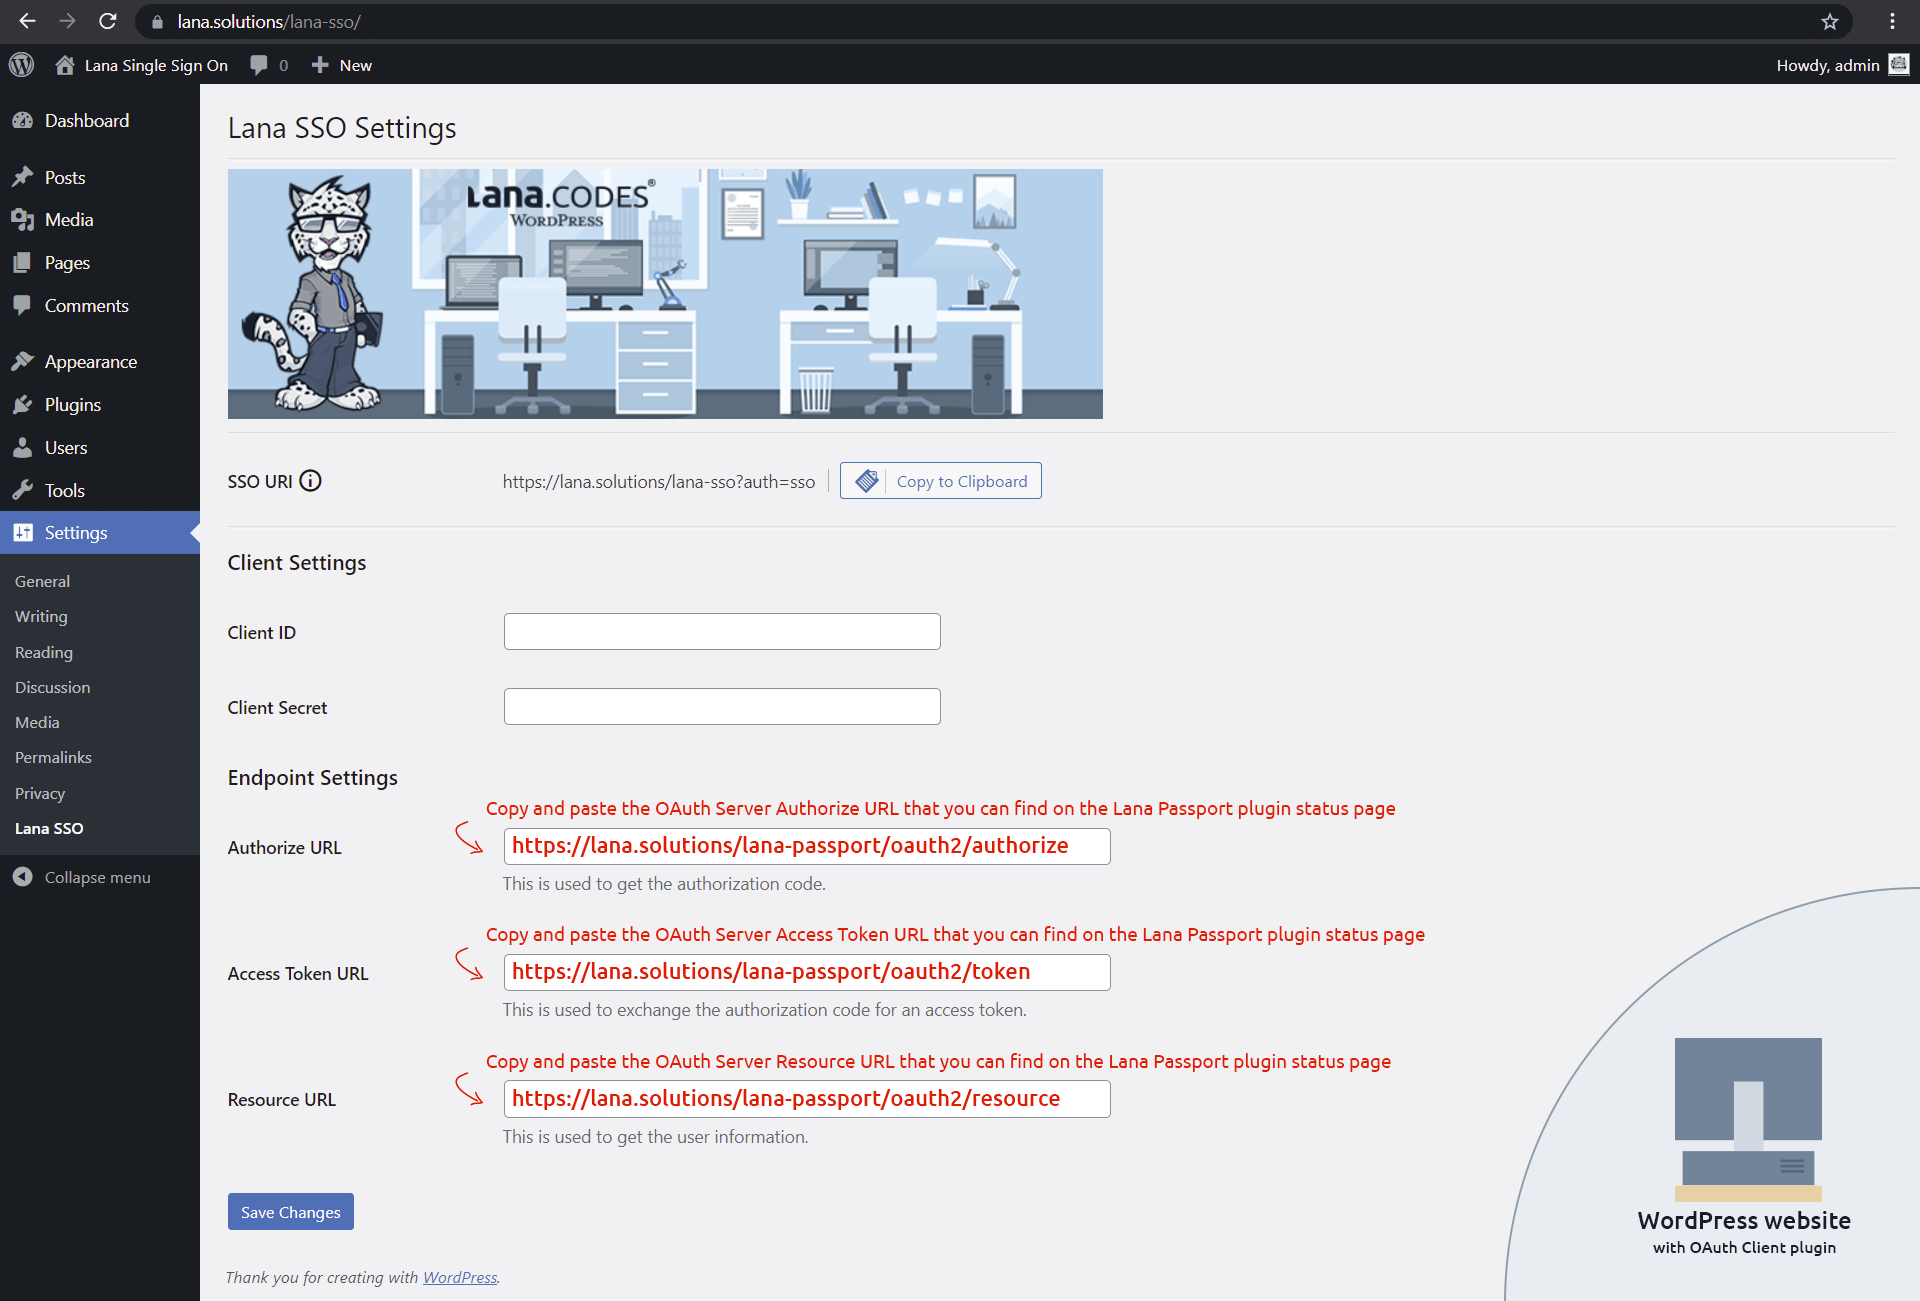
You need to set the three URLs in the "Lana Single Sign On" Settings page:
- Authorize URL
- Access Token URL
- Resource URL
3. Copy the SSO URI from the OAuth Client
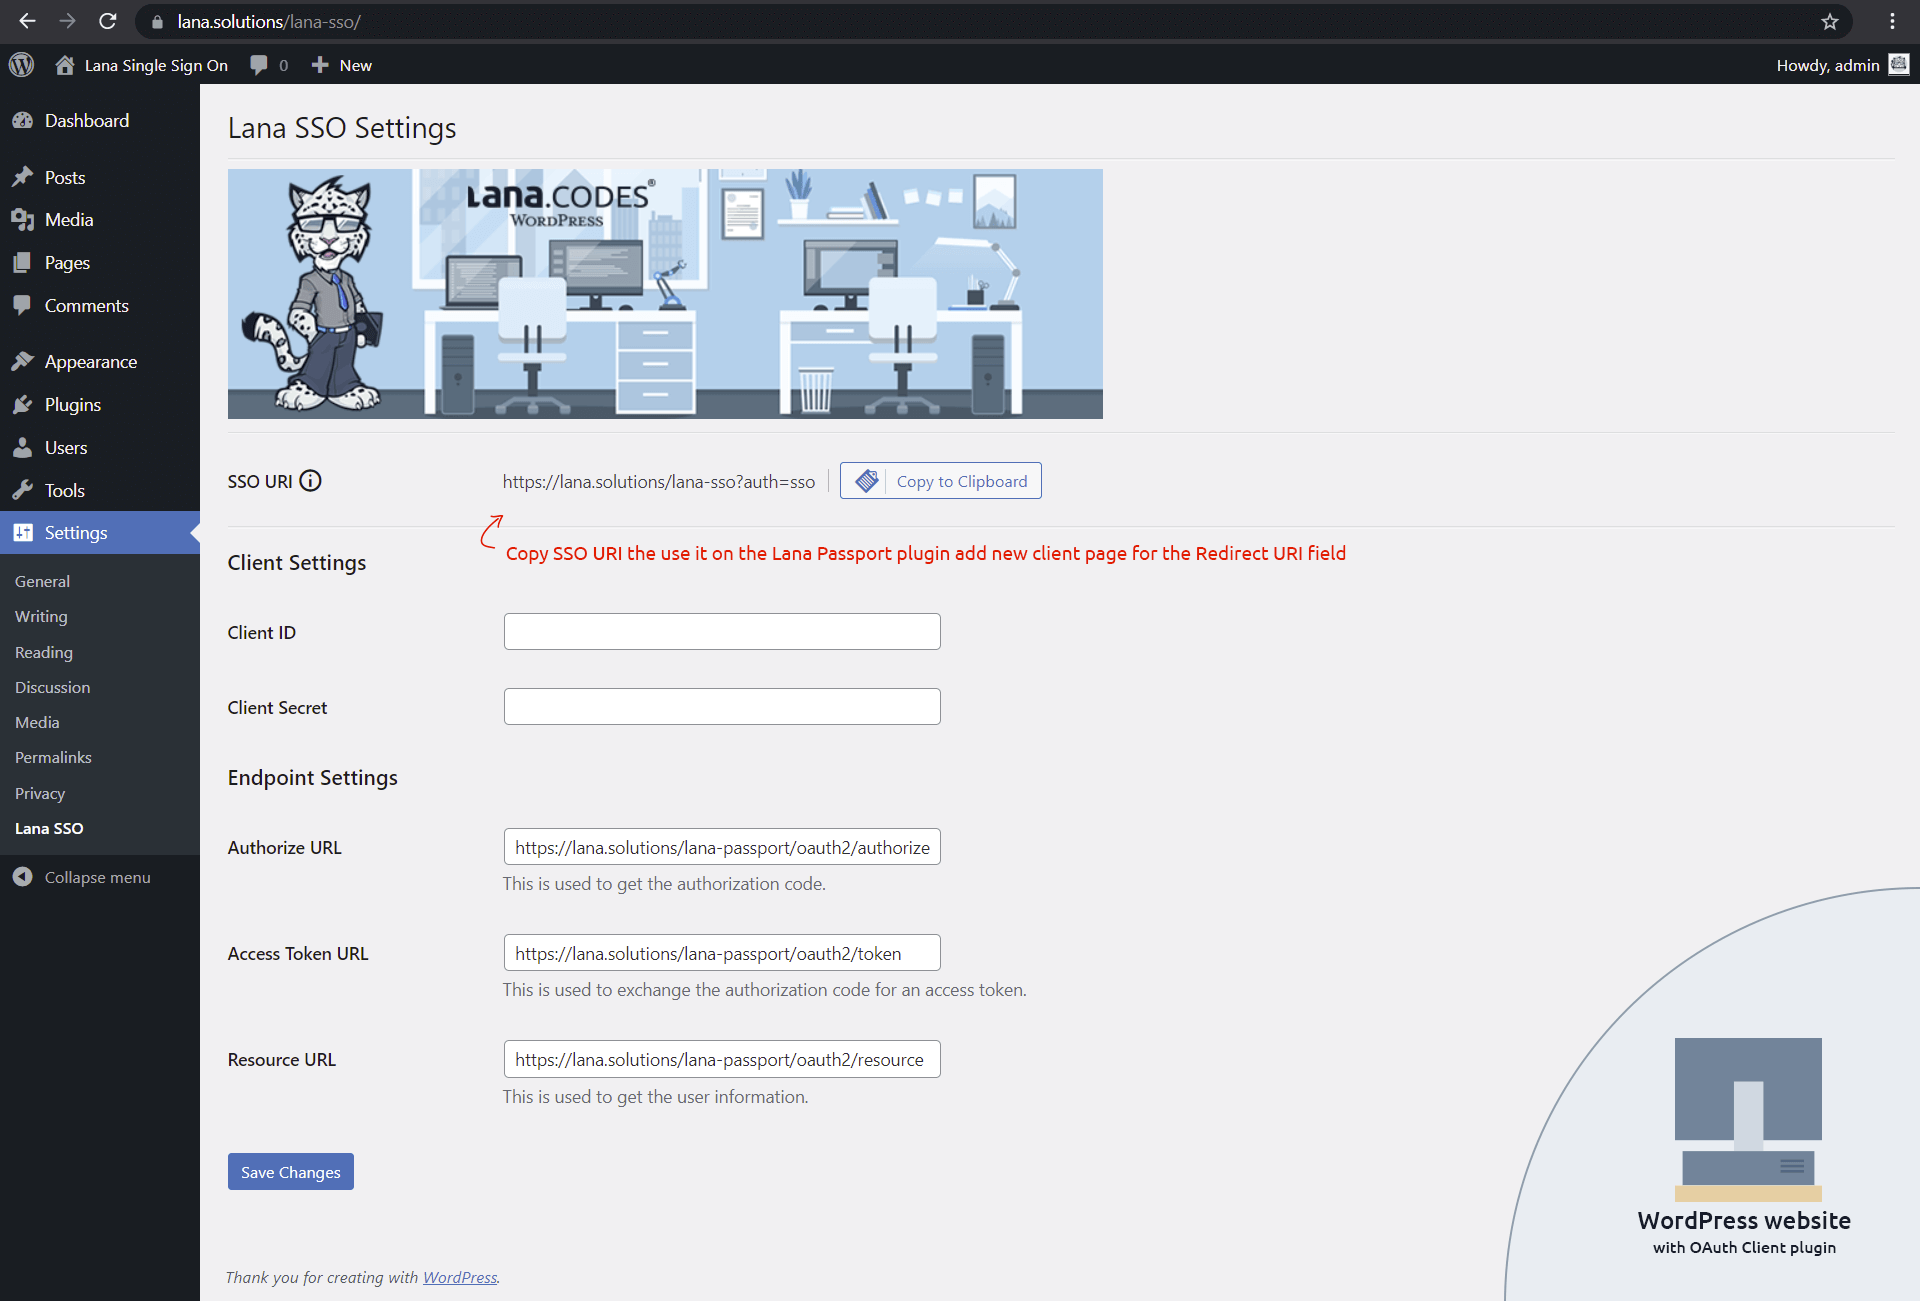
You need to copy the SSO URI from the "Lana Single Sign On" Settings page.
This URI will be used by the server.
4. Set the Redirect URI in the OAuth Server

You need to add a new client to the "Lana Passport".
When adding a client, paste the previously copied SSO URI into the Redirect URI.
Click the "Publish" button and the server will generate the client.
5. Copy the Client ID and Client Secret from the OAuth Server
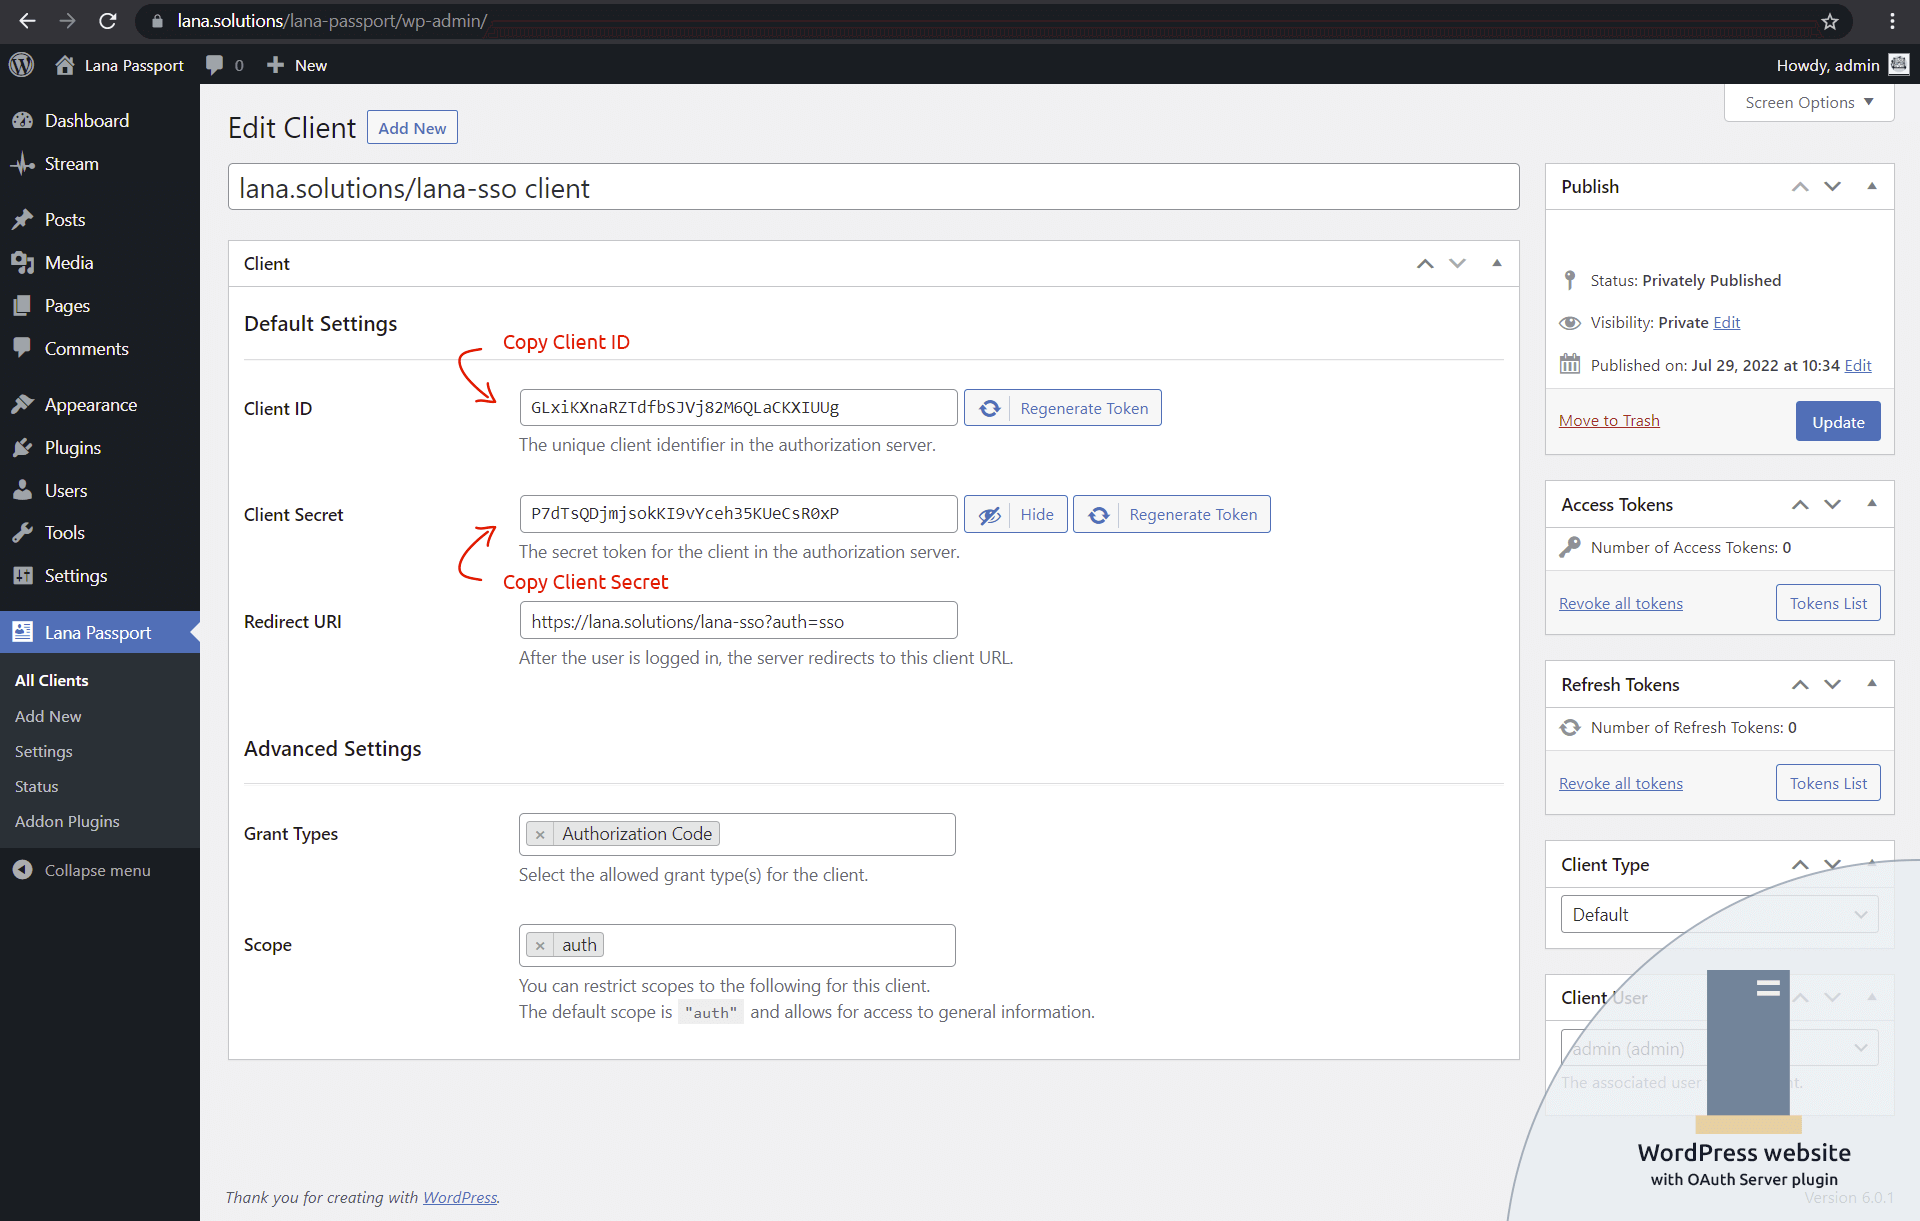
After you have successfully added the client, you can see the client edit, where you can find the generated Client ID and Client Secret tokens.
Copy these tokens because you need to enter them in the OAuth client settings.
6. Set the Client ID and Client Secret in the OAuth Client
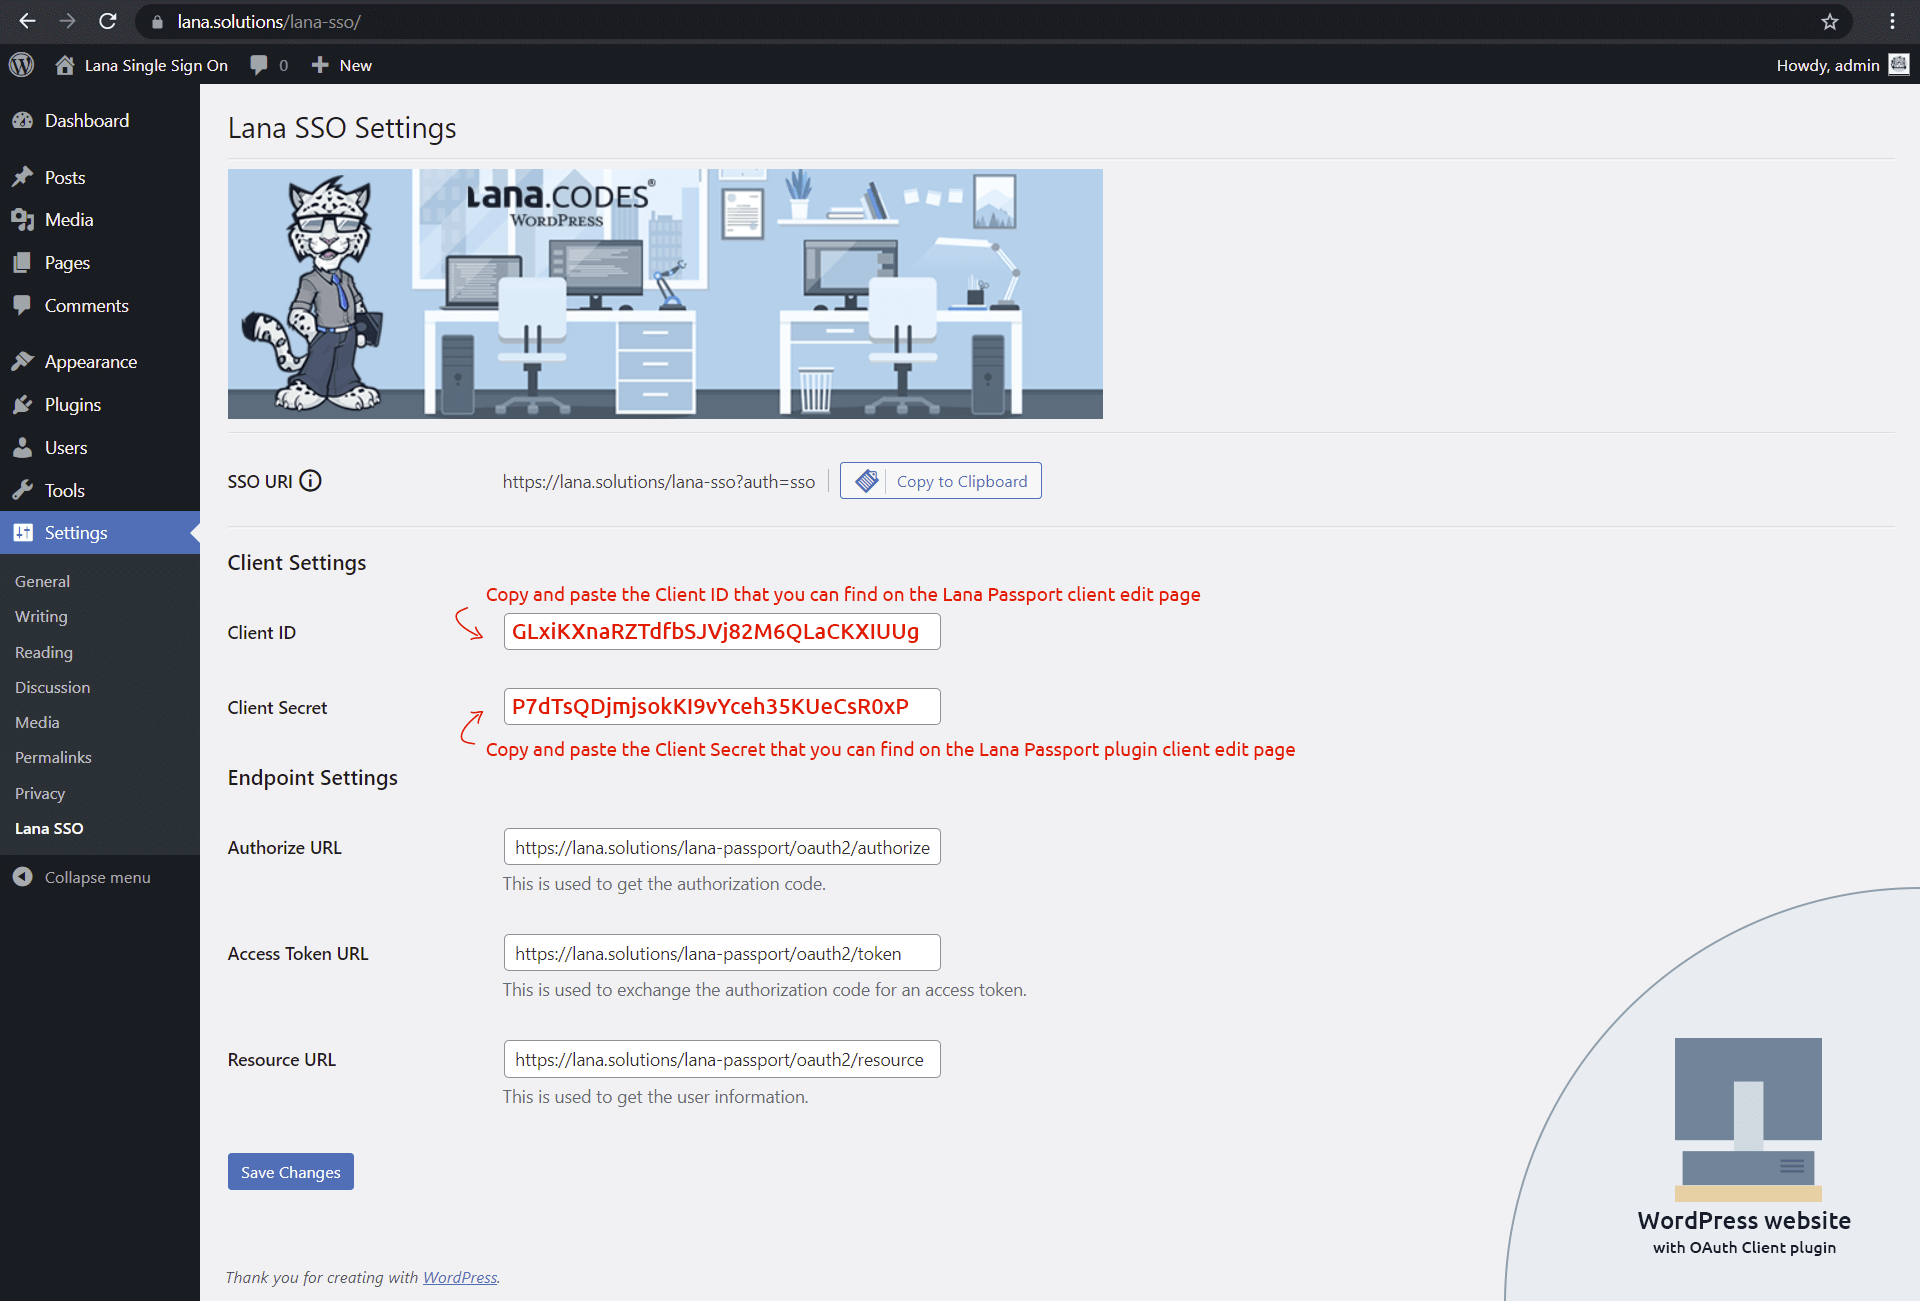
Paste the previously copied Client ID and Client Secret tokens on the "Lana Single Sign On" settings page.
Grant Types
This is how you can use "Authorization Code" grant type. The authorization code grant type is used to obtain both access tokens and refresh tokens and is optimized for confidential clients. This is the grant type most often associated with OAuth.
Documentation: rfc6749#section-4.1
1. Enable grant type in Settings
The grant type must be enabled globally on the server so that the grant type can be set and used on the client as well.

First you have to enable it in the Settings.
1. Select "Authorization Code" for the Supported Grant Types in the Default Settings section.
2. Click on the "Save Changes" button.
2. Enable grant type in Client
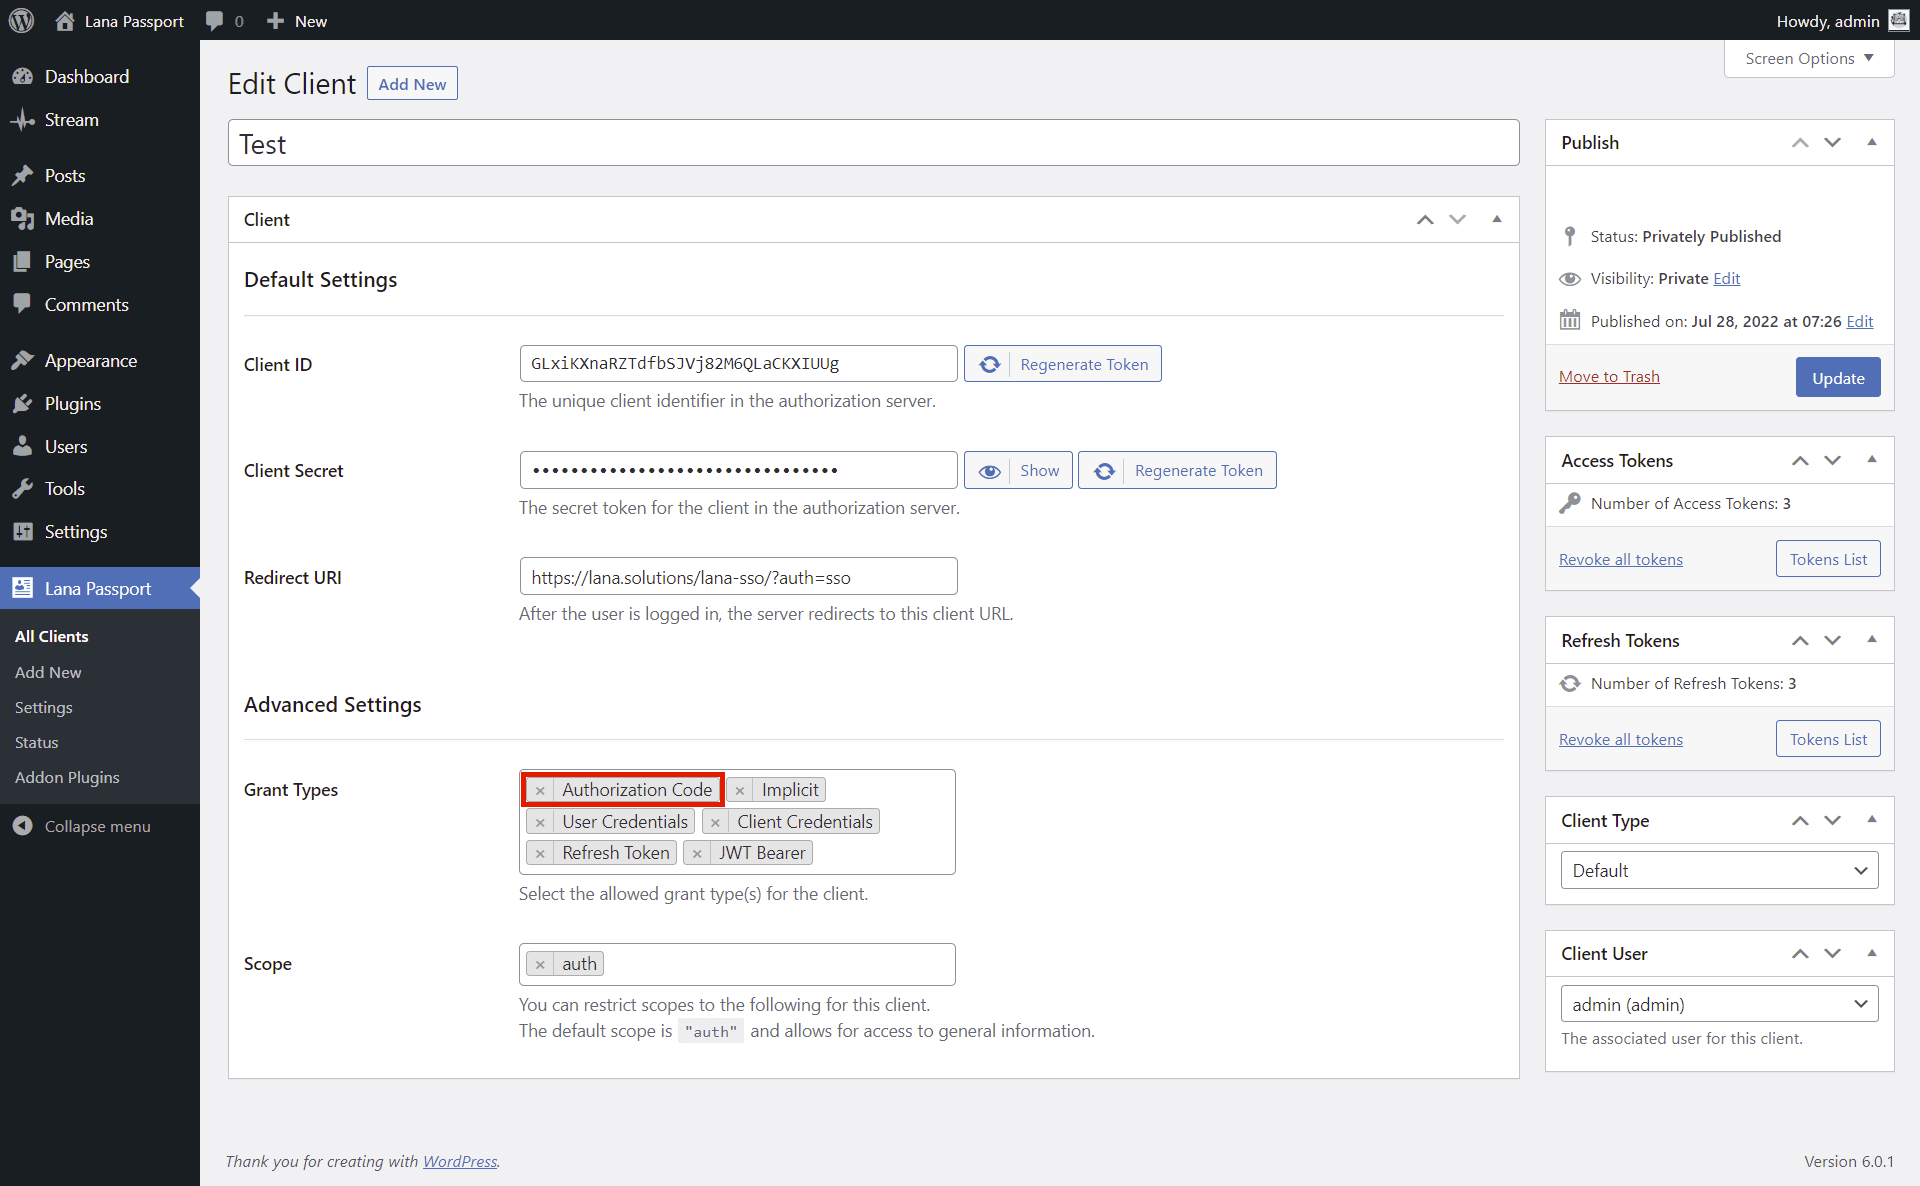
You have to enable it in the Client.
1. Select "Authorization Code" for the Grant Types in Advanced Settings section.
2. Click on the "Update" button.
You can send an authentication request to the OAuth server using "Authorization Code" grant type.
This is used by the "Lana Single Sign On" plugin, more information on how to configure it: Lana Single Sign On plugin documentation
This is how you can use "Implicit" grant type. The implicit grant type is used to obtain access tokens (it does not support the issuance of refresh tokens) and is optimized for public clients. These clients are typically implemented in a browser using a scripting language such as JavaScript.
Documentation: rfc6749#section-4.2
1. Enable grant type in Settings
The grant type must be enabled globally on the server so that the grant type can be set and used on the client as well.
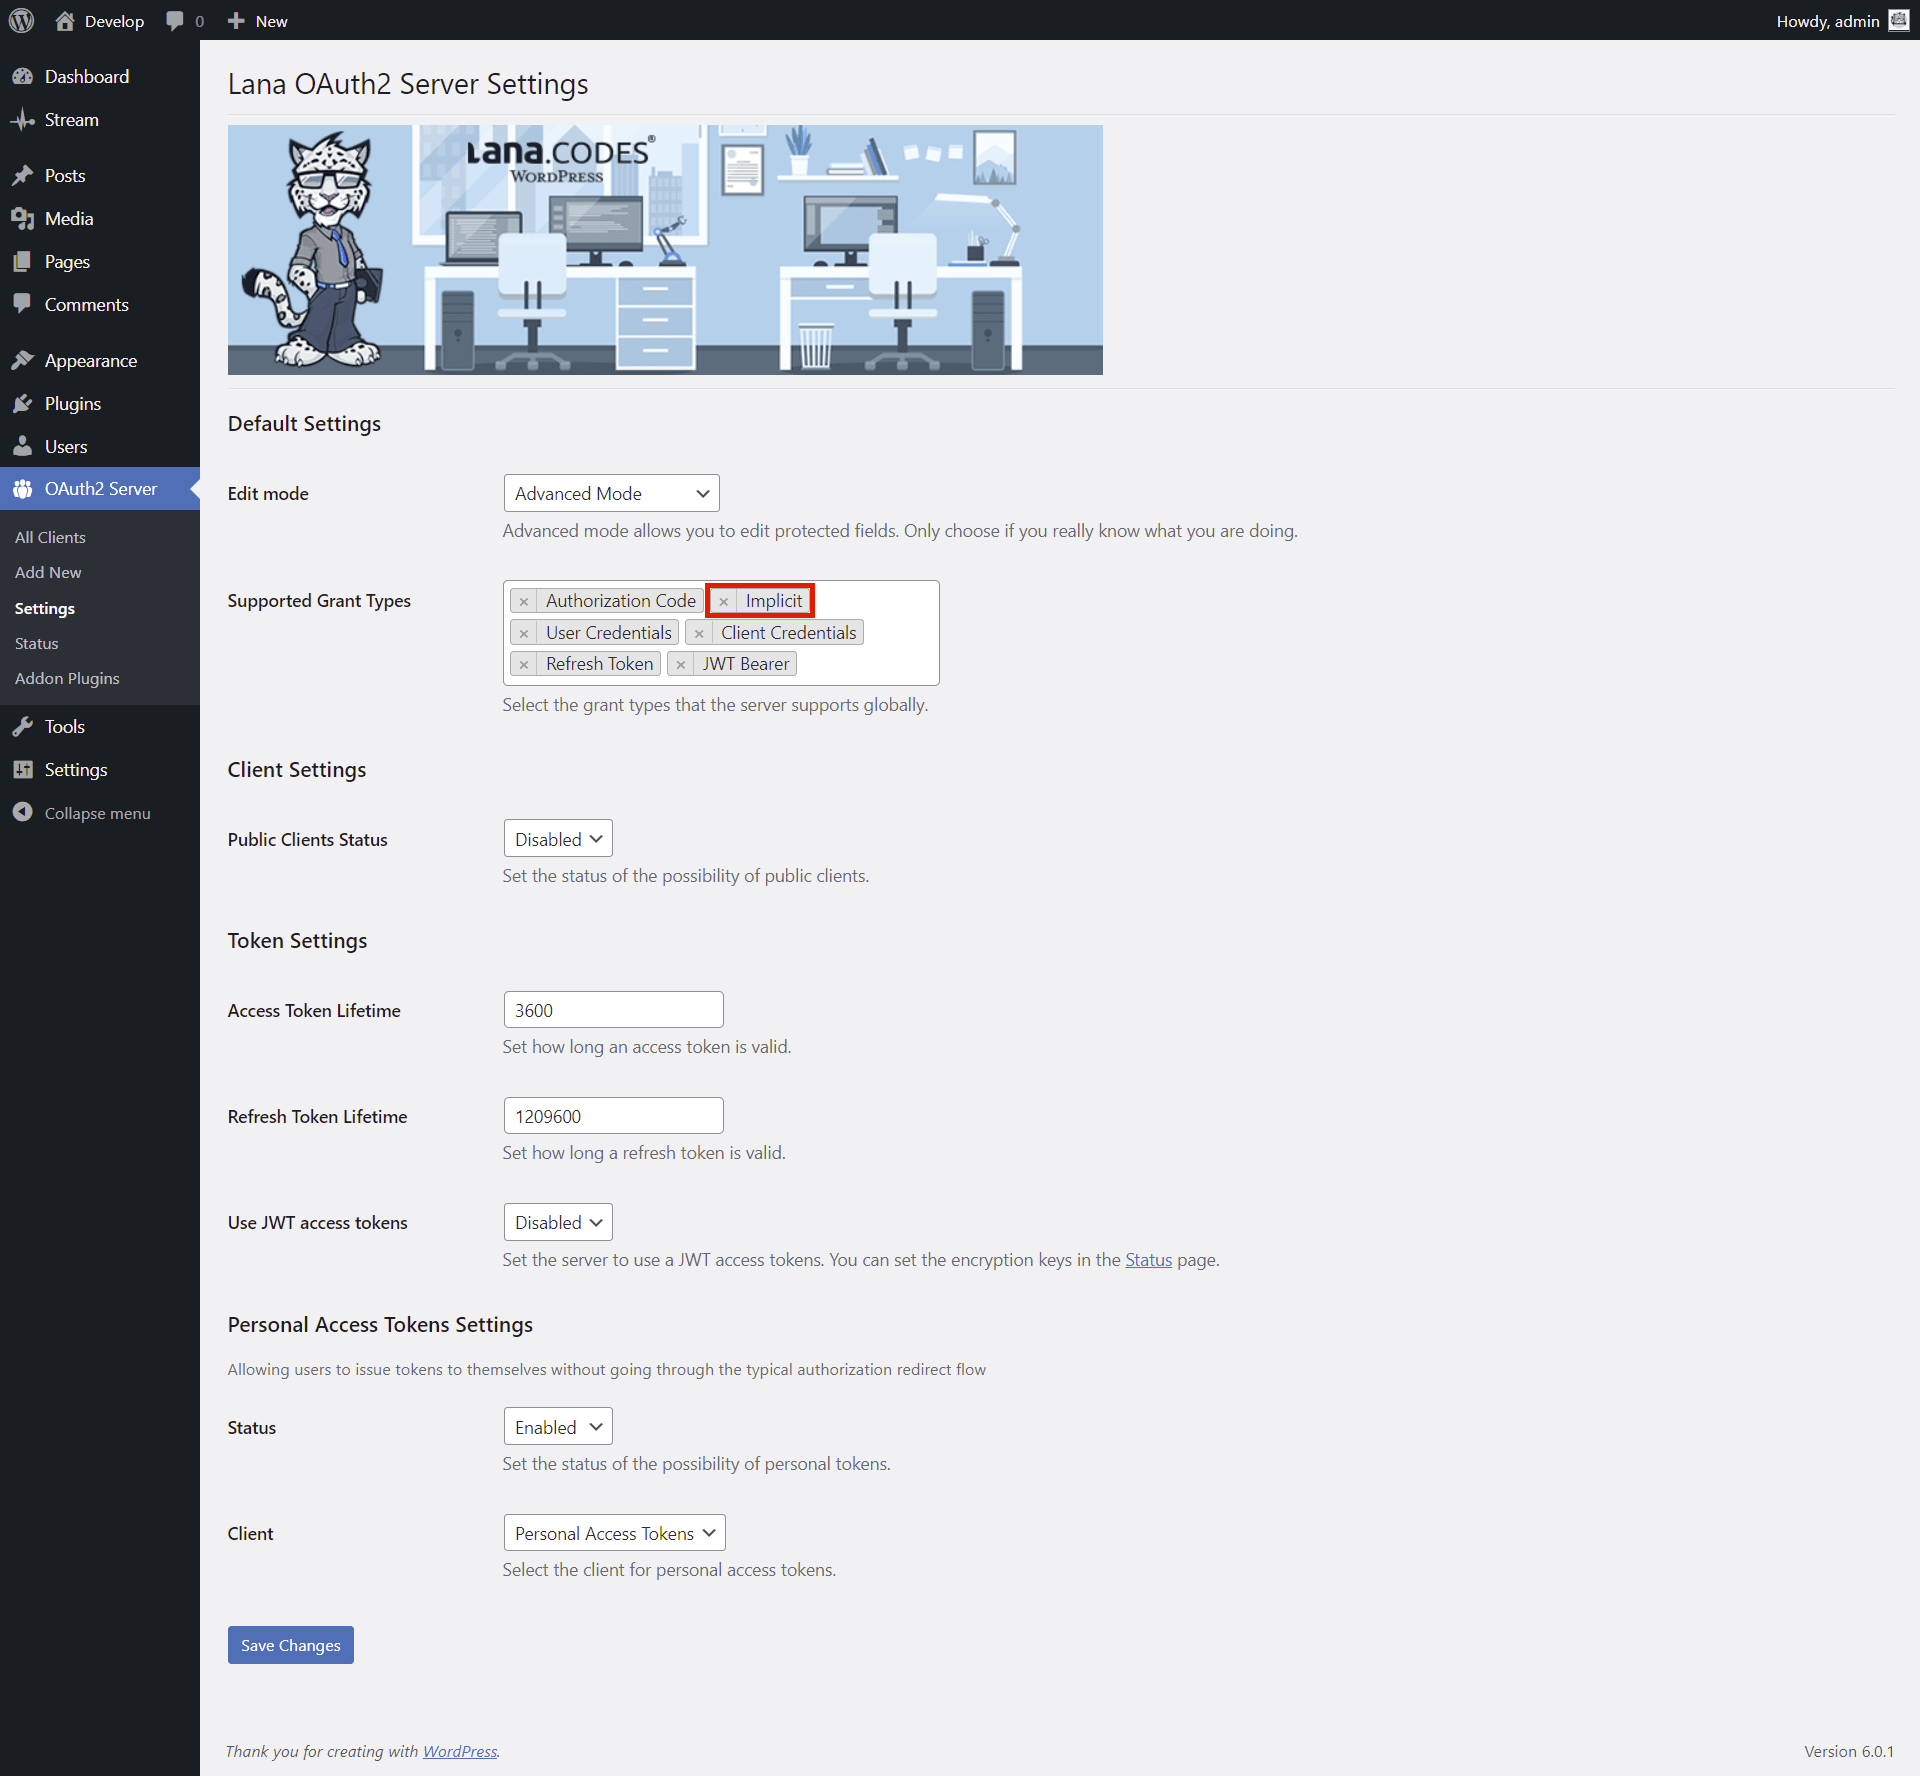
First you have to enable it in the Settings.
1. Select "Implicit" for the Supported Grant Types in the Default Settings section.
2. Click on the "Save Changes" button.
2. Enable grant type in Client
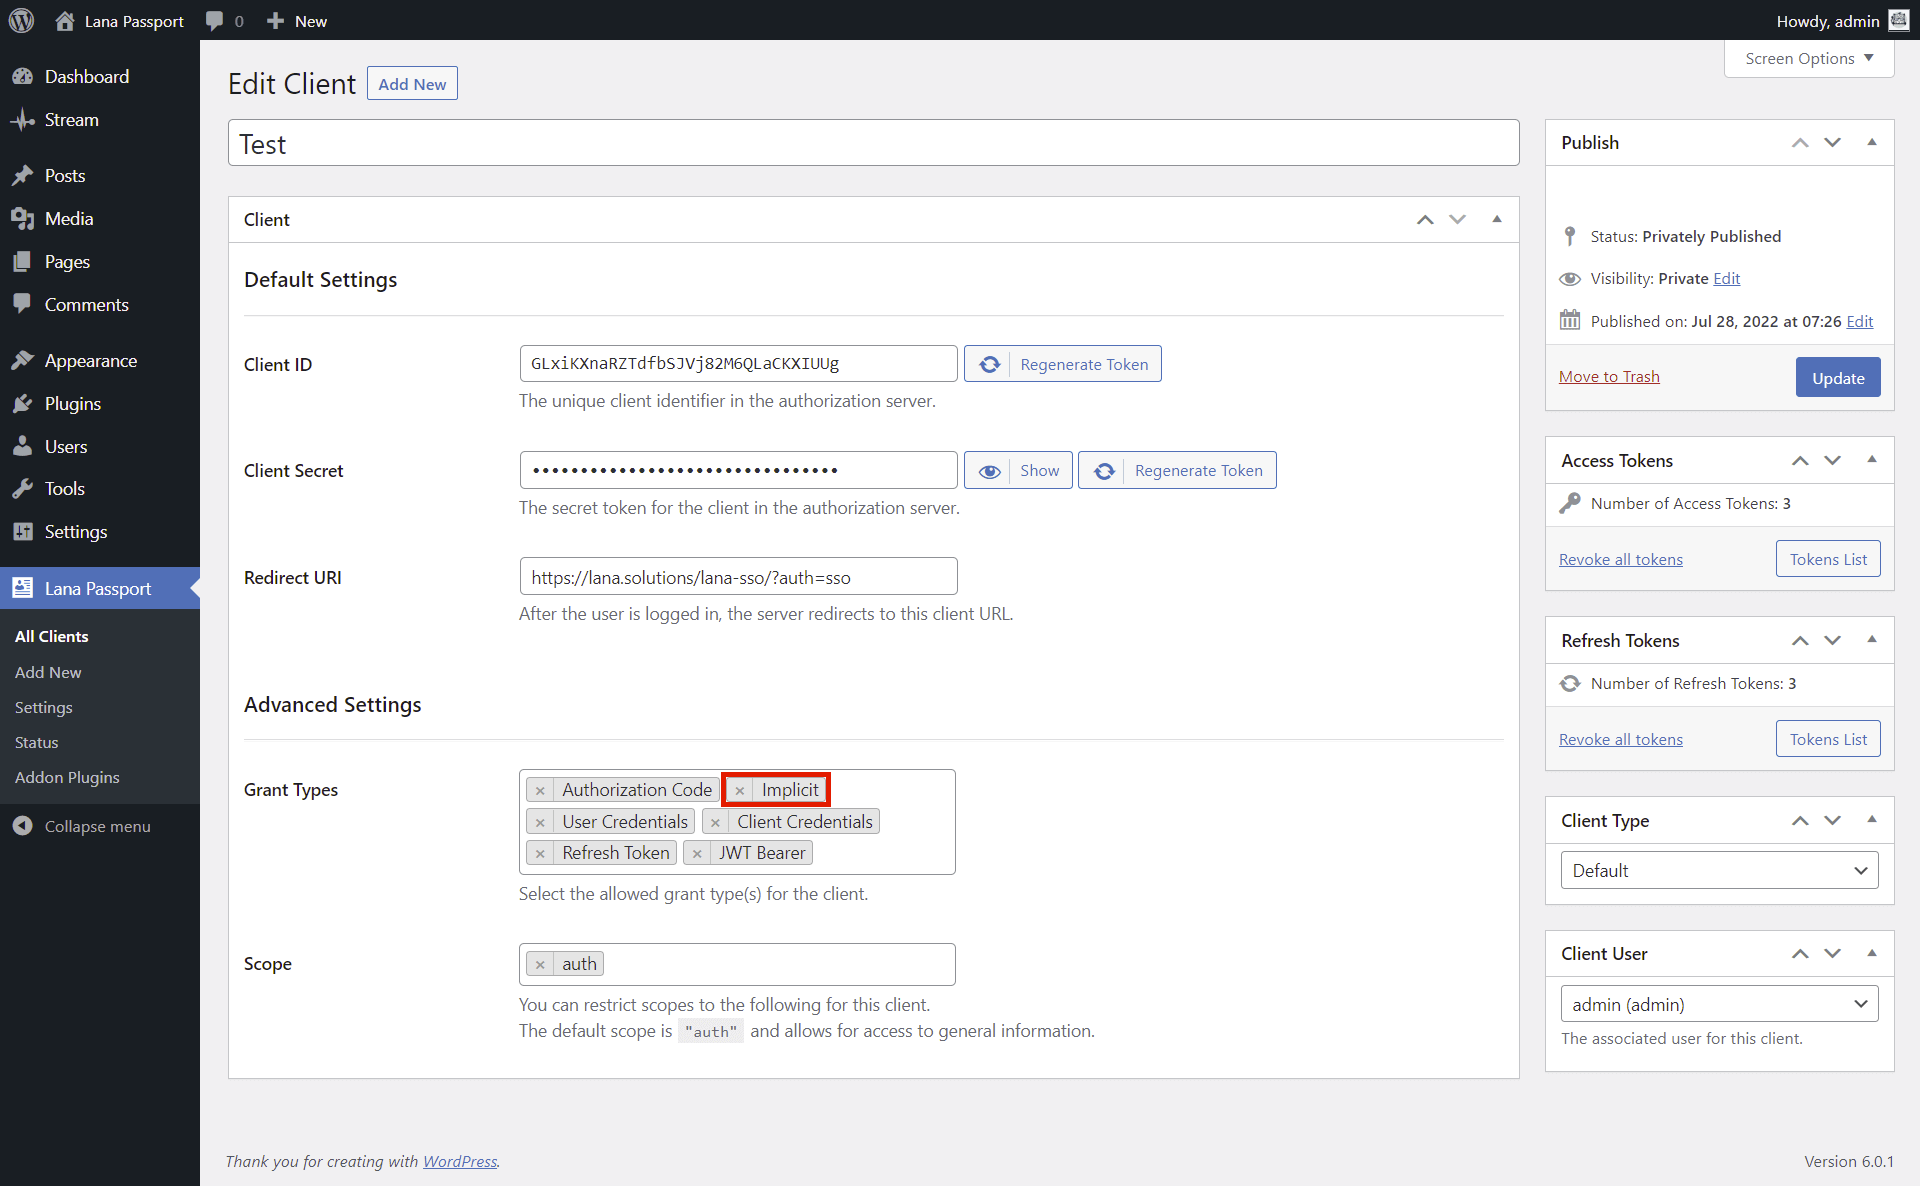
You have to enable it in the Client.
1. Select "Implicit" for the Grant Types in Advanced Settings section.
2. Click on the "Update" button.
You can send an authentication request to the OAuth server using "Implicit" grant type.
This is how you can use "User Credentials" grant type. The resource owner password credentials grant type is suitable in cases where the resource owner has a trust relationship with the client, such as the device operating system or a highly privileged application. The authorization server should take special care when enabling this grant type and only allow it when other flows are not viable.
Documentation: rfc6749#section-4.3
1. Enable grant type in Settings
The grant type must be enabled globally on the server so that the grant type can be set and used on the client as well.

First you have to enable it in the Settings.
1. Select "User Credentials" for the Supported Grant Types in the Default Settings section.
2. Click on the "Save Changes" button.
2. Enable grant type in Client
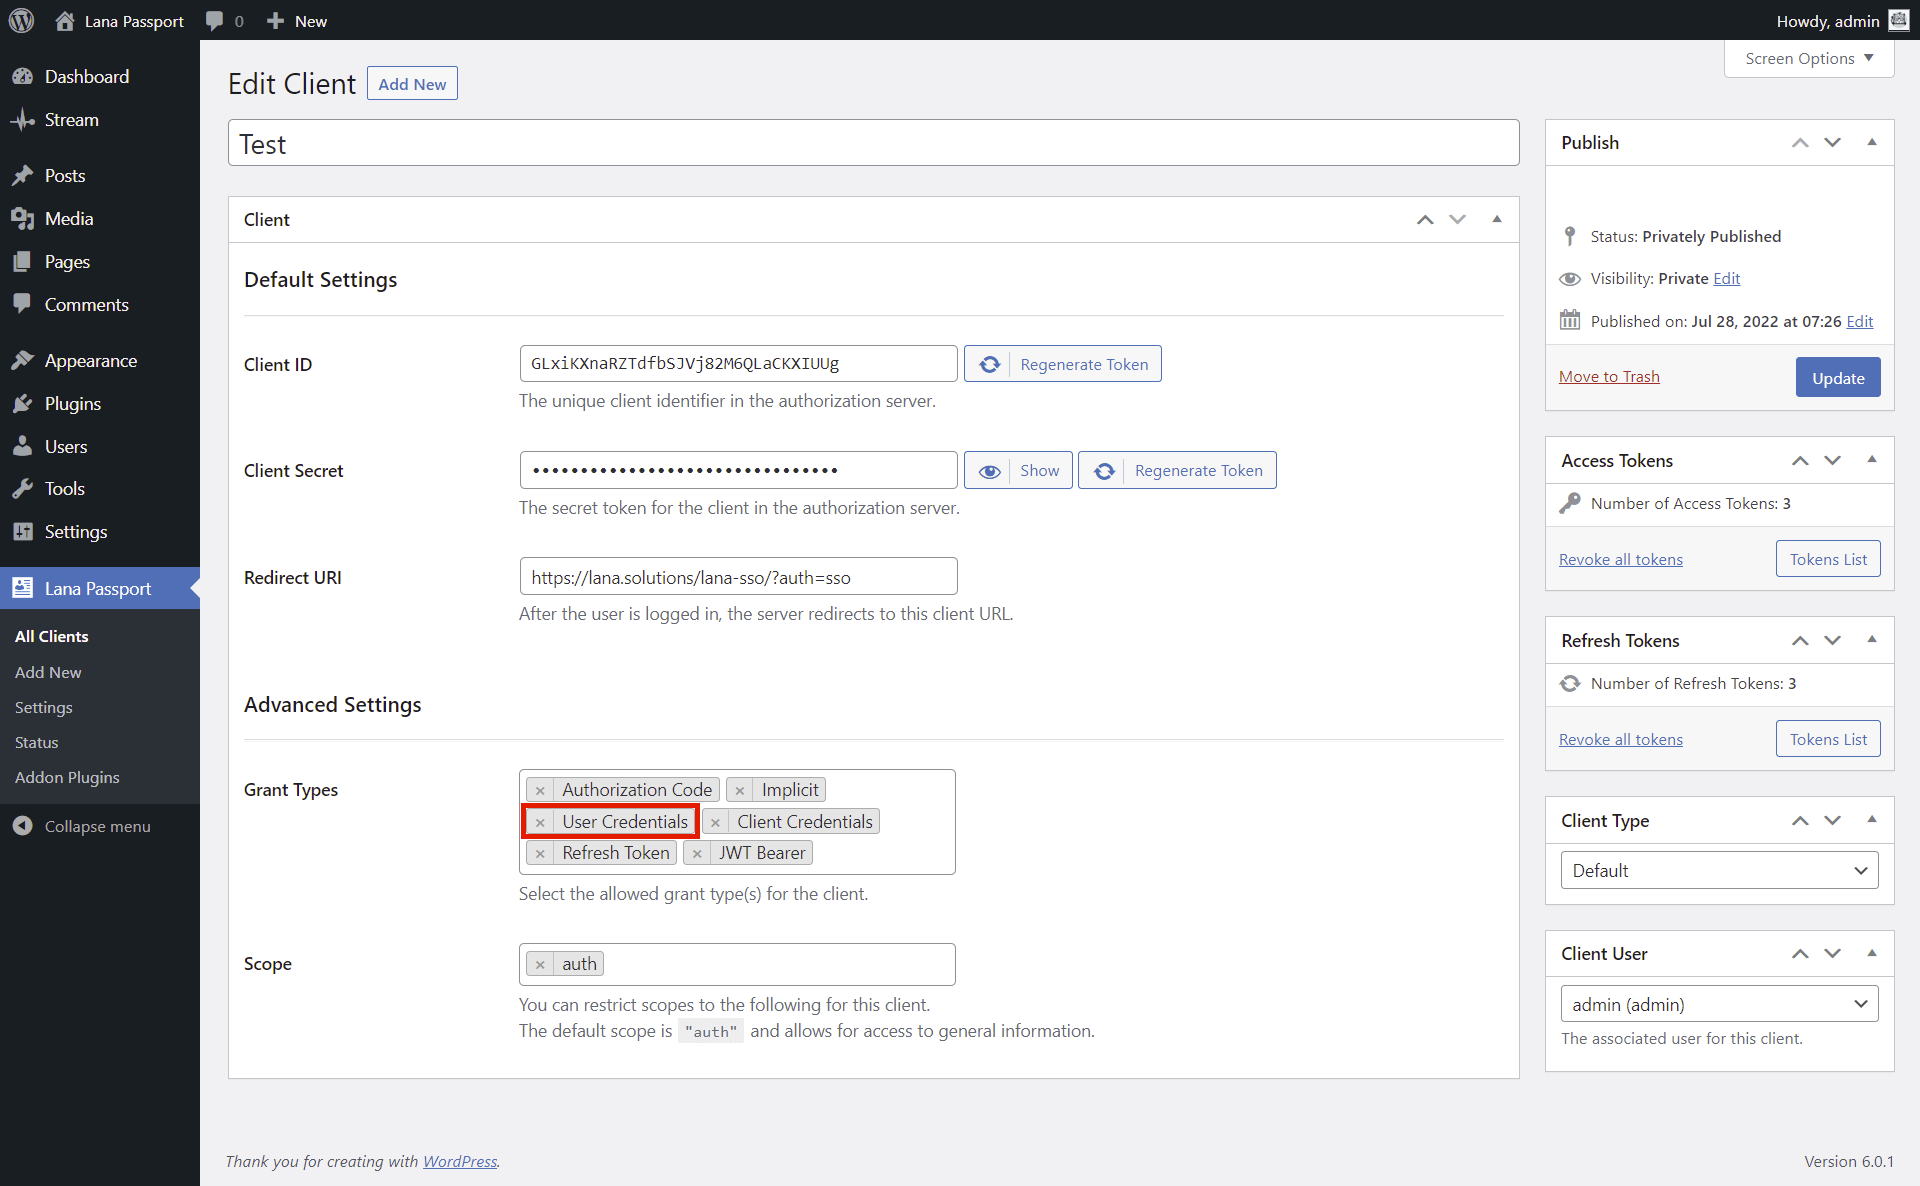
You have to enable it in the Client.
1. Select "User Credentials" for the Grant Types in Advanced Settings section.
2. Click on the "Update" button.
You can send an authentication request to the OAuth server using "User Credentials" grant type.
This is how you can use "Client Credentials" grant type. The client can request an access token using only its client credentials. The resource will be the associated user. The client credentials grant type MUST only be used by confidential clients.
Documentation: rfc6749#section-4.4
1. Enable grant type in Settings
The grant type must be enabled globally on the server so that the grant type can be set and used on the client as well.
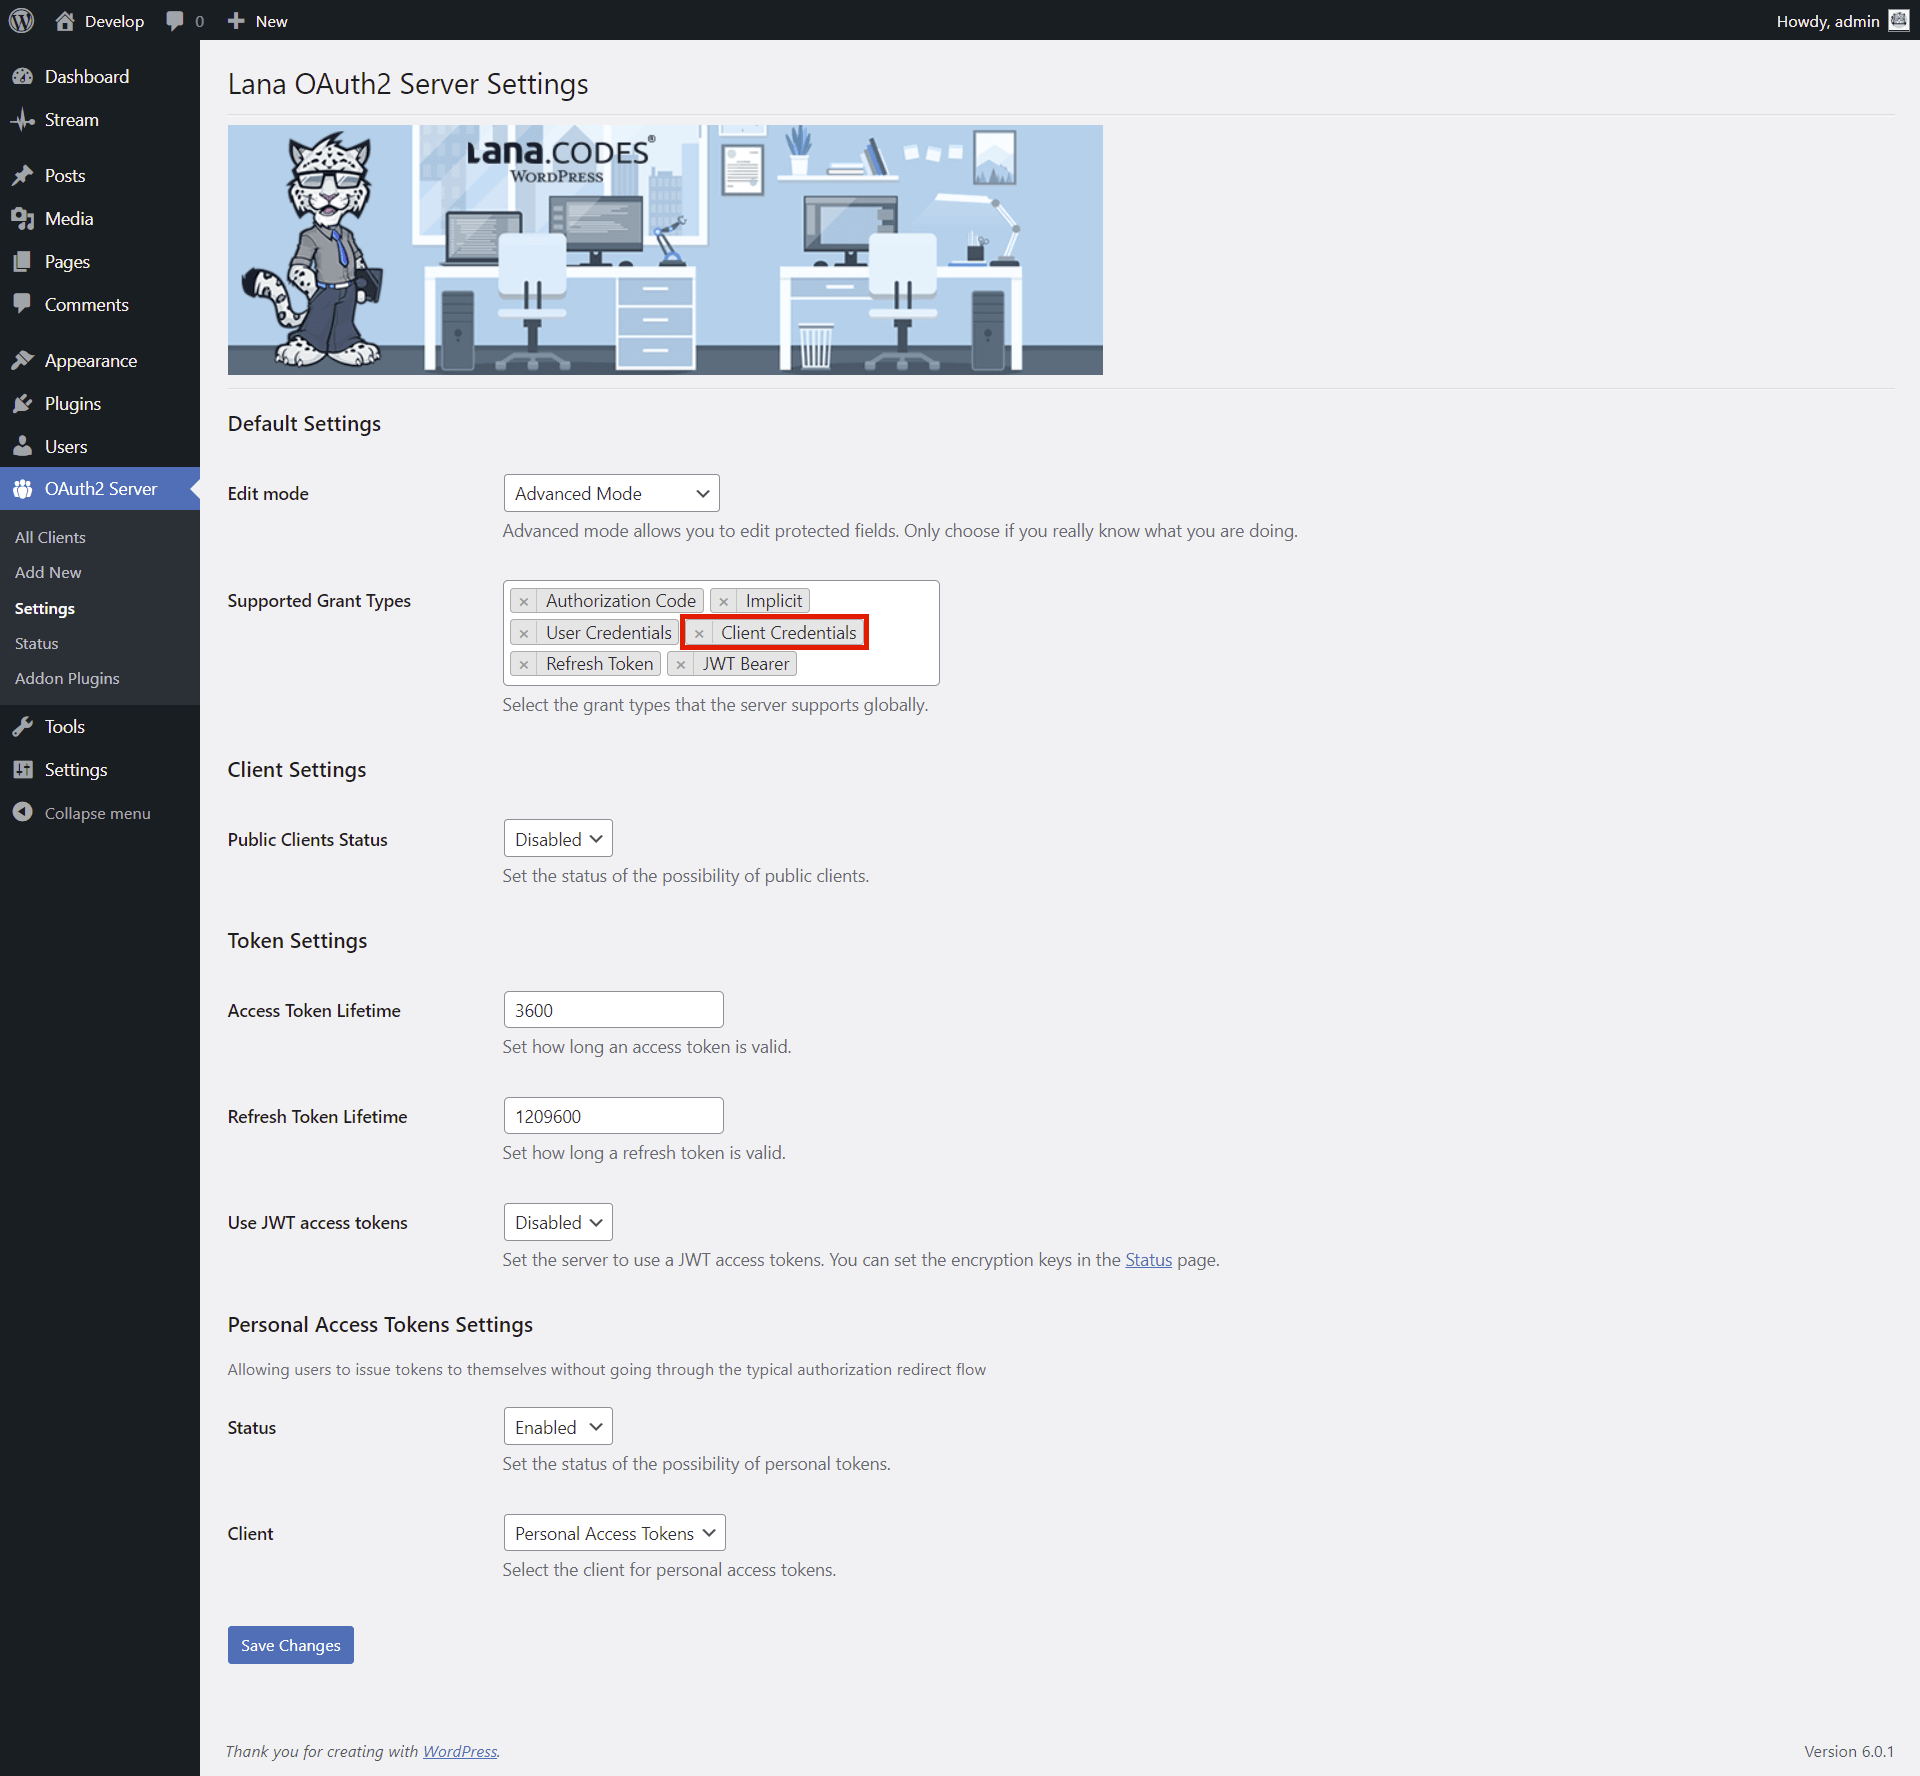
First you have to enable it in the Settings.
1. Select "Client Credentials" for the Supported Grant Types in the Default Settings section.
2. Click on the "Save Changes" button.
2. Enable grant type in Client
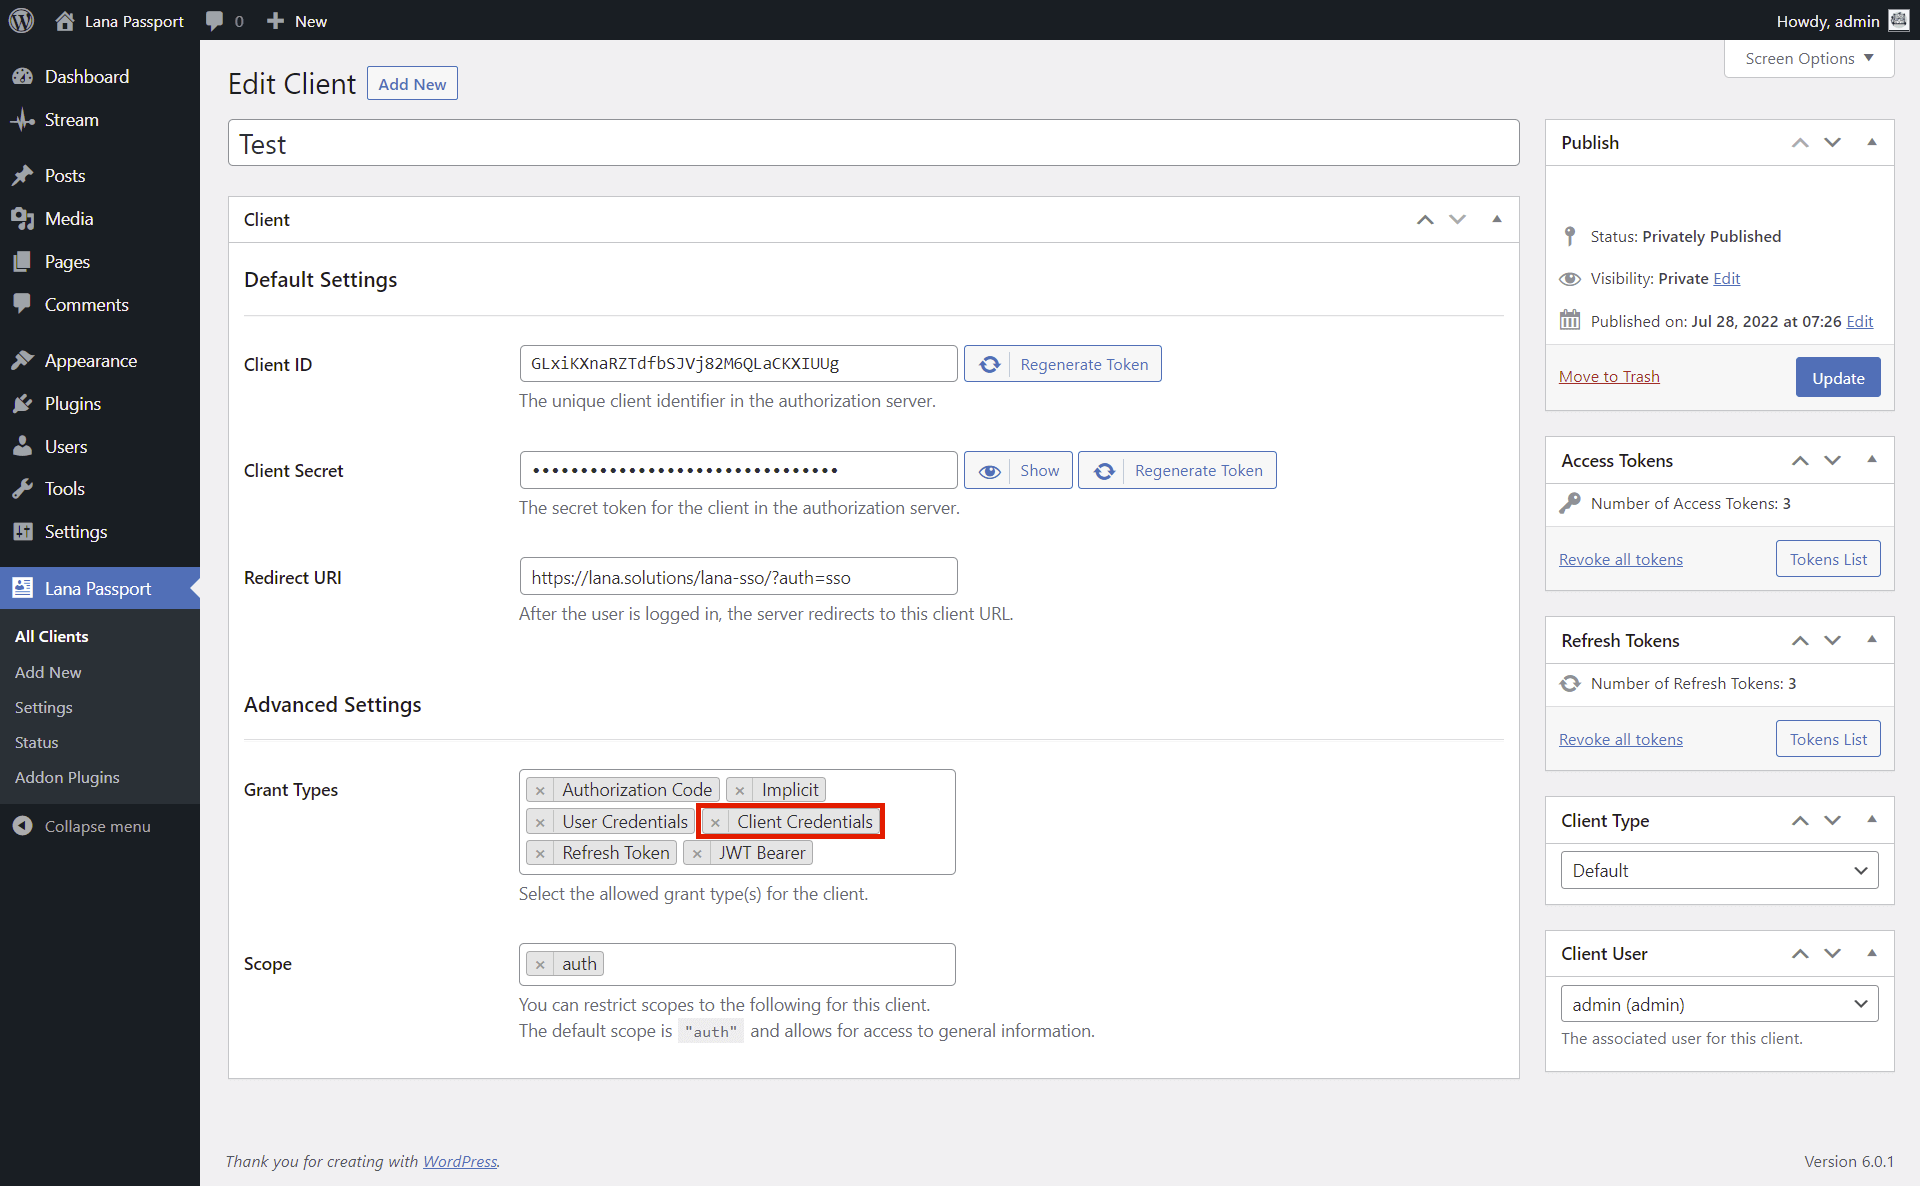
You have to enable it in the Client.
1. Select "Client Credentials" for the Grant Types in Advanced Settings section.
2. Click on the "Update" button.
3. Edit Client User
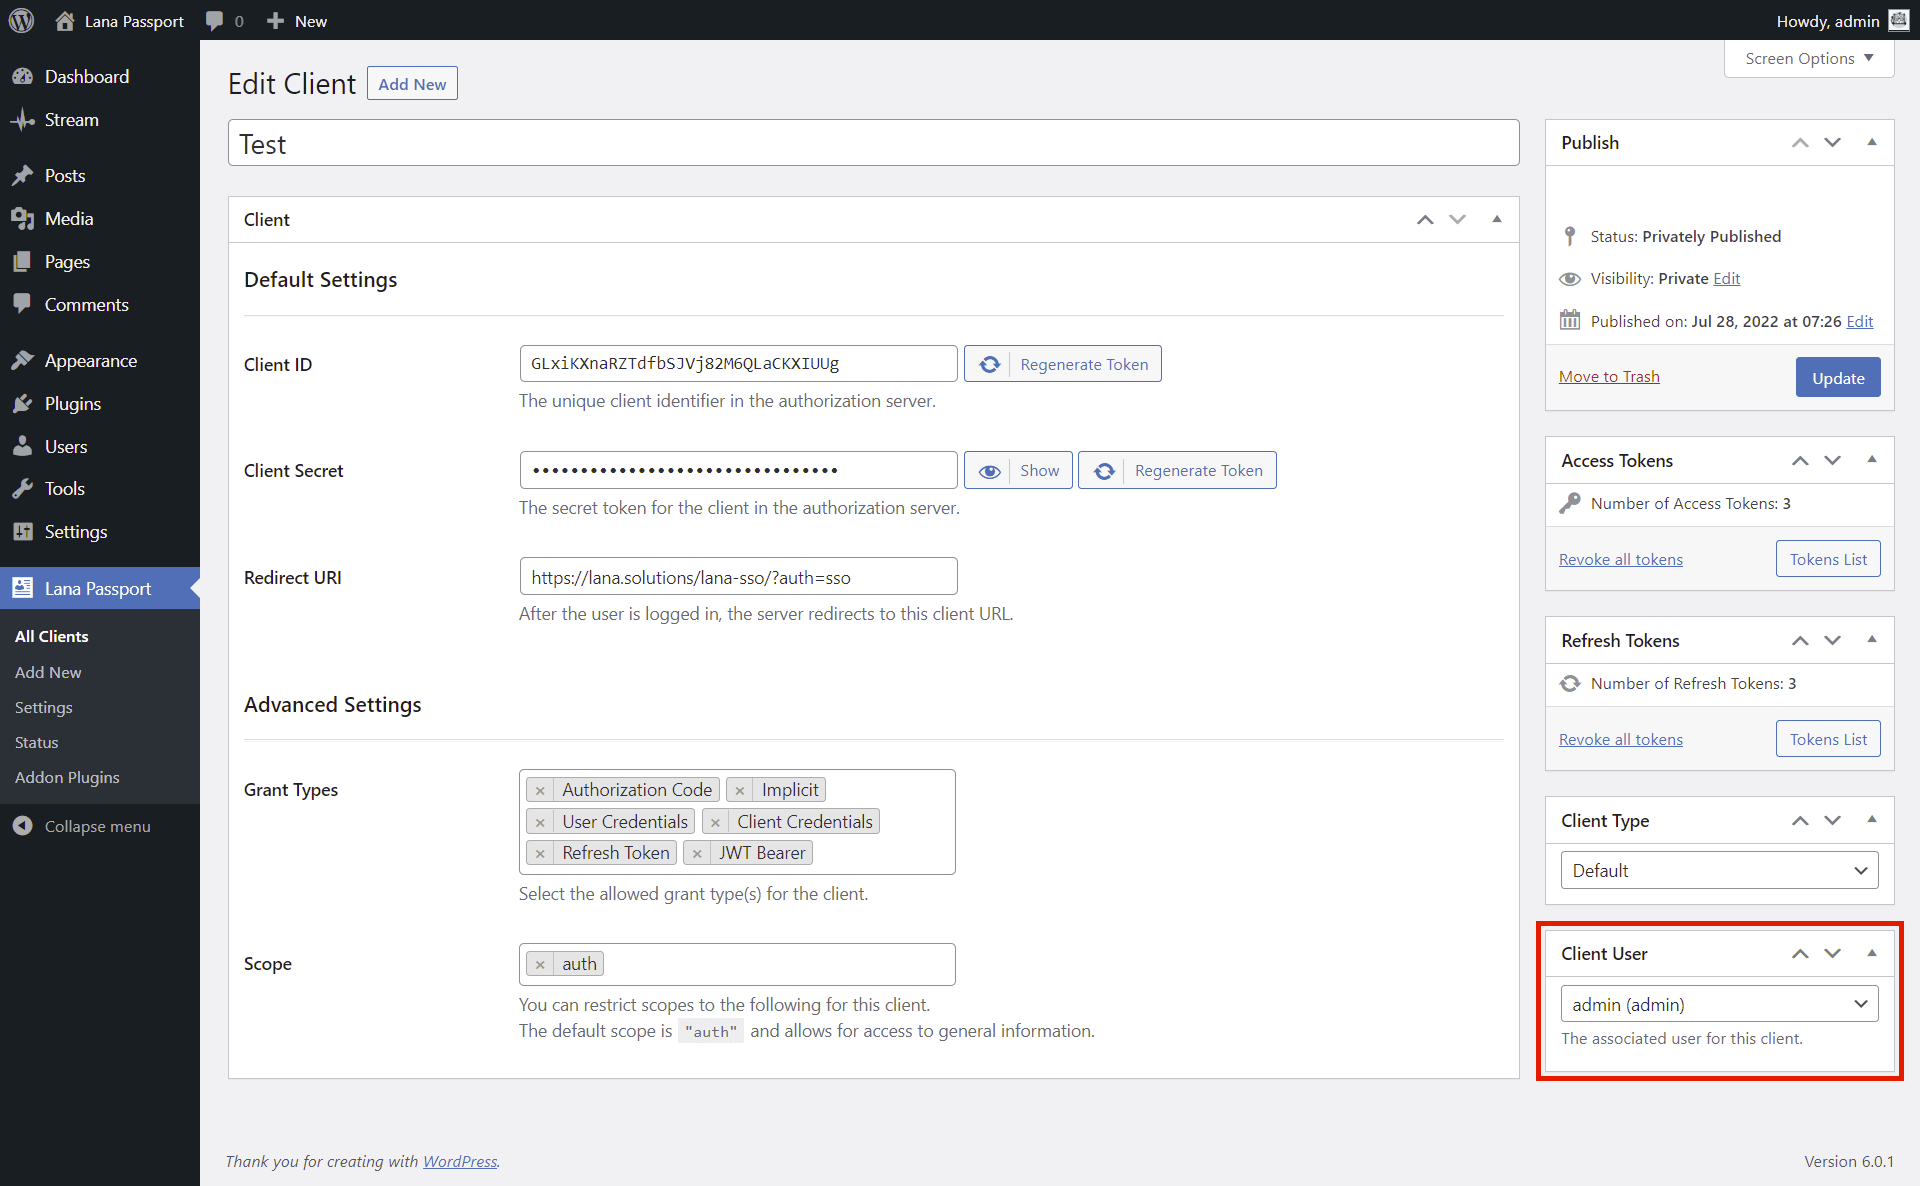
In case of "Client Credentials" grant type, it will use the resources of the associated user, which can be set in the "Client User" metabox.
You can send an authentication request to the OAuth server using "Client Credentials" grant type.
This is how you can use "Refresh Token" grant type. If the authorization server issued a refresh token to the client, the client can make a refresh request.
Documentation about refresh token:
rfc6749#section-1.5
Documentation about the refresh token grant type:
rfc6749#section-6
1. Enable grant type in Settings
The grant type must be enabled globally on the server so that the grant type can be set and used on the client as well.
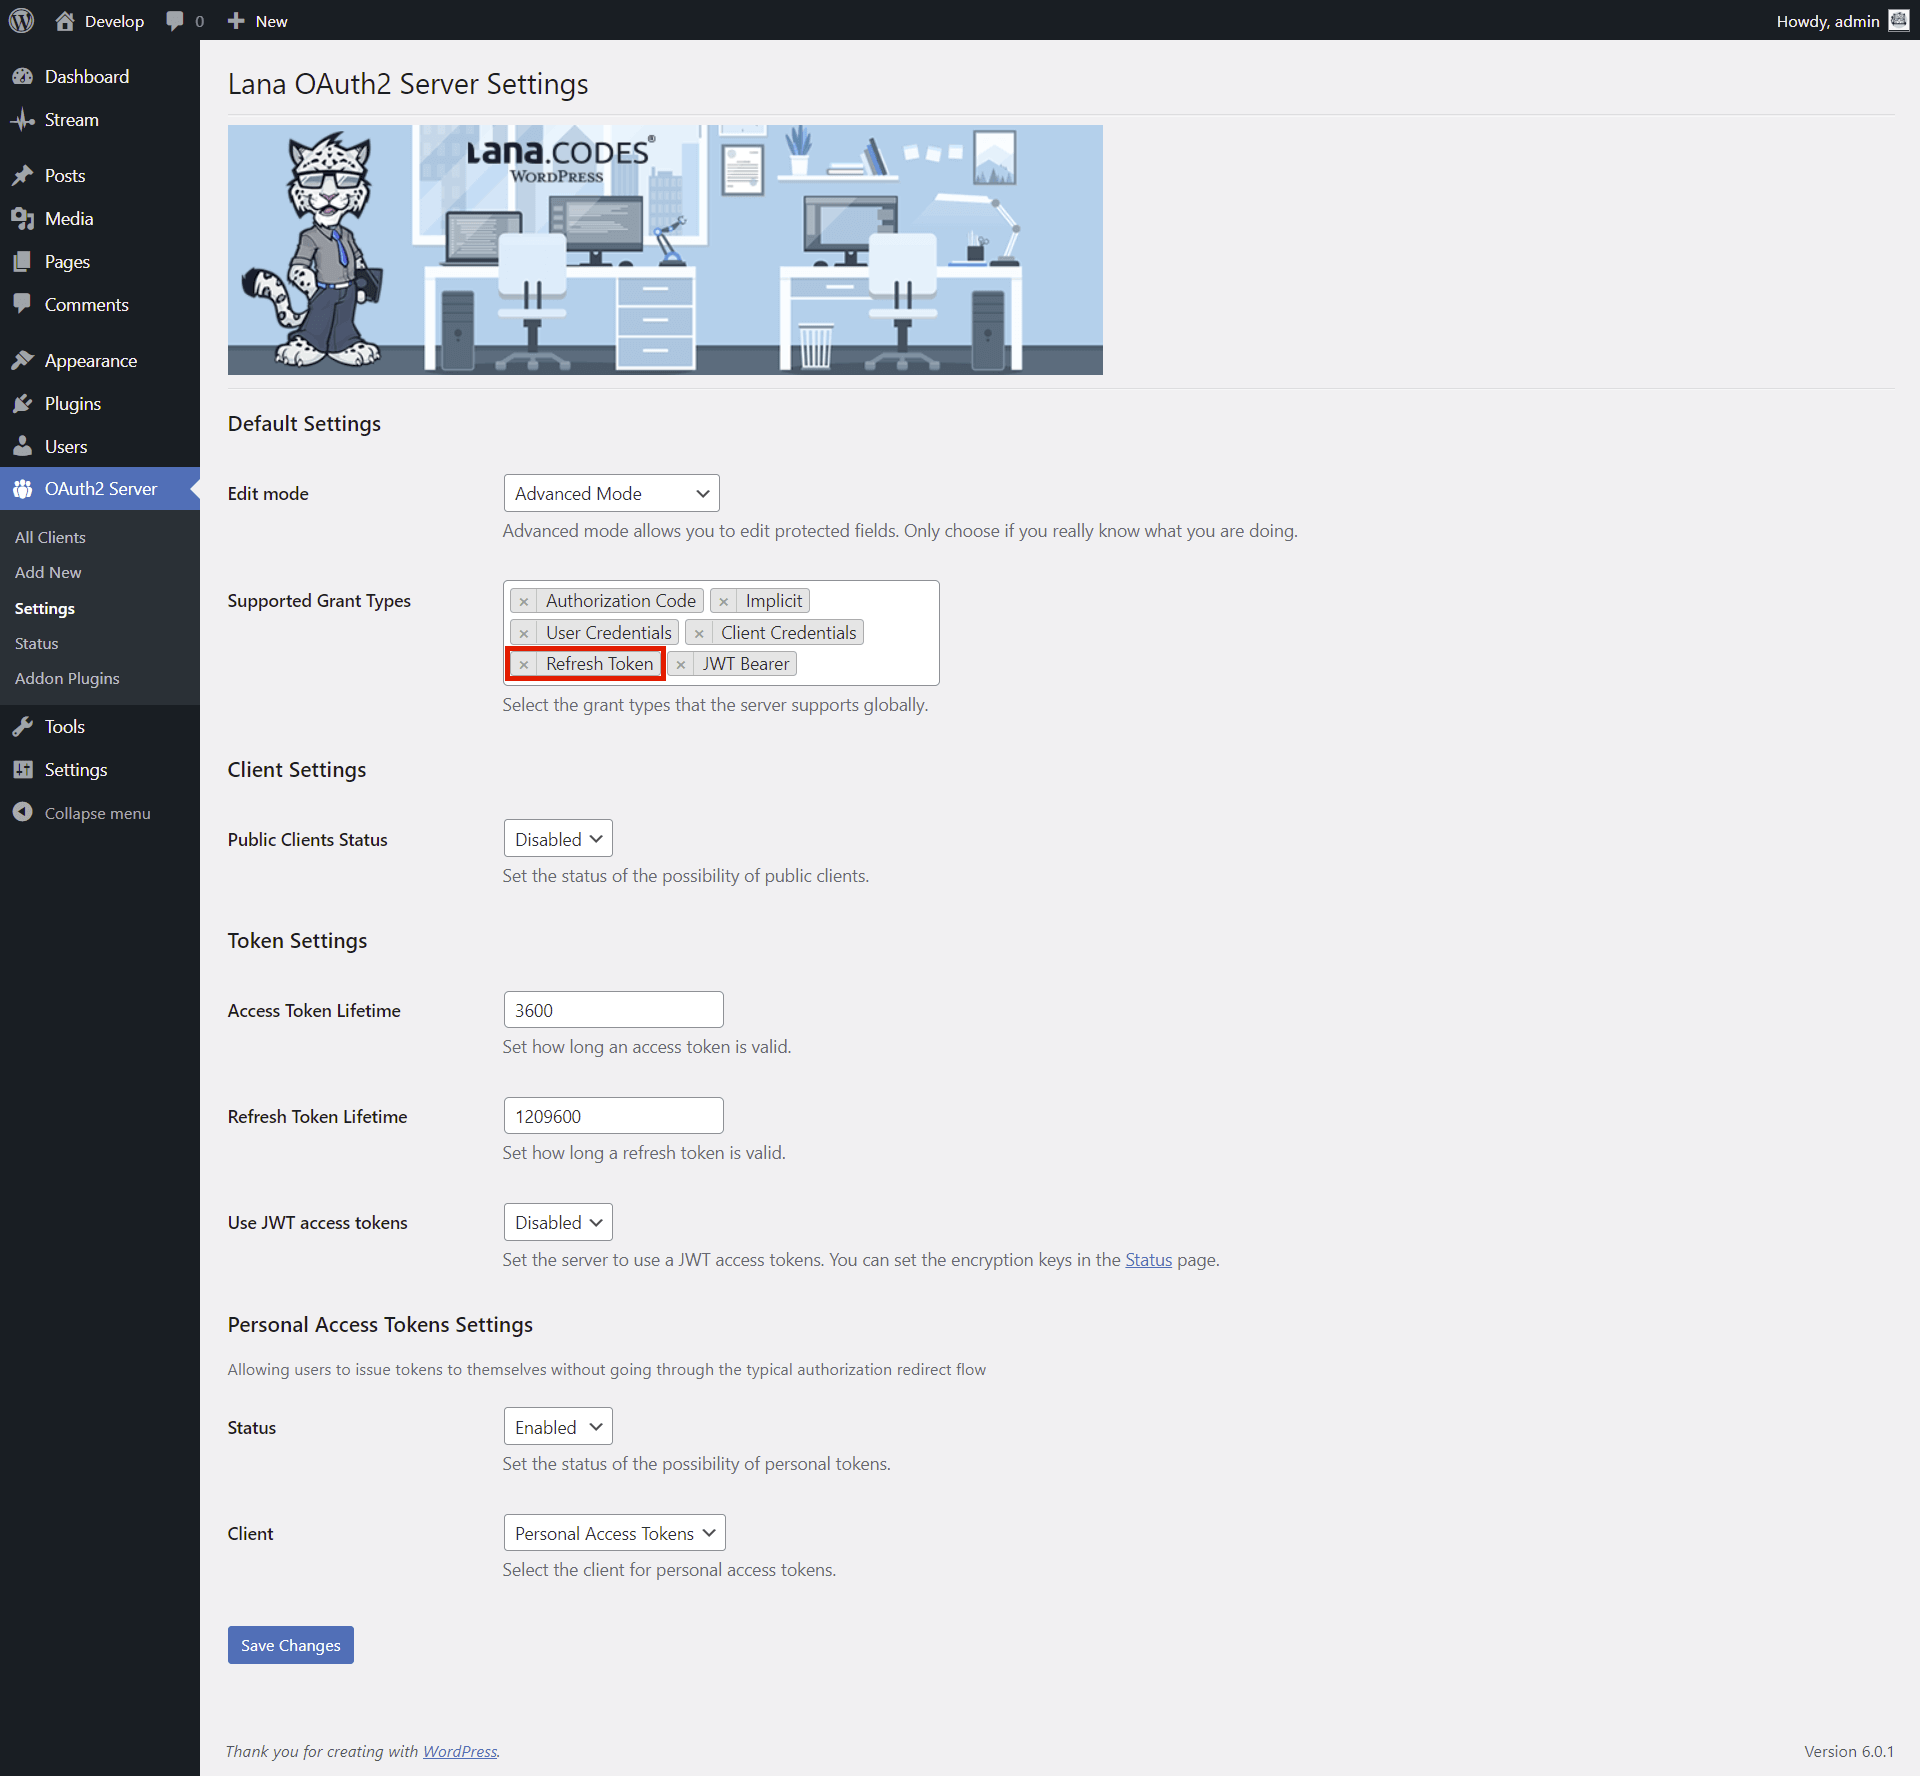
First you have to enable it in the Settings.
1. Select "Refresh Token" for the Supported Grant Types in the Default Settings section.
2. Click on the "Save Changes" button.
2. Enable grant type in Client
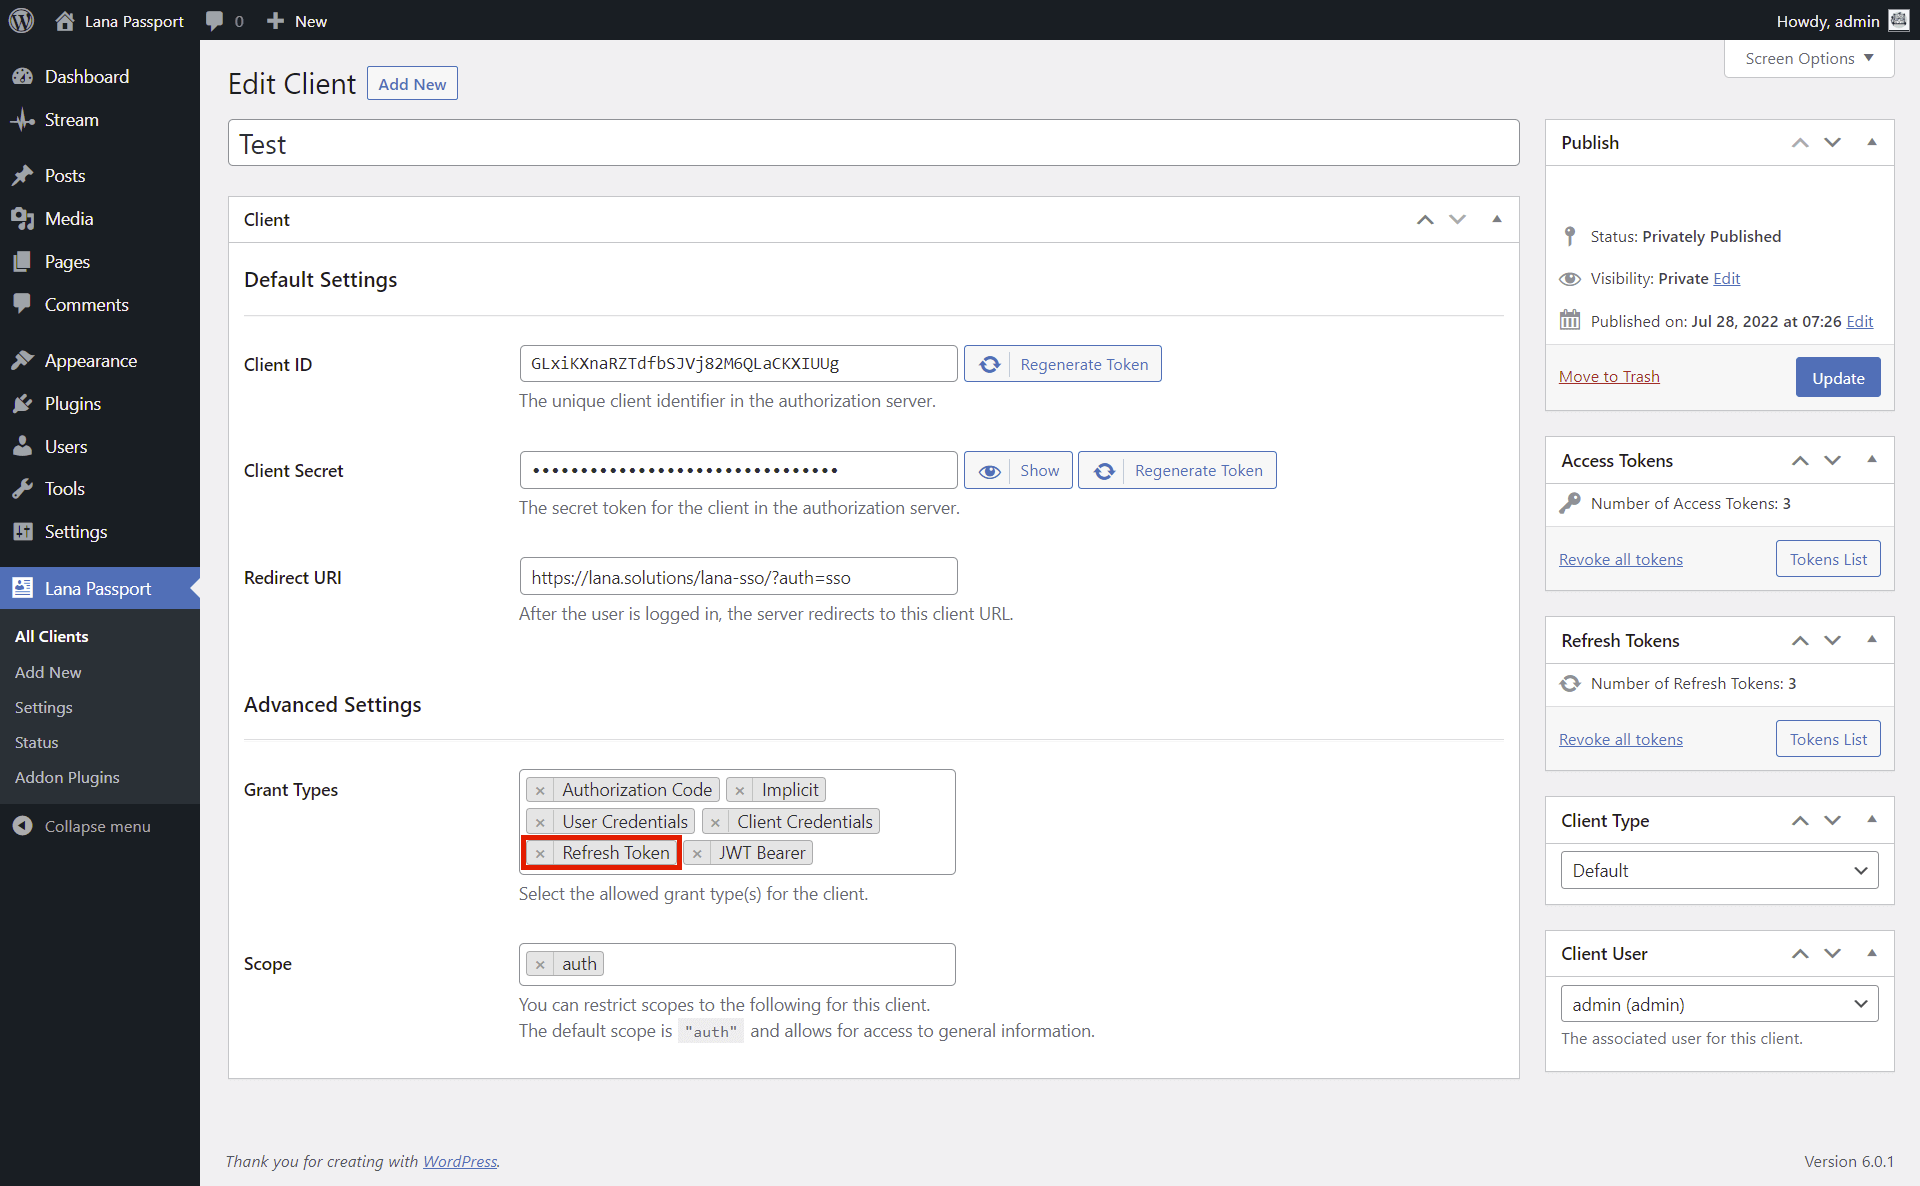
You have to enable it in the Client.
1. Select "Refresh Token" for the Grant Types in Advanced Settings section.
2. Click on the "Update" button.
You can send an authentication request to the OAuth server using "Refresh Token" grant type.
This is how you can use "JWT Bearer" grant type. The JWT Bearer grant type is used when the client wants to receive access tokens without transmitting sensitive information such as the client secret. This can also be used with trusted clients to gain access to user resources without user authorization.
Documentation: rfc7523#section-4
1. Enable grant type in Settings
The grant type must be enabled globally on the server so that the grant type can be set and used on the client as well.

First you have to enable it in the Settings.
1. Select "JWT Bearer" for the Supported Grant Types in the Default Settings section.
2. Click on the "Save Changes" button.
2. Enable grant type in Client
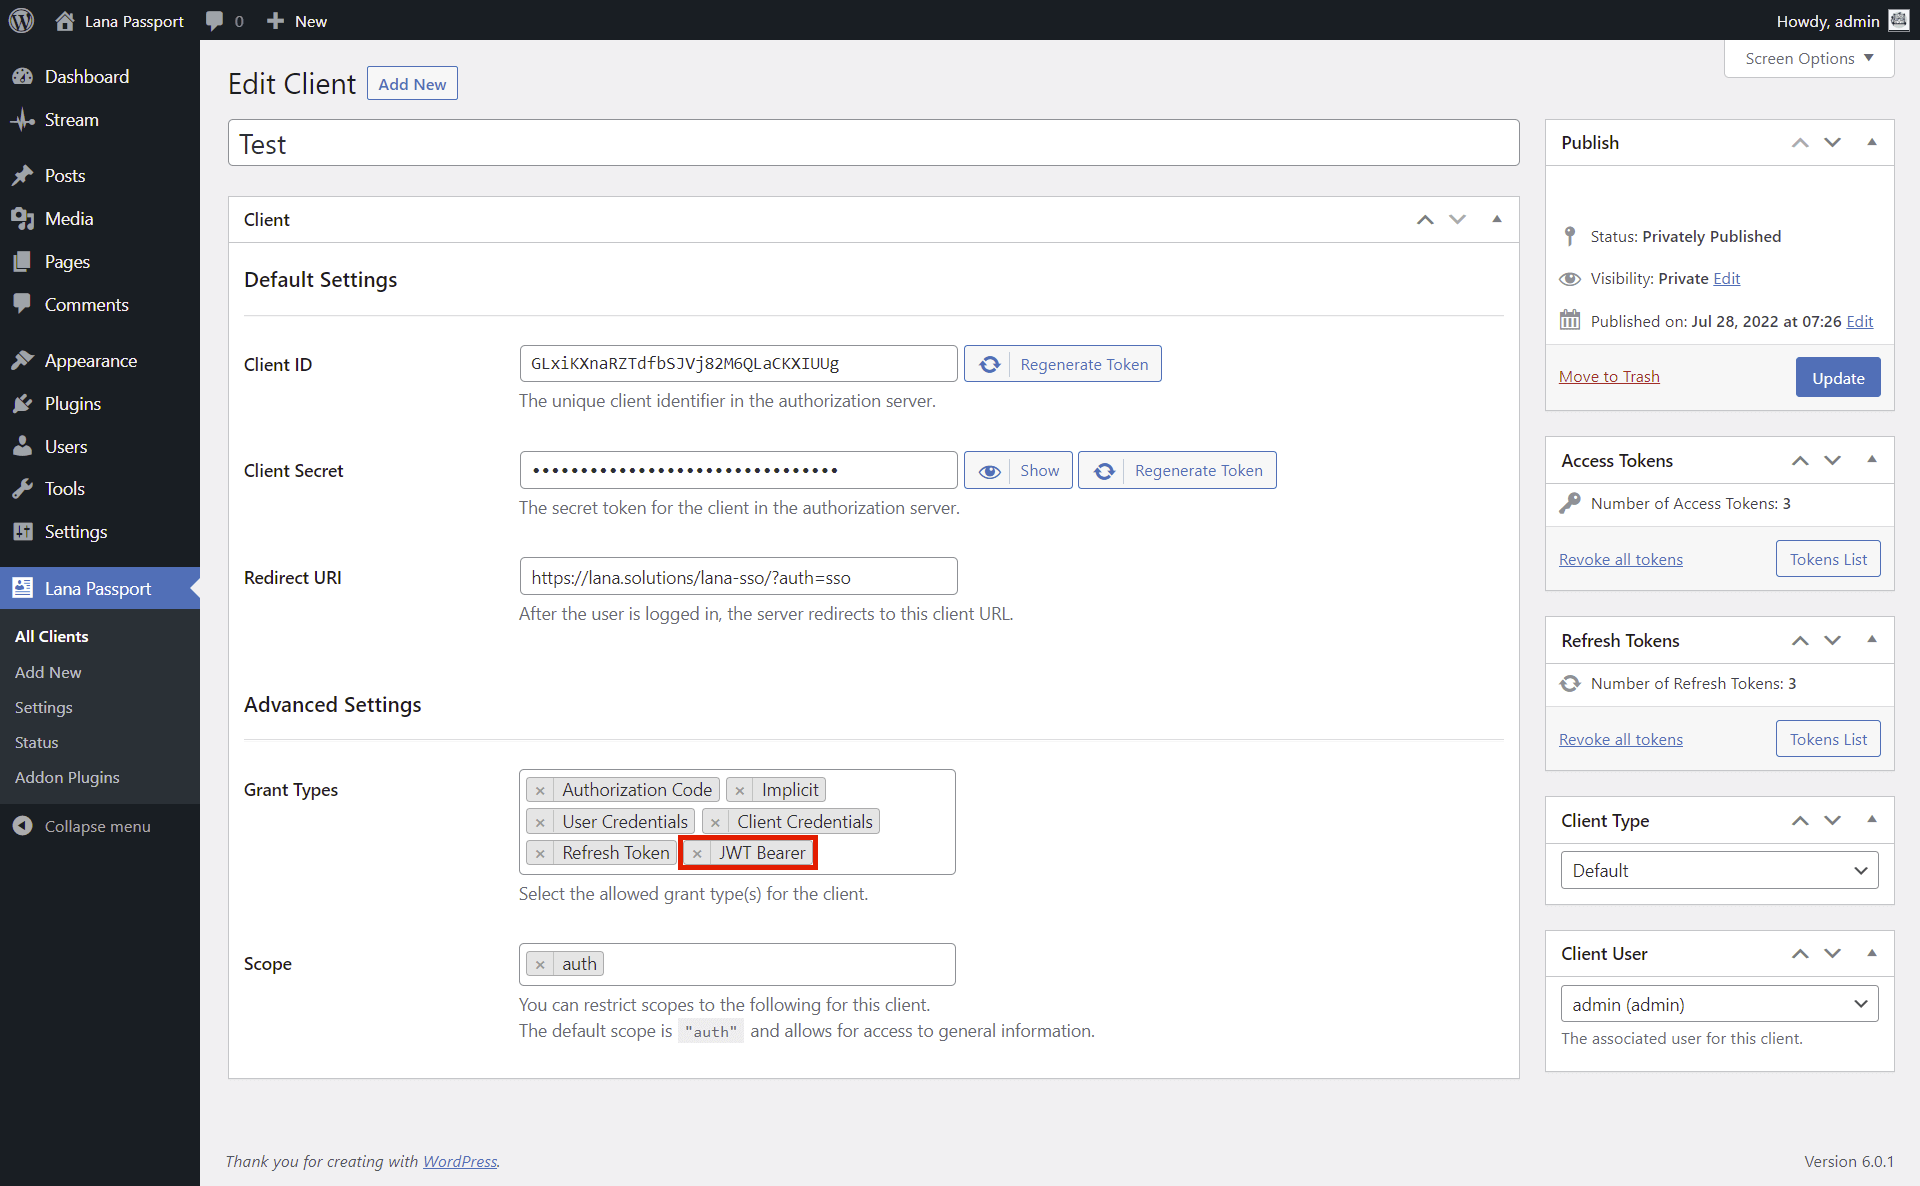
You have to enable it in the Client.
1. Select "JWT Bearer" for the Grant Types in Advanced Settings section.
2. Click on the "Update" button.
3. Generate public and private keys
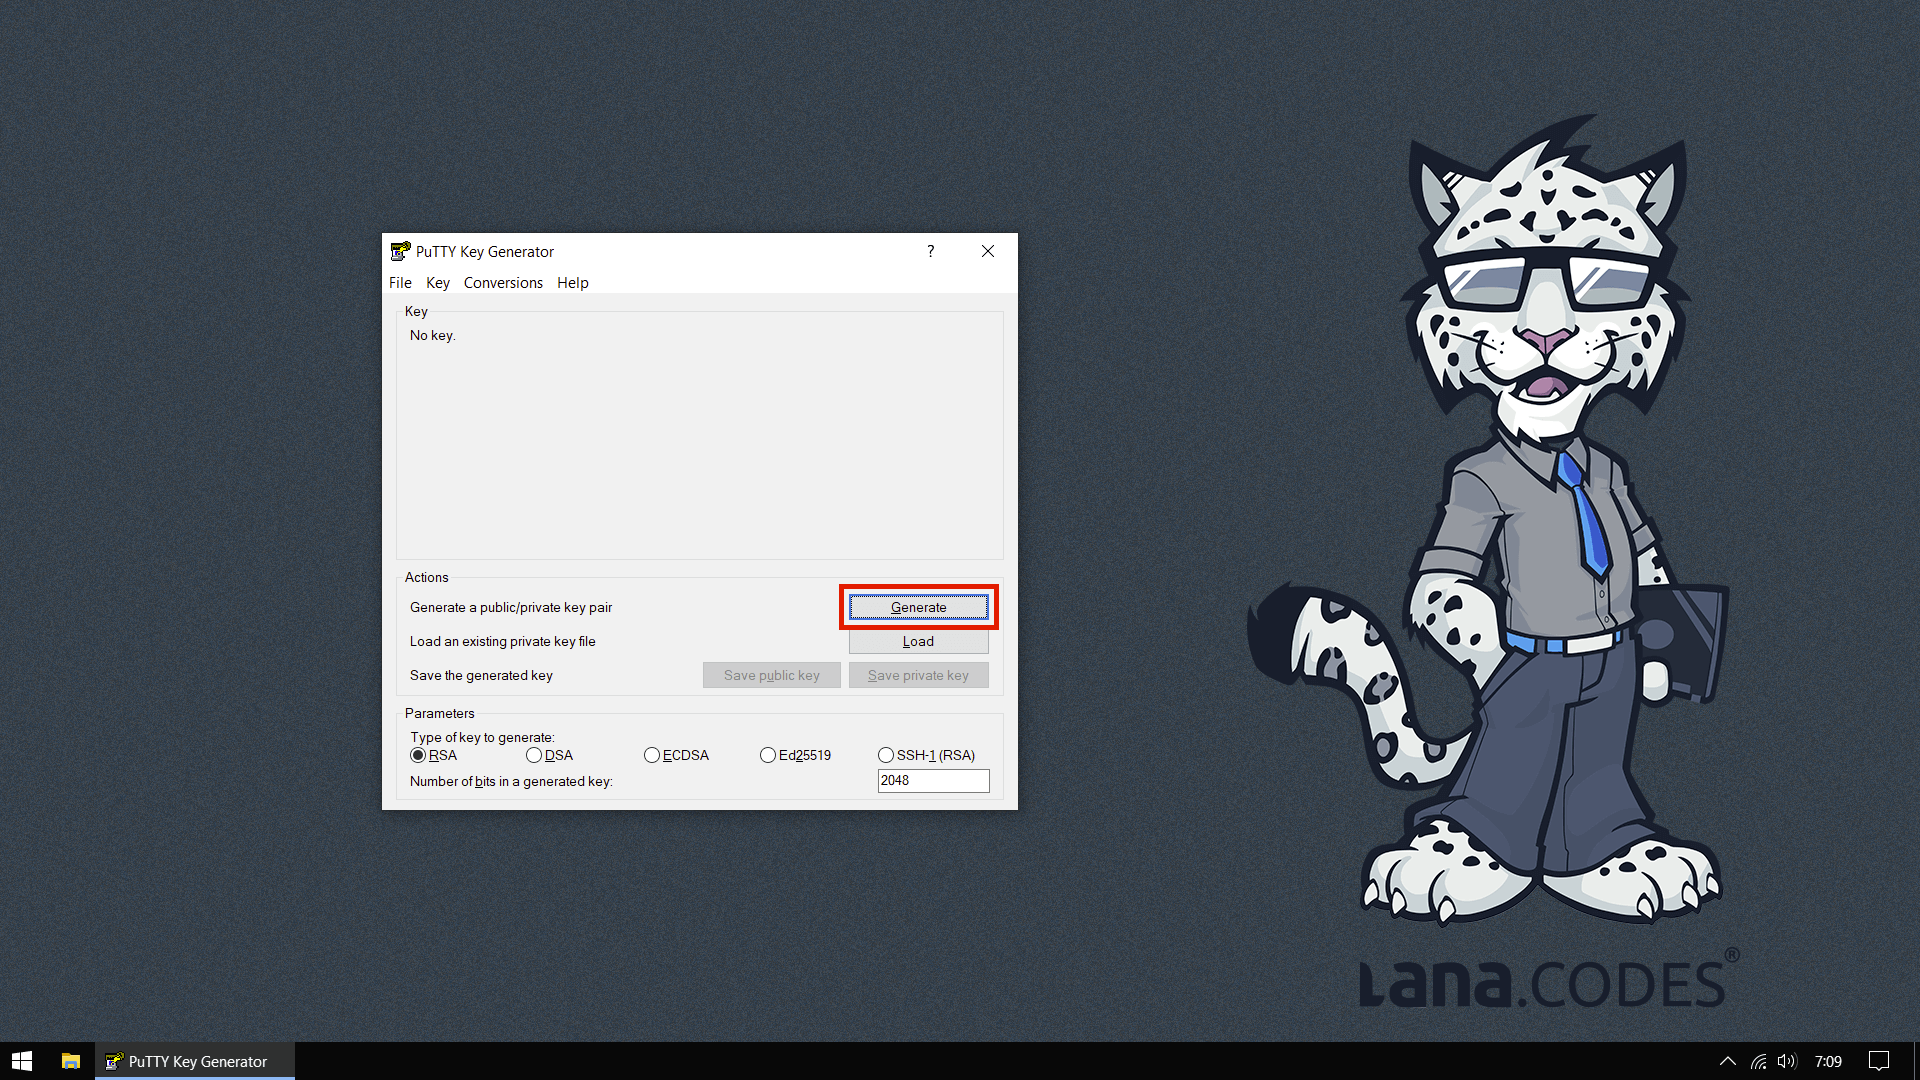
JWT requests require the signing of the JWT assertion using public key cryptography.
So you have to generate public and private keys. You can use PuTTYgen to generate it.
4. Click on the JWT List button
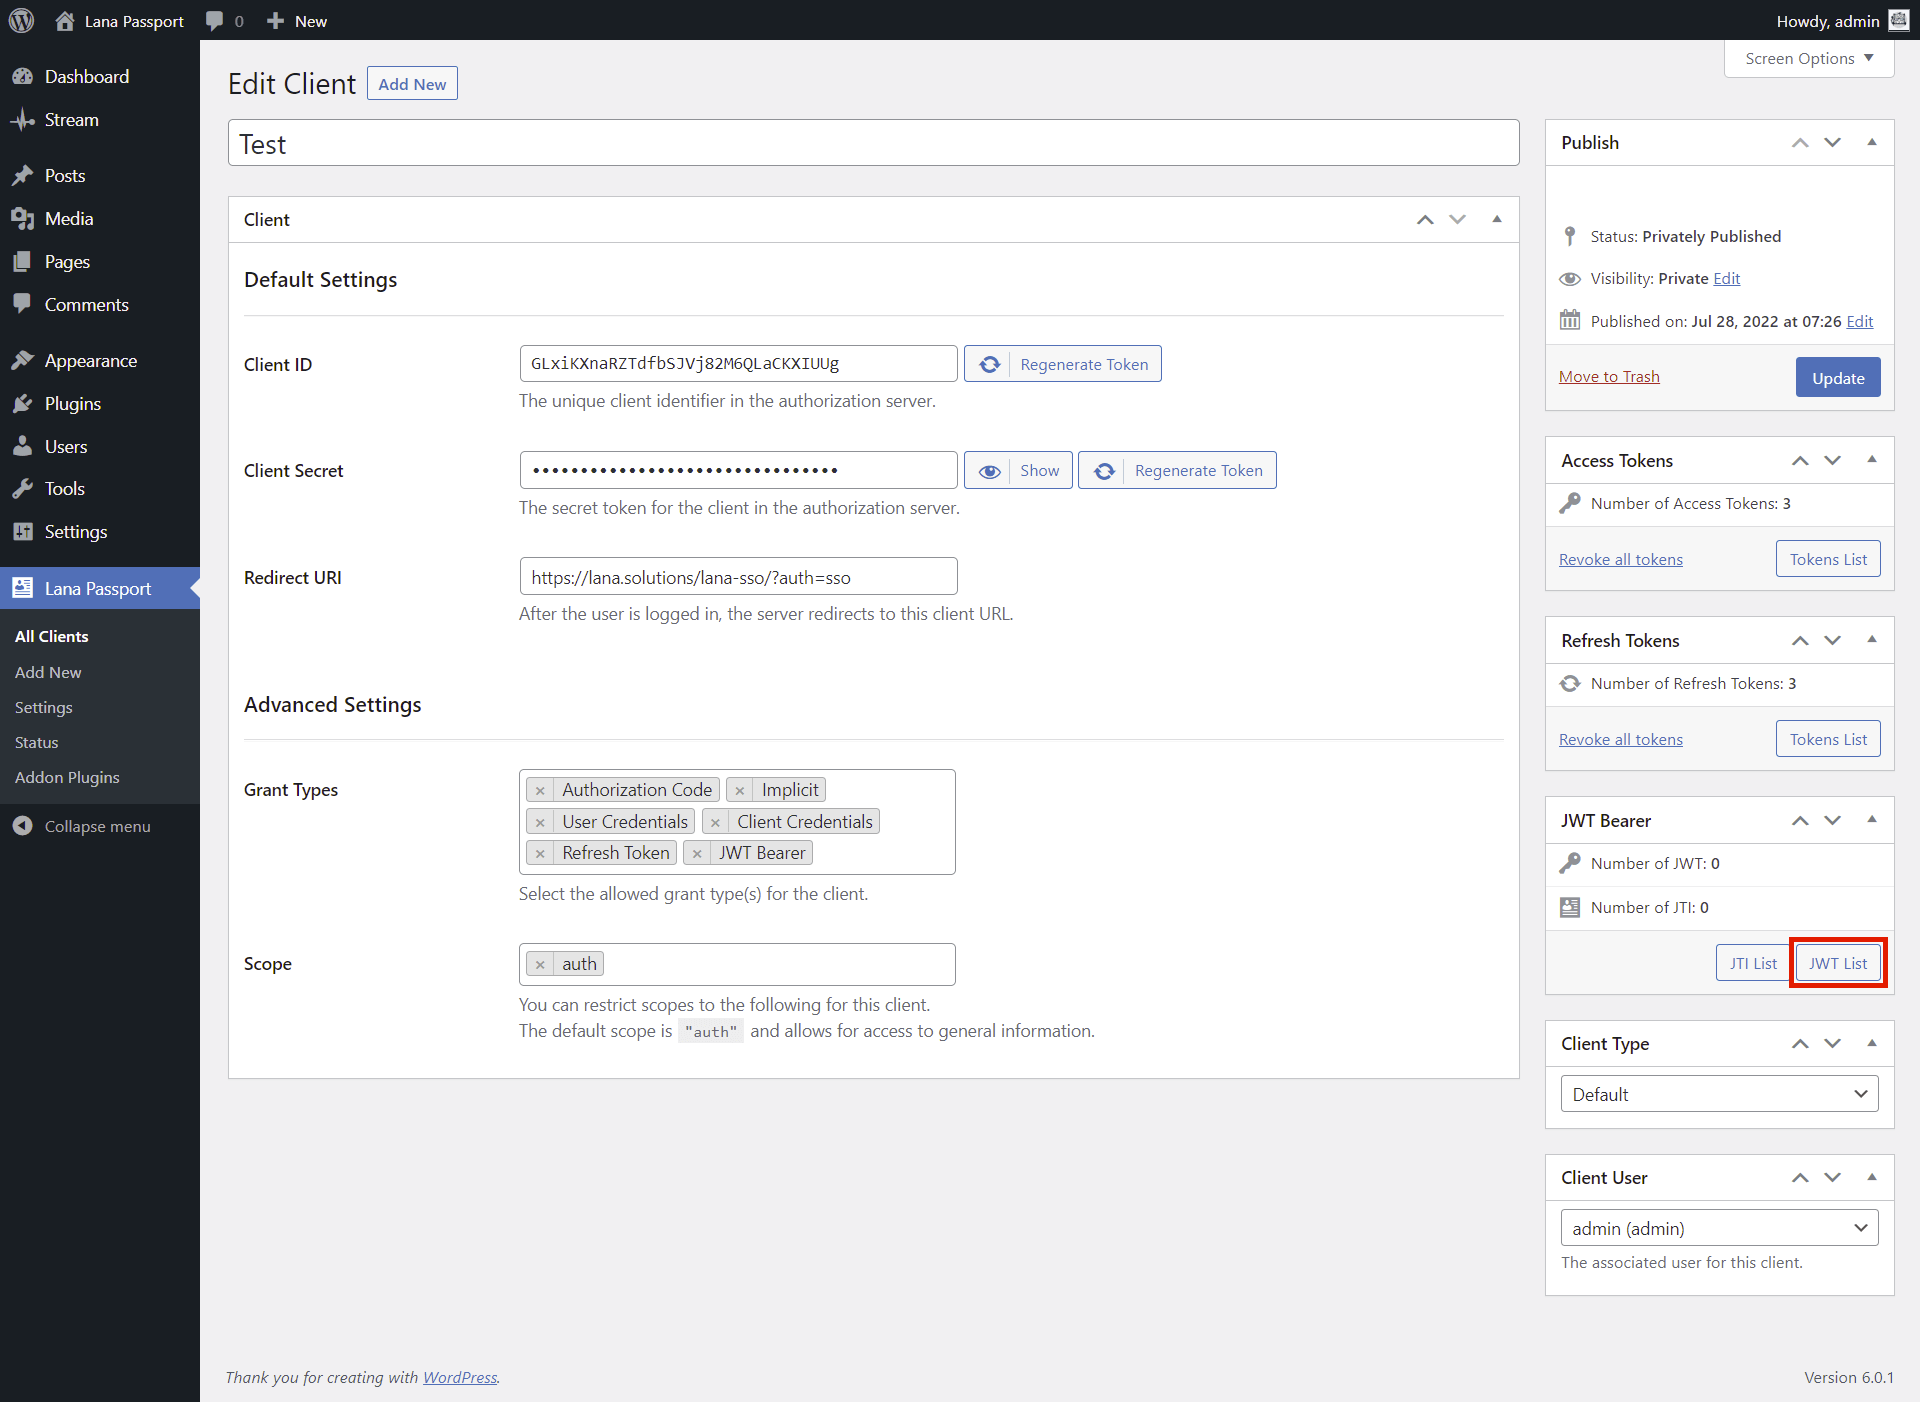
Click on the JWT List button in Client edit page.
This will direct you to the Client's JWT List page.
5. Click on the Add New JWT button
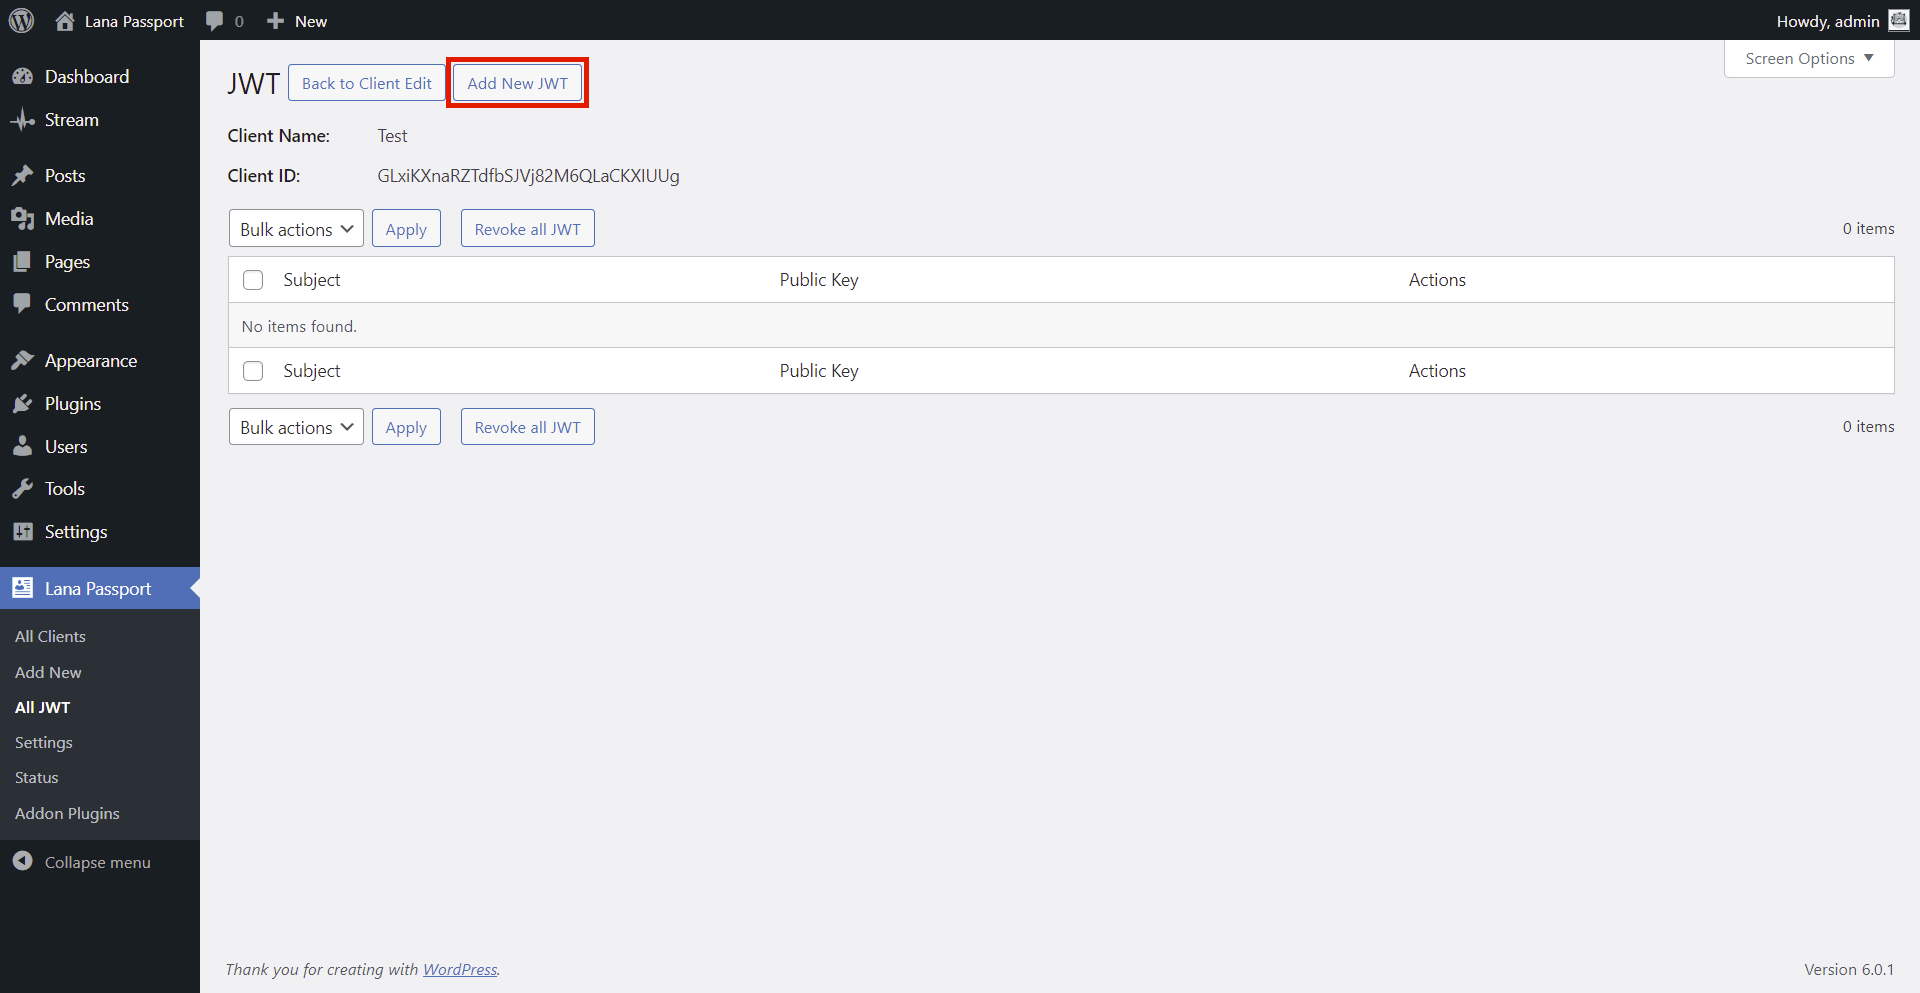
Click on the Add New JWT button at the top of the list in the header.
This will direct you to the add form.
6. Add JWT to the Client
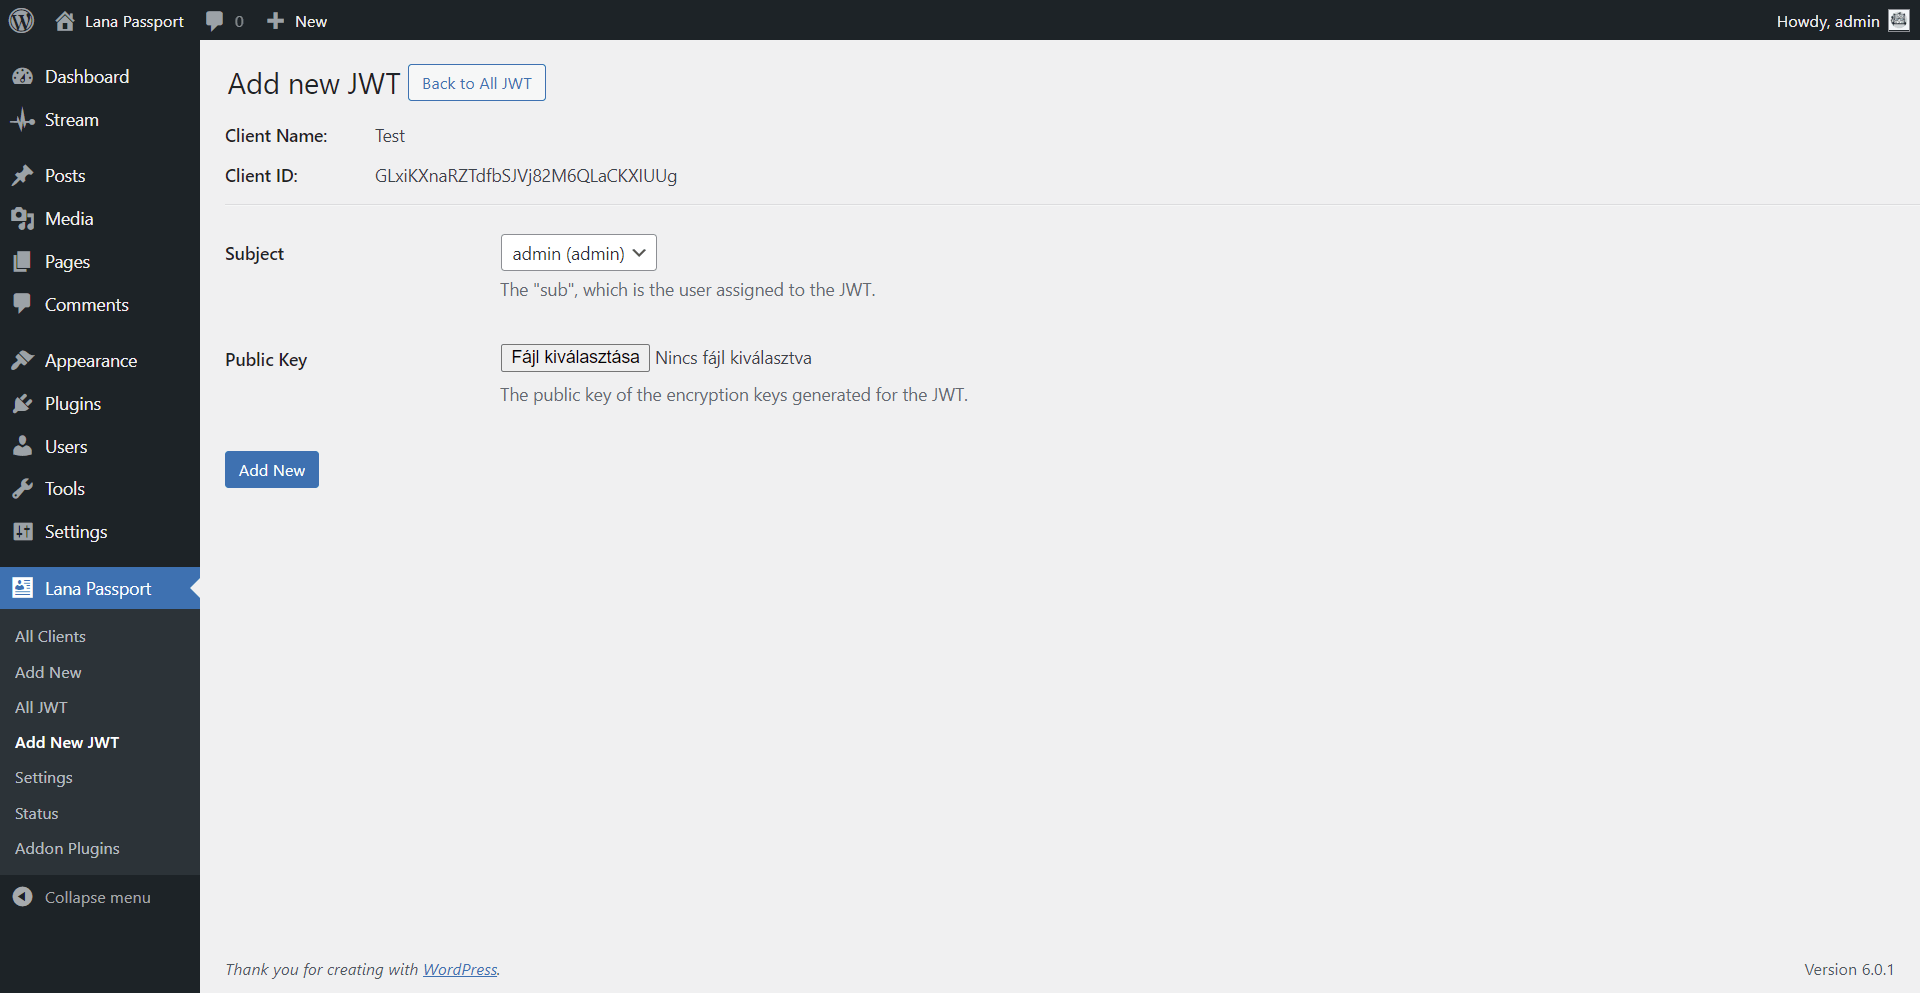
1. Select the associated user and upload the public key.
2. Click on the "Add New" button.
You can send an authentication request to the OAuth server using "JWT Bearer" grant type. Use the generated private key for the request.
Credits
bshaffer/oauth2-server-php: https://github.com/bshaffer/oauth2-server-php
Select2: https://select2.org/
toastr: https://toastrjs.com/
jQuery: https://jquery.com/